IoT MQTT connect in Onesait Platform
Today we bring you one of those posts that you can get a lot out of if you like to mess around with IoT gadgets. Throughout the workshop, you will learn the basic knowledge to be able to start working with the Onesait Platform in a complete way, from the field (Edge part) to the cloud (Cloud part).
To do this, we will define step by step the configuration of a device to send information to the cloud, where you can later process and visualise it.
Needed tools
To carry out a complete end-to-end integration (E2E), you will need the following systems to create the complete data flow.
1.- Field device
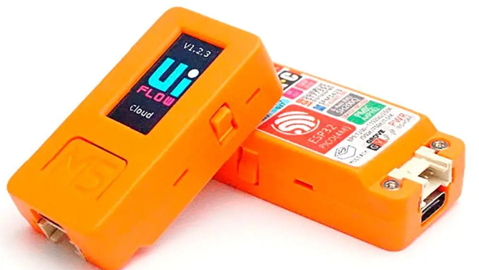
For this workshop, we are going to use an M5stack device, specifically the M5StickC. This model provides a programmable microphone with different shields that allow us to extend its functionalities. In this entry, we are going to make use of the weather and GPS devices of the brand itself.
2.- UIFlow environment
This programming environment is a web interface through which you can program your M5StickC module.
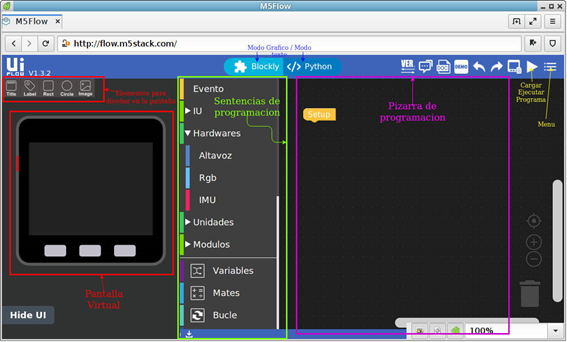
UIFlow has a very friendly and simple programming interface, similar to Scratch‘s style but for microcontrollers. It is both powerful and flexible. With regard to the available programming languages, it has two options:
- Blockly: which is a Scratch-like language developed by Google.
- MicroPython: which is Python adapted to run on a wide variety of microcontrollers.
The Onesait Platform
The Onesait Platform is a digital platform that provides the flexibility for developers to build their own solutions in a solid and agile way using open-source technologies, a flexible architecture and an innovative approach.
It is based on open-source components, and it covers the entire information lifecycle, from ingestion to visualisation, including processing and analysis.
It offers a unified web console for the solutions’ development and operation profiles.
Thanks to the different wizards and the encapsulation of best practices, it is possible to develop systems with complex architectures in a simple way, reducing costs and time to market (T2M). The Platform has a specialisation for Edge and another one for Cloud:
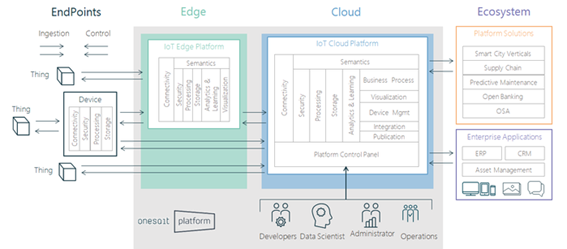
For this workshop we are going to make use of both layers; the Edge to collect our data, and the Cloud to store and display them in one of those brand new Dashboards that we enjoy so much.
Device configuration
As we said at the beginning of the post, we are going to use an M5StickC as a programmable device, where you can add different inputs to be processed and sent to the cloud. But that doesn’t mean that you can’t use other boards, such as Arduino, Raspberry Pi or any other you may have at hand (we have previously used an Arduino for something similar).
In the case of the M5StickC, we have a quite friendly interface (the aforementioned UIFlow) that will allow you to work with it even if you don’t have very advanced programming skills.
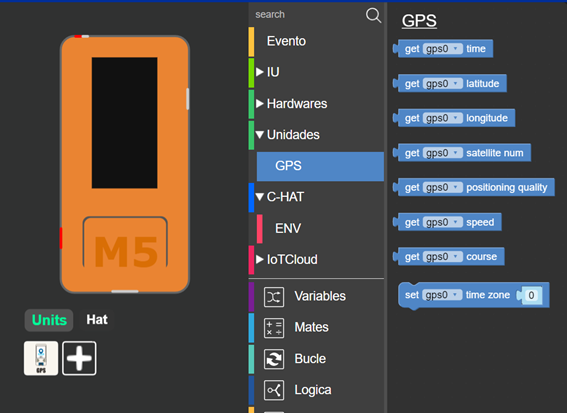
The first thing to do before starting to work with the device is to indicate which shields or systems we are going to include in the M5StickC. For this example, we are going to work with two: a shield that will retrieve environmental information, and a GPS module.
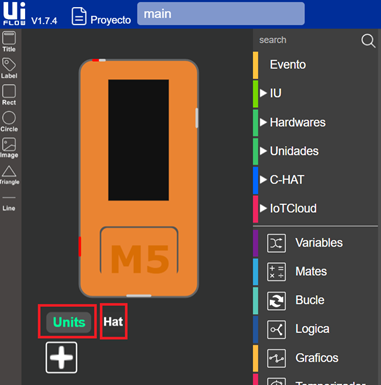
To indicate the environmental sensor shield, click on the «Hat» button, and in the list of shields that will be displayed, select the «ENV» shield.

Next, to indicate that you have a GPS, click on the «Units» button, and from the list that appears, select «GPS».

Once you have selected both of them, you will be able to see in the drop-down list of actions of both added elements, where you will be able to see the available actions by selecting each one of them. For example, if you select GPS, the following will appear:
Once the initial configuration of the device is done, you are ready to register it in the IoTHub, which is the global management system of the entire Edge infrastructure. This is why it is often deployed in the Cloud or on-premise within an operation and control centre.
As it is the global management component of distributed nodes, it provides you with:
- Management of device registrations and de-registrations, and management by projects and environments.
- Secure communication with nodes and devices, including their attestation.
- Management of a remote Edge Engine configuration repository.
- Capacity to perform update operations and/or configurations of deployed applications.
- Remote management with SSH operation console.
Therefore, from here, you can keep control of the device, covering the communication with the necessary security. To register the device, you need to have the MAC address of the device in order to identify it.
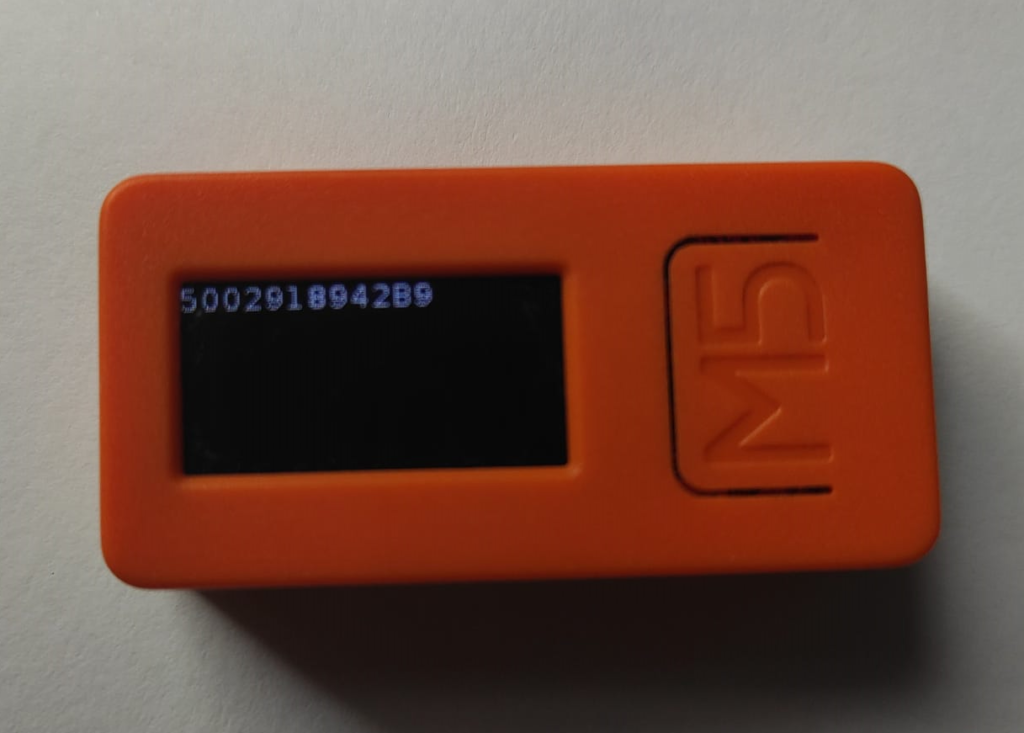
To obtain this information, you are going to load the following code in the M5StickC so that it shows the address on the screen:
from m5stack import *
from m5ui import *
from uiflow import *
import espnow
macAddr = None
espnow.init()
label0 = M5TextBox(78, 0, "Text", lcd.FONT_Default, 0xFFFFFF, rotate=90)
macAddr = str((espnow.get_mac_addr()))
macAddr = macAddr.replace(':', '').upper()
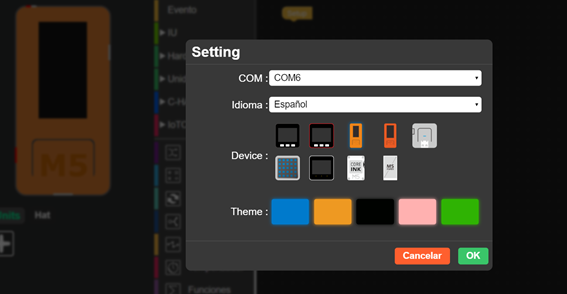
label0.setText(str(macAddr))To perform the upload, connect the device via USB to the computer, then select the corresponding COM and the device you are using.
Then, launch the upload to the device:
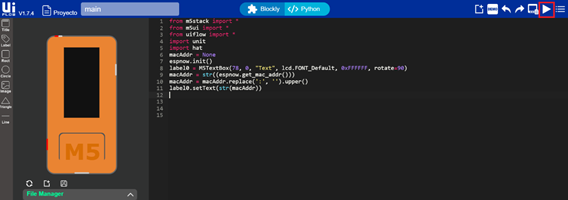
Once the upload is finished, you should see the MAC address of the device on the screen. Then, write it down and proceed to register the device in the Platform’s IoTHub.
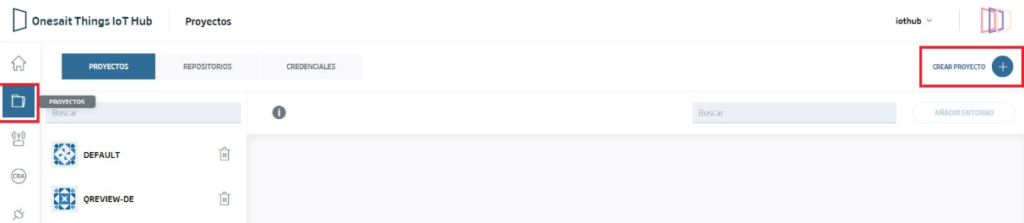
IoT Project
For starters, introduce your user and password in the Edge Platform environment, and once inside, we will navigate to the «Projects» menu, and create a New Project.
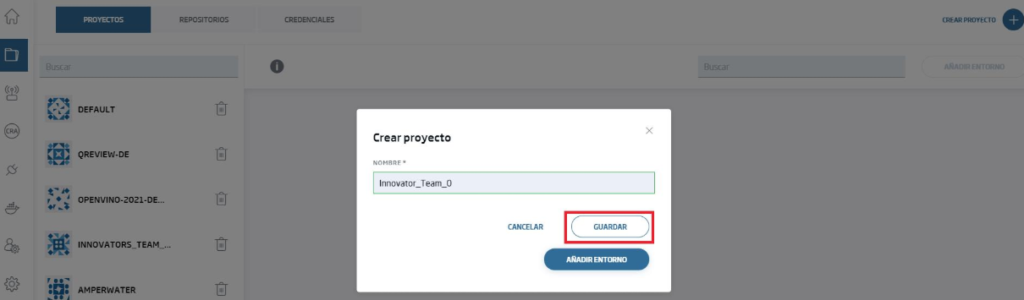
In the modal that appears, indicate a name for your project and click on Save.
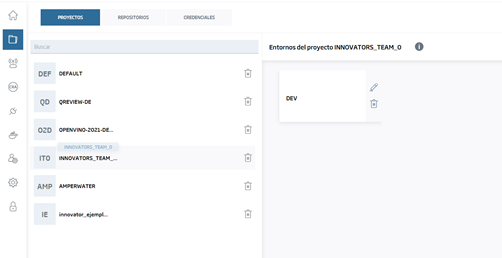
Once the project is created, you will see that it appears in the side list. By selecting it, you will be able to see that an environment called «DEV» has been generated.
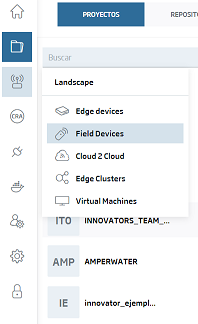
Next, you are going to register the device and link it to your project. This will be done from the Landscape > Field devices menu.
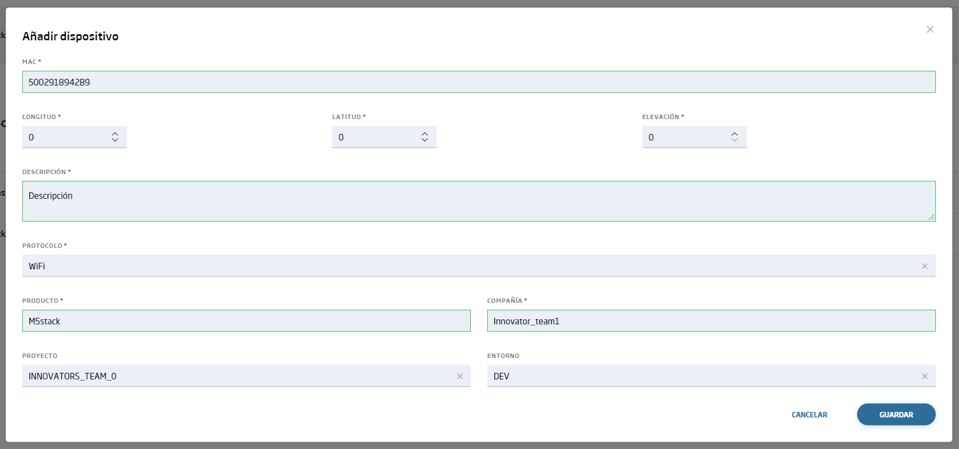
In the field devices screen, select the «Add Device» option, and complete the necessary information for your M5StickC.
- MAC: Here you will enter the MAC address of your M5StickC.
- Longitude, Latitude and Elevation: these fields refer to the geospatial location of your device. As you have a GPS, it is not necessary to indicate any value.
- Description: a short text describing the functionality of your device, or anything you want to say.
- Protocol: the way it will connect to the internet. In this case, it’s via WiFi.
- Product: your device.
- Project: the one you created in the previous step.
- Company: the name you give to your organisation, if you have one.
- Environment: the one associated with the Project, which in this case is «DEV».
Once registered, you will be able to know the status of the device from the previously generated project, and from which you can add new devices directly.

In this case, the device is switched off and is not sending information, so it appears as «disconnected» in the image.
Once your device has been configured, the IotHub will be in charge of defining its connections and implanting it an authentication token. To obtain this information, go back to the list of devices (Landscape menu > Field devices), and click on the three dots on your device.

Once clicked, a modal will appear with the information of the associated authentication token, and the MQTT connection channels that will allow you to fully interact with the device.
For the token, you will see a modal like this:
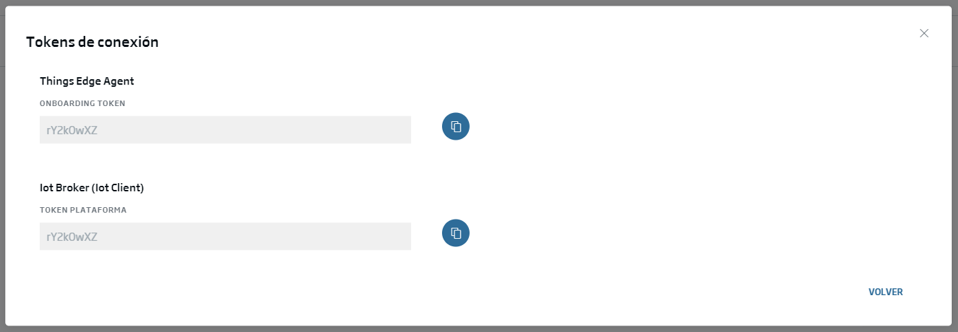
And for the MQTT connections, another one like this:

Finally, and with all the security on the device ready, you are going to register a connector to finish securing all the communication. To do this, go to connectors and click on «create a new connector».
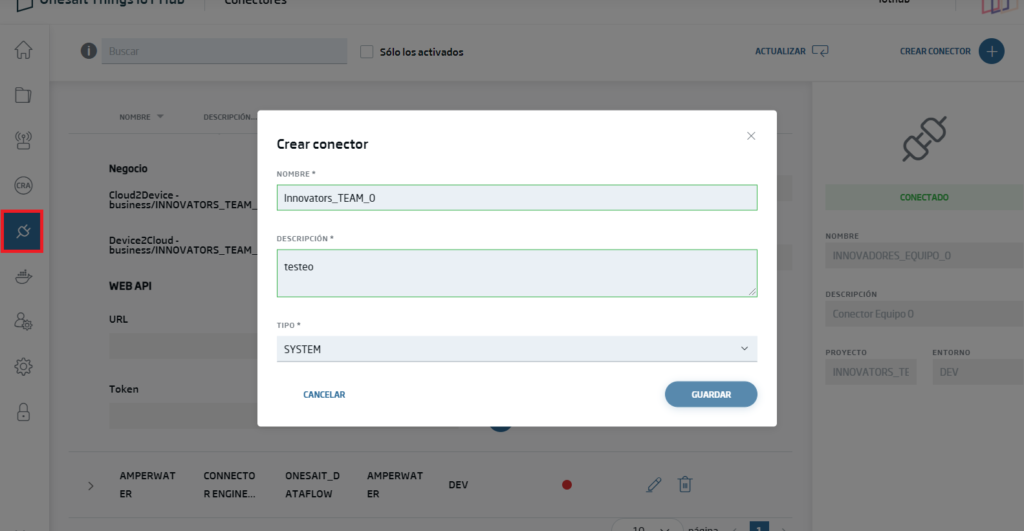
Once generated, the connector will be associated to a project and an environment, offering you both the topics defined for MQTT and the necessary authentication for that connector, which you will later use in the connection configuration from the FlowEngine.

Sending information to the cloud
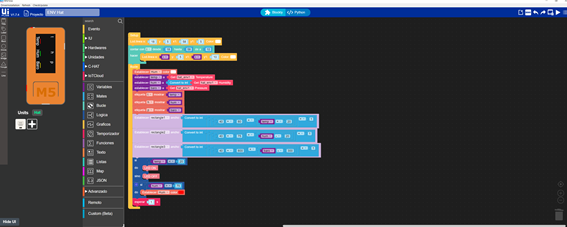
Once the access points to your system have been determined, you must generate the code to send the information. This will be done in MicroPython language, generating both the communication with the cloud and the traces to be sent.
Next we present the code generated for uploading to the device, where two functions are defined, both for sending information and for receiving commands from the cloud. This is what we will load in the M5StickC.
Firstly, the code is initialised, the necessary libraries are loaded and the variables to be used are defined:
#######Load libraries######
from m5stack import *
from m5ui import *
from uiflow import *
import wifiCfg
import espnow
from m5mqtt import M5mqtt
import hat
import json
import unit
import machine
import urequests
import machine
from micropython import const
import ntptime

#####Defining global variables#####
setScreenColor(0x111111)
macAddr = None
id_client_control = None
id_client_business = None
business_topic_p = None
business_topic_s = None
sensorData = None
mensaje = None
ssid = "<wifi_network>" #configuration of wifi connection
password_wifi = "<password>"
wifiCfg.wlan_sta.active(True)
wifiCfg.doConnect(ssid, password_wifi) #wifi connection initialisation
Then, the code is started and the connection to the predefined WiFi network is made, obtaining the time zone and starting the data collection from the GPS.
Después, se inicia el código y se realiza la conexión a la red WiFi predefinida, adquiriendo la zona horaria e iniciando la recogida de datos por parte del GPS.
espnow.init()

while (not wifiCfg.wlan_sta.isconnected()):
    wifiCfg.doConnect(ssid, password_wifi)

ntp = ntptime.client(host='es.pool.ntp.org', timezone=1) #Timezone selection
rtc.setTime((ntp.year()), (ntp.month()), (ntp.day()), (ntp.hour()), (ntp.minute()), (ntp.second()))

hat_env0 = hat.get(hat.ENV)
gps0 = unit.get(unit.GPS,unit.PORTA)
pir0 = unit.get(unit.PIR, (21,22))
Once the system is started, you can proceed to define the information that you want to be displayed on the screen, and the MQTT communication definition: defining the access point, port and authentication token (the business_client_id will always be defined as «b_<macAddr>», keeping control of the purpose of the generated message).
espnow.init()
####Defining and creating text position on the device screen####
label0 = M5TextBox(78, 0, "Text", lcd.FONT_Default, 0xFFFFFF, rotate=90)
label1 = M5TextBox(61, 0, "Text", lcd.FONT_Default, 0xFFFFFF, rotate=90)
label2 = M5TextBox(44, 0, "Text", lcd.FONT_Default, 0xFFFFFF, rotate=90)
label3 = M5TextBox(26, 0, "Text", lcd.FONT_Default, 0xFFFFFF, rotate=90)

macAddr = str((espnow.get_mac_addr()))  # Retrieve device's MAC
macAddr = macAddr.replace(':', '').upper()
id_client_control = macAddr
id_client_business = "b_"+id_client_control  # business client id.
frec=1 // Initial value for sending frequency
business_topic_p = "business/INNOVATORS_TEAM_0/DEV/server" # upload topic
business_topic_s = "business/INNOVATORS_TEAM_0/DEV/device/"+id_client_business # download topic
label0.setText(str(macAddr))
label1.setText(str(id_client_business))
label3.setText('Hello GPS')
label0.setText(str(business_topic_p))
wait(3)

label0.setText('Start sending')
label1.setText(str(str(macAddr)))
label3.setText('Searching for Sats')
wait(3)

m5mqtt = M5mqtt(str(id_client_business), 'iothub02.onesaitplatform.com', 8883, str(id_client_control), 'rY2kOwXZ', 30, ssl = True) # MQTT Communication Initialisation
Next, define the send function device to Cloud to send information, and Cloud to device to receive the message from the cloud, where we will send the new value for the sending frequency.
Seguidamente se define la función de envío device to Cloud para el envío de información, y Cloud to device para recibir el mensaje desde la nube, donde enviaremos el nuevo valor para la frecuencia de envío.
def fun_business_c2d_(topic_data):   # Cloud to device function. For MQTT reception
  global m5mqtt,business_topic_p,gps0,macAddr,frec
  #Cloud-2-Device command process
  label1.setText(str(topic_data))
  wait(0.5)
  jsonTopic_data=json.loads(topic_data)
  frec=jsonTopic_data["frec"]
   #Example, Echo function of the sent message
  mensaje_echo = {'deviceId':macAddr,'latitude':(gps0.latitude),'longitude':(gps0.longitude),'timestamp':ntp.formatDatetime('-', ':'),'payload':jsonTopic_data}
  wait(0.2)
  m5mqtt.publish(str(business_topic_p),json.dumps(mensaje_echo))

def fun_business_d2c_(topic_data):   #Device to Cloud function, to send with MQTT
  global m5mqtt,business_topic_p
  #Cloud-2-Device command process
  label1.setText(str(topic_data))
  m5mqtt.publish(str(business_topic_p),str((json.dumps(topic_data))))
Finally, start the MQTT communication and the continuous sending of the generated message, from the initially defined frequency (0.5 seconds), or by the one sent from the cloud.
m5mqtt.subscribe(business_topic_s, fun_business_c2d_) # Subscribtion to MQTT topic to receive messages from the cloud. Activating the c2d function on reception.
m5mqtt.start() # Start MQTT
while True:
sensorData = {'hum':(hat_env0.humidity),'temp':(hat_env0.temperature),'press':(hat_env0.pressure),'light':(pir0.state)}
label2.setText(str(id_client_business))
label3.setText(str(business_topic_p))
mensaje = {'deviceId':macAddr,'latitude':(gps0.latitude),'longitude':(gps0.longitude),'timestamp':ntp.getTimestamp()}
mensaje.update(sensorData)
#Proceso del envio de datos Device-2-Cloud
fun_business_d2c_(mensaje)
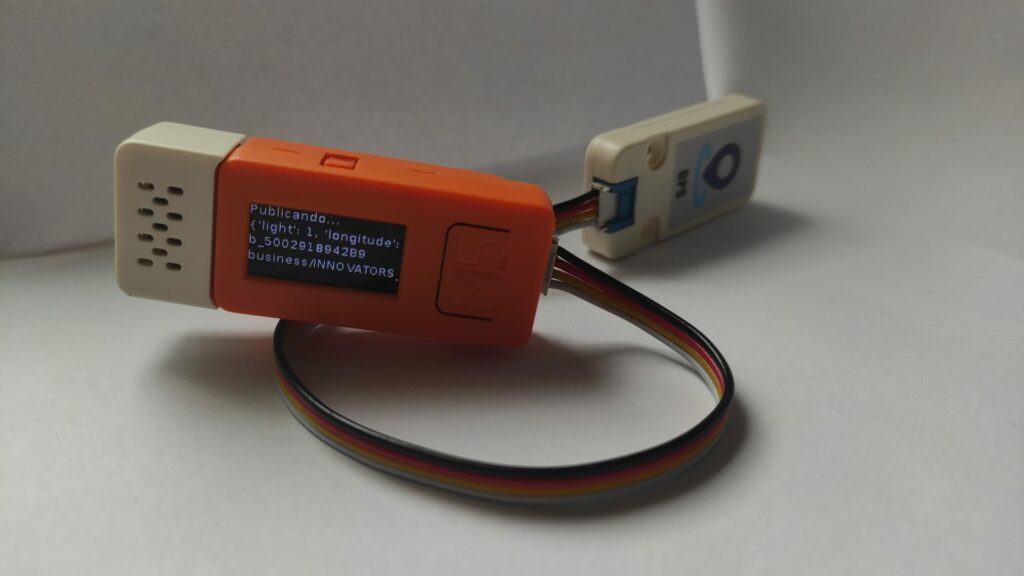
label0.setText('Publicando...')
M5Led.on()
wait(0.5)
M5Led.off()
mensaje.clear()
sensorData.clear()
wait(frec)
while (not wifiCfg.wlan_sta.isconnected()):
wifiCfg.doConnect(ssid, password_wifi)
You can download the complete code from this link.
Cloud Configuration
Once you have configured and managed your device, you are going to generate the data model of the information in the Platform, and the acquisition and storage of it (of the Platform) – all this, while you define the sending of commands to the device.
To do this, you are going to make use of the Onesait Platform CloudLab environment, which, as its name suggests, corresponds to the Platform’s Cloud layer. This environment is open and free, and we use it so that everyone can test the Platform’s functionalities and power.
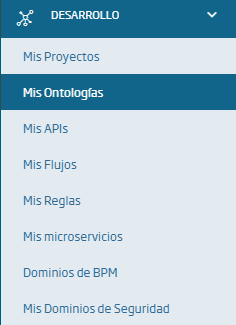
Once you have accessed with your user, navigate to the menu Development> My Ontologies.
Here, create a new ontology step by step, defining the necessary information.
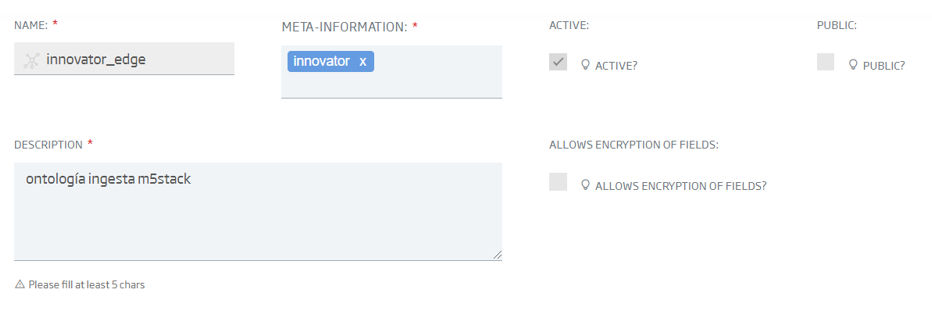
About the template to use, you will use an empty template, creating all the fields you want to retrieve from your device.
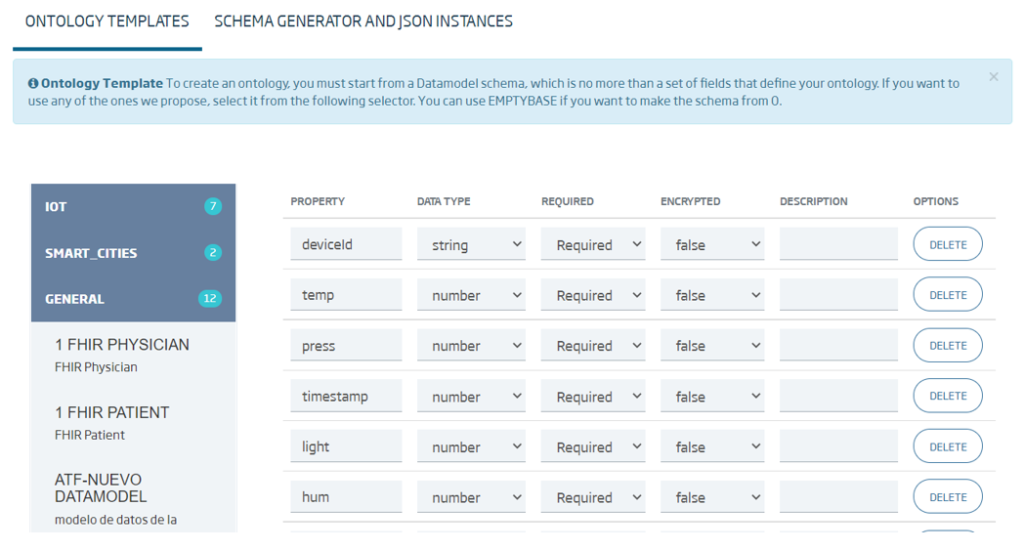
Once the fields have been declared, generate a test instance, to see if the record is as you want it to be, and then create the new ontology.
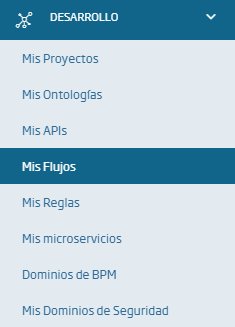
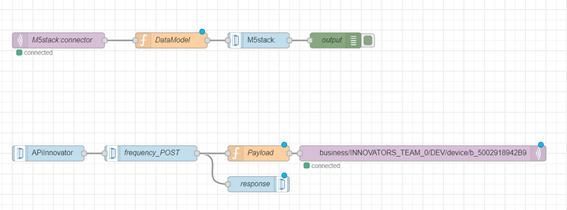
To ingest this ontology with the device data, you are going to create a flow using Flow Engine, which you can access from the menu Development > My Flows.
The communication will be through MQTT, managing this communication through the IoTHub and the topics generated for your project. To do this, create a listening flow to the device to Cloud topic, and model the incoming message to store it directly in your repository.
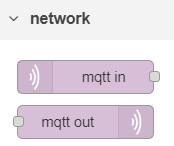
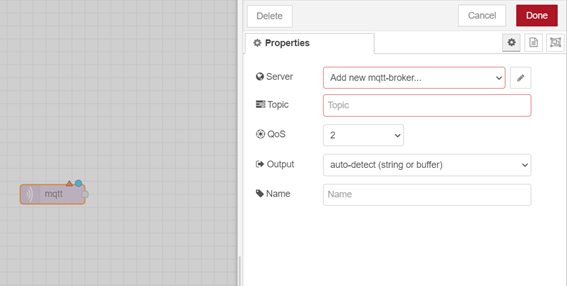
From the MQTT module provided by Node-Red, define the MQTT broker and the input to the flow.
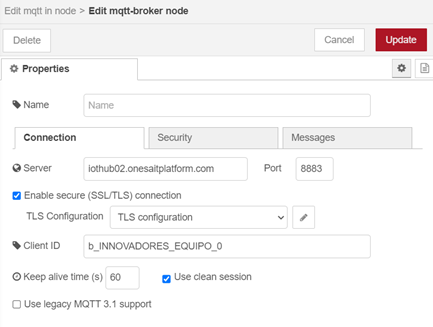
Complete the information of the new MQTT broker with the information previously generated in the IoTHub and by means of a secure communication through port 8883.
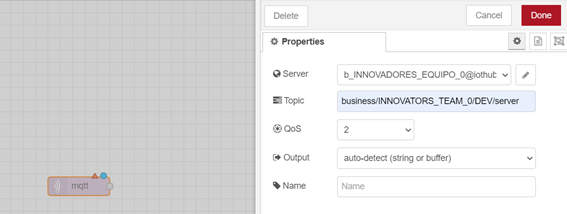
Similarly, complete the communication through the device to Cloud topic.
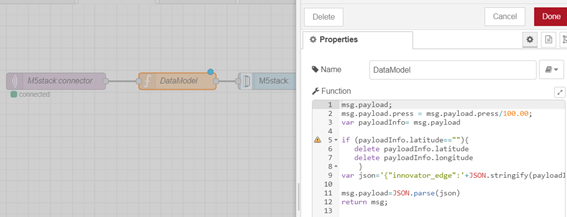
Once the information input has been configured, you still have to model the incoming message to insert it into the selected ontology.
To send Cloud to device traces, you must develop an API in FlowEngine, which will serve as input to send, via MQTT, from the cloud to the device. In this example, you will send the new sending frequency.

Once both information flows are finished, you have two systems to receive and send information to the M5StickC.
Starting up the system
Once the device is connected and the program created in the UiFLow is loaded, it will initially start sending information every second. You can check this data ingestion both in the previously generated flow, and in queries to the generated ontology.
For the latter option, you can use the Platform query tool, which is accessible from the Tools>Query Tools menu. From there, you can query your ontology, to verify that it is indeed storing the traces generated by your device.
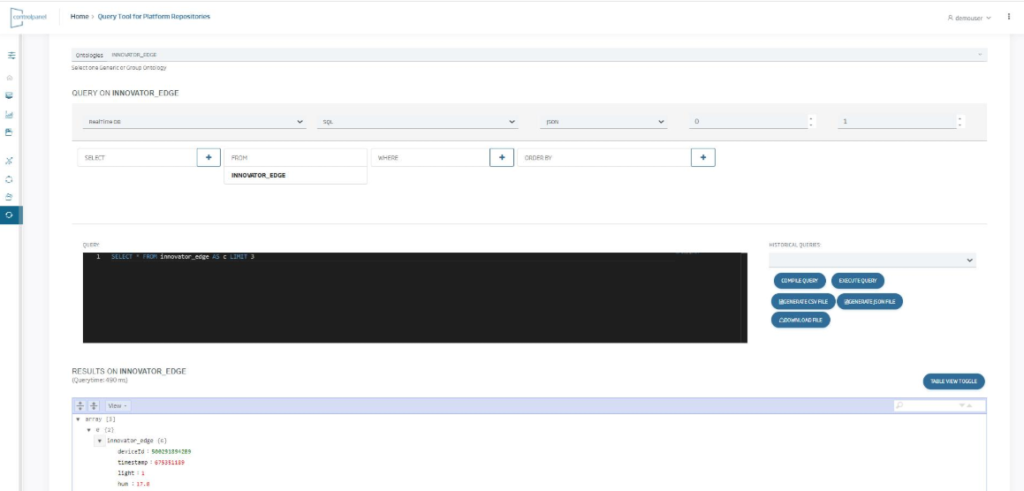
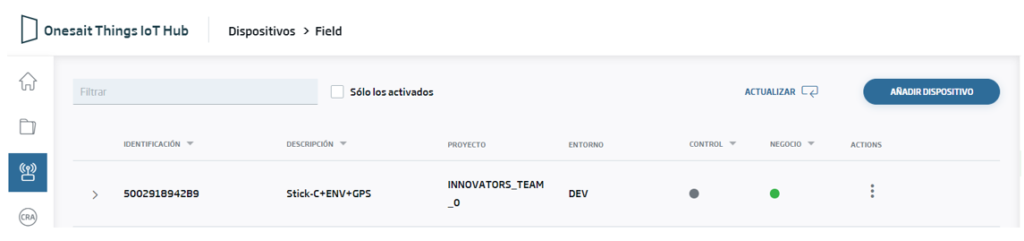
When you are ingesting information in the ontology and the M5StickC is running, you can see that, in the IoTHub, it appears as operative.
Data visualisation
Well, once you have the device sent data and the ontology storing it, you can visualise the data in a graphical way. So you have created a small Dashboard that shows the information in tables, graphs and even with a location map:
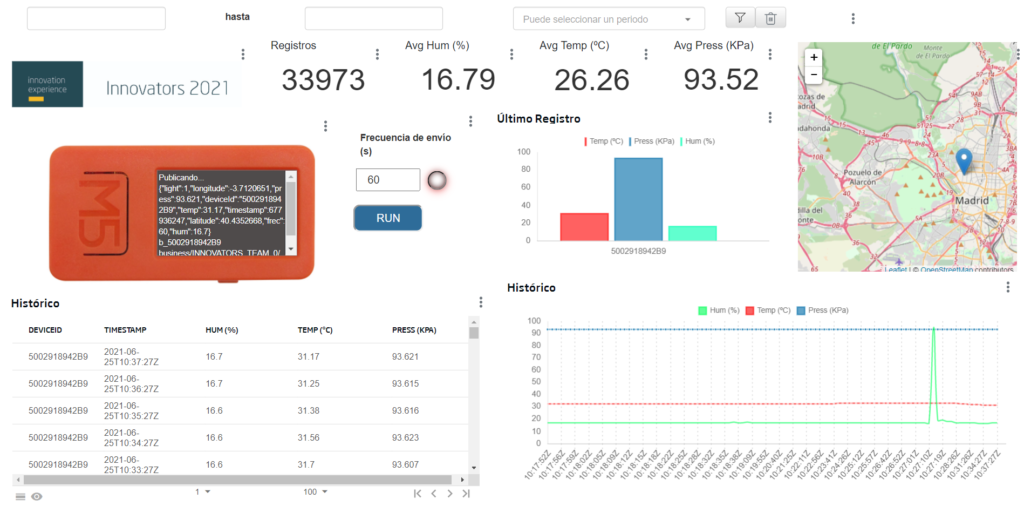
Although the Dashboard seems complex, the Platform facilitates its creation through guided wizards for the different gadgets, and it also allows you to create templates to generate custom gadgets.
We have previously discussed how to create a Dashboard (in the Developer Portal you have different guides). However, for this workshop, we are going to discuss in more detail a specific Gadget, which will allow you to invoke the API that you have previously generated in the Flow Engine, and where you can send a value that will define the device’s new sending frequency.
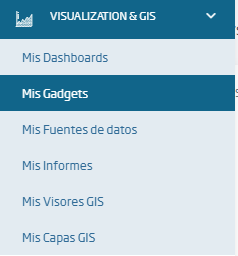
To create this Gadget, navigate to the Visualization & GIS > My Gadgets menu.
Here you can create a new Gadget template, and you can implement the HTML and JavaScript codes to generate a numeric inbox where the new data reception frequency can be entered, and a button that will execute the call to the generated API, sending the selected value.
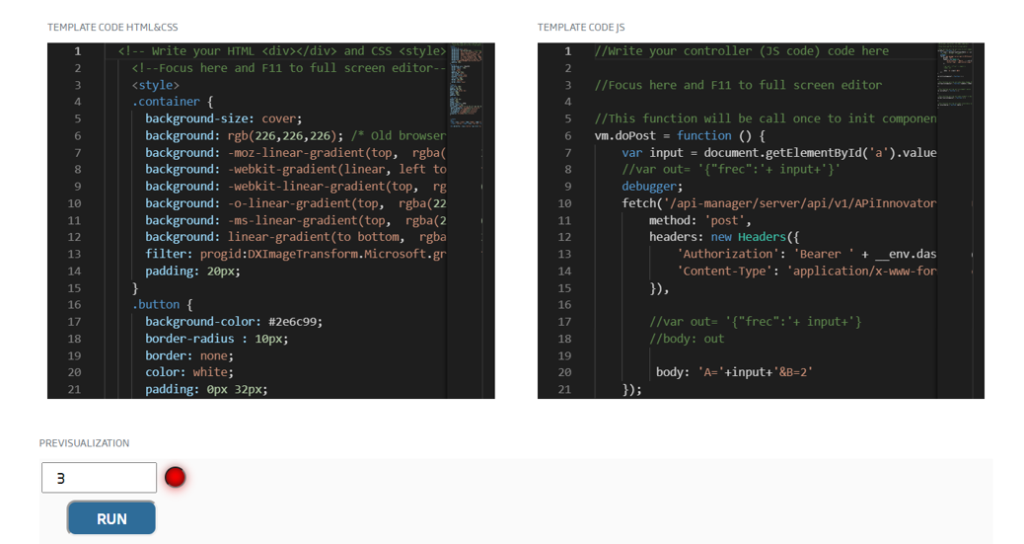
You can download the HTML template code from this link, and the JavaScript one from this other link.