
Spring Boot Actuators Use Guide
An Actuator is made of already-predefined functionalities used in production by our application. It allows you to monitor the application, collect metrics, understand the traffic or understand the state of your database in a trivial way.
The main benefit of this library is that you can get production-level tools without having to implement the features yourself.
An Actuator is mainly used to expose operational information about the application once it is running: status, metrics, information, dumping, environment, etc. For its use, it uses HTTP endpoints or JMX beans to allow interaction with the Actuator. In the case of this guide, it is implemented using HTTP endpoints.
Once the dependency is instated in the project, several endpoints are available for use. Next, we will explain how to implement it and use it in your projects.
How do I implement it?
First of all, you need to add the dependencies in your Spring Boot project:
<dependency>
    <groupId>org.springframework.boot</groupId>
    <artifactId>spring-boot-starter-actuator</artifactId>
    <version>2.2.6.RELEASE</version>
</dependency>
With this, you already have all the functionalities available at the moment you launch our application.
Once launched, all endpoints under the path «/{aplicación}/actuator» will be automatically generated.
Predefined Endpoint Extension
One of the features that Spring Boot Actuators offers is the possibility of extending the predefined endpoints that are already offered by the library itself.
To do this, you can follow this example in which the «/health» endpoint is extended:
@Component
public class HealthCheck implements HealthIndicator {

@Override
    public Health health() {

//Llamadas a diferentes métodos que nos devuelven el estado de nuestros servicios
     Boolean genStatus=isRunningServiceGenerator();
     Boolean libStatus=isRunningServiceLibraries();
     Boolean modStatus=isRunningServiceModules();

     HashMap<String,String> details=new HashMap<String,String> ();
     details.put("Libraries Service", libMsg);
     details.put("Modules Service", modMsg);
     details.put("Generator Service", genMsg);

//En el caso de que alguno de nuestros servicios no esté en un estado correcto, se indicará que el servicio no está correcto
        if (!genStatus || !libStatus || !modStatus)
               return Health.down().withDetails(details).build();

     return Health.up().withDetails(details).build();
    }
}
Creating a new endpoint
Another of the possibilities offered to us with the Actuators is the creation of endpoints designed and personalized by the users.
To do this, you can follow this example:
@Component
public class CustomEndpoint implements Endpoint<List<String>> {

    @Override
    public String getId() {
       return "customEndpoint";
    }

    @Override
    public boolean isEnabled() {
        return true;
    }

    @Override
    public boolean isSensitive() {
        return true;
    }

    @Override
    public List<String> invoke() {

        // Custom logic to build the output
        List<String> messages = new ArrayList<String>();

        messages.add("This is message 1");
        messages.add("This is message 2");

        return messages;

    }

}
Configuration in Rancher
Since the Actuators provide with information about the status your applications are in, you can use it to manage the control over these.
Within Rancher, when deploying or updating our services, there is a tab called «Health Check», with which you can set application health checks so that, in case of many errors, it can be automatically restarted or marked to indicate to developers that it is not in optimal condition.
Using the endpoint generated by Spring Boot Actuators, you can set a policy like the following:
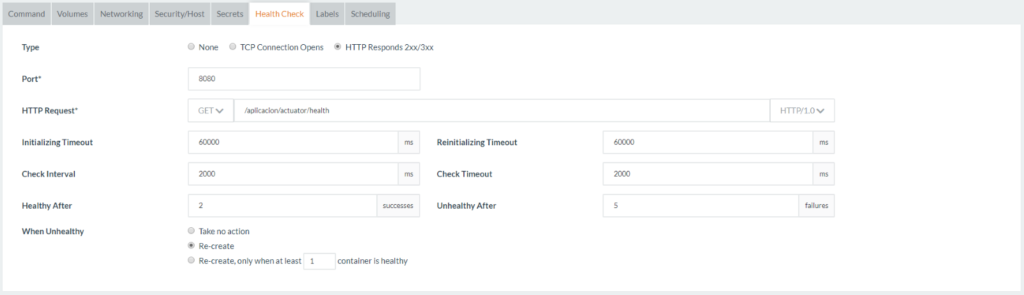
As you can see, configuring Spring Boot Actuators is quite fast and simple, and the possibilities that it offers are many.
We hope you have found it interesting and, if you have any questions, do not hesitate to leave us a comment.


Pingback: Spring Boot Admin Server Use Guide – Onesait Platform Community
Pingback: How to integrate external application metrics in the advanced monitoring of the Onesait Platform? – Onesait Platform Community