
How to use the JavaScript API to communicate with the Platform
In this post, we are going to explain how to connect the JavaScript API with the Onesait Platform. So that it is understood in the best possible way, we are going to explain it with a practical case.
To carry out this practical case, you must have your environment to carry out tests, checks, etc. To do this, download the JavaScript API found in the following repository on your computer.

When you have all the files and folders downloaded to your computer, you can start.
Cuando tengamos todos los archivos y carpetas descargados en nuestro equipo ya podremos empezar.
Preparing the API
Start by creating a «OnesaitPlatform» platform client. To do this, edit the «op_apiJs_websocketExample.html» HTML file, and include the following in its «<script>» tag:<
let client = new OPClient()Next, within this file, you will find an object where the configuration parameters will be stored. In this case, use those of the «Ticket» entity and the «TicketingApp» client:
let config = {}
config['url'] = "http://lab.onesaitplatform.com/iot-broker/message"
config['deviceTemplate'] = 'TicketingApp' // Must be the same as the id you defined on the client
config['token'] = '0e9264405327494dac6551d01aac7e97' // TicketingApp security key
config['device'] = 'TicketingApp01' // Name that you will give to the device
This variable will be passed as a parameter to the previously-defined client object using the «configure()» method:
client.configure(config)Finally, using the «connect()» method, connect to the Platform:
client.connect()This method is asynchronous, so when it connects, then you can already execute the code that you want:
client.connect().then(() => console.log('Logged'))The final code would be:
let client = new OPClient()

let config = {}
config['url'] = "http://lab.onesaitplatform.com/iot-broker/message"
config['deviceTemplate'] = 'TicketingApp'
config['token'] = '0e9264405327494dac6551d01aac7e97'
config['device'] = 'TicketingApp01'

client.connect().then(() => console.log('Logged'))
As a pre-existing example, below you can see the configuration of the «AirQuality» entity:

Once you have the above configured and you have verified that the «Ticket» entity and the «TicketingApp» client exist in the Platform, you can invoke all the methods implemented in the «OPClient» Client object:
- Join
- Query
- Insert
- Update
- UpdateById
- Remove
- RemoveById
- Subscriptions
Operation examples
JOIN
The «JOIN» operation will be the first action to be performed, because it allows connecting to the defined client. If everything is correct, it will return the «sessionKey» identifying the current session. With this, you will be connected to the Platform.
To do this, define the following:
this.join = function (callback)

function connectTest() {
     client.join().then(response => {
          writeResult('responseDivJoinResult', 'response join ', response)
     })
}

The response you will receive will be:
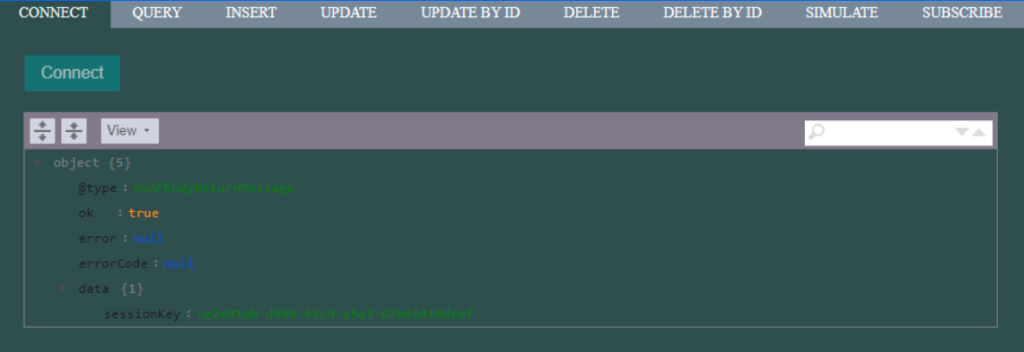
After clicking the «Connect» button, you can see how a response message has been received from the Platform that includes the «sessionKey».
QUERY
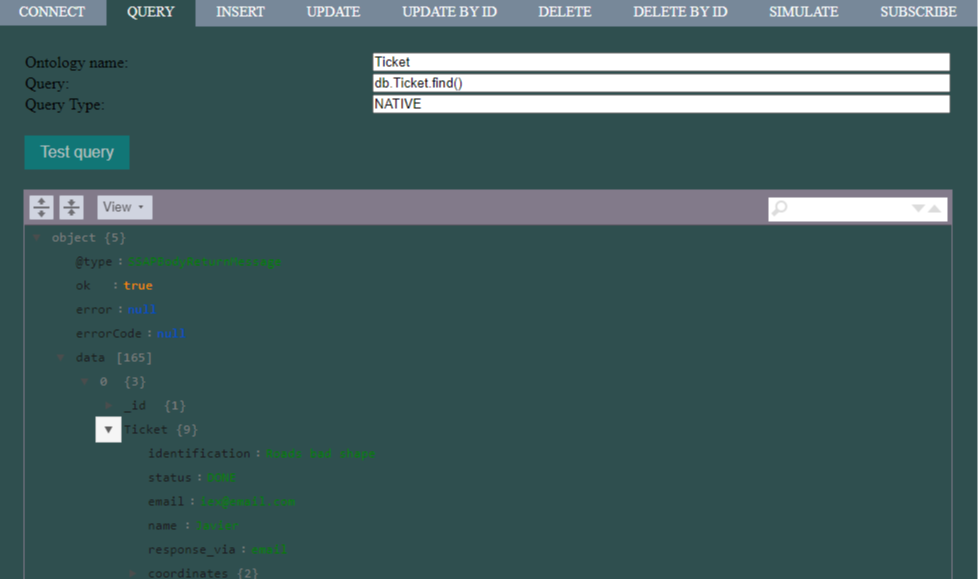
The «QUERY» operation allows obtaining the data that was stored in a given entity/ontology. You will have to specify the entity/ontology, the query you want to perform and the type of query.
Both native and SQL queries are accepted. You can also perform SQL queries that include “SELECT/UPDATE/DELETE”.
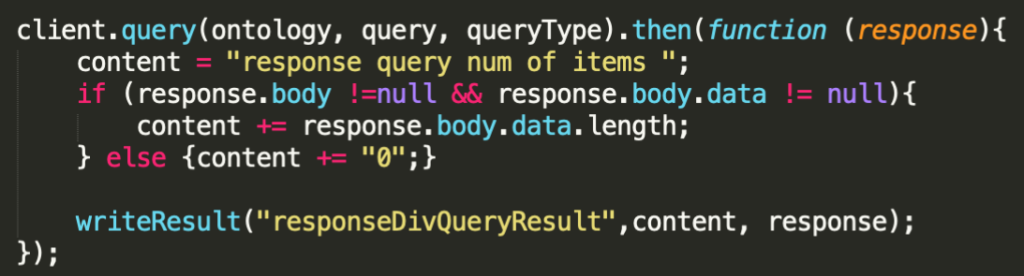
this.query = function (ontology, query, queryType, callback)

client.query(ontology, query, queryType).then(response => {
     let content = 'response query num of items '

     if (response.body !== null & response.body.data !== null) {
          content += response.body.data.length
     } else {
          content += '0'
     }

     writeResult('responseDivQueryResult', content, response)
})
Native with the «Ticket» entity/ontology:
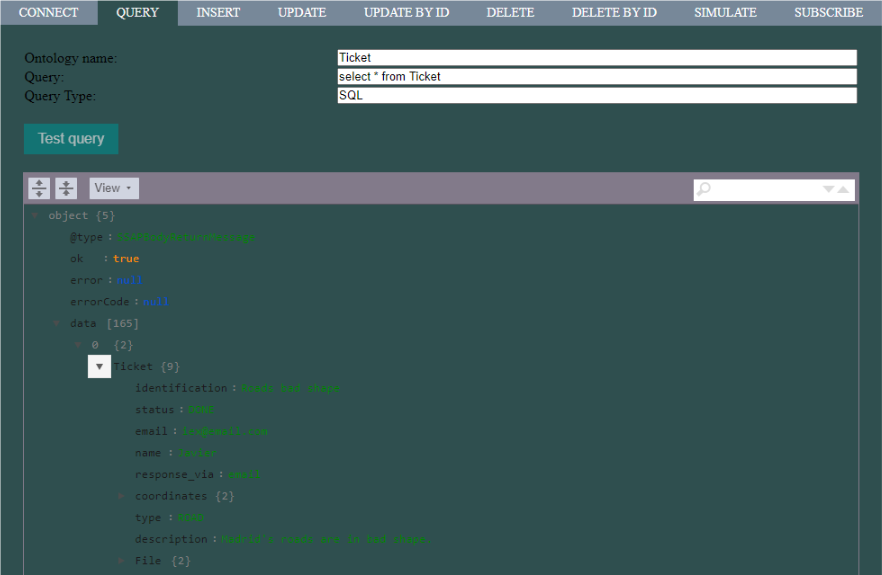
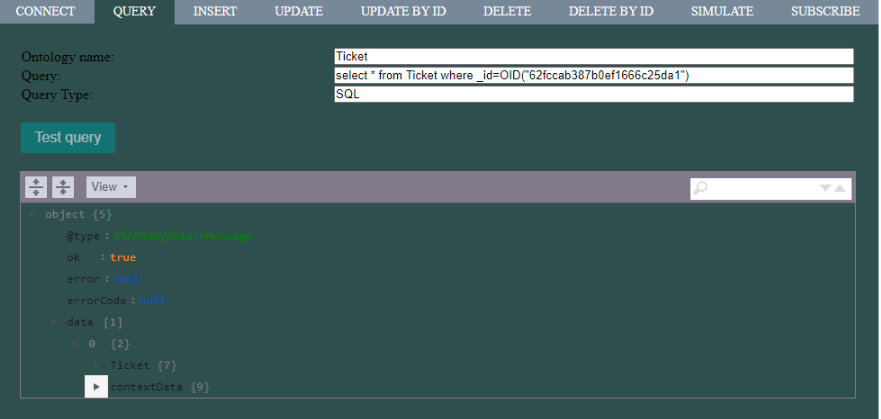
SQL with the «Ticket» entity/ontology:
In case you want to filter the query:
Query of the «Ticket» entity/ontologywith «Update»: using the query:
update Ticket set Ticket.name ="Angela" where _id=OID("62fccab387b0ef1666c25da1") and Ticket.name="Pepe"
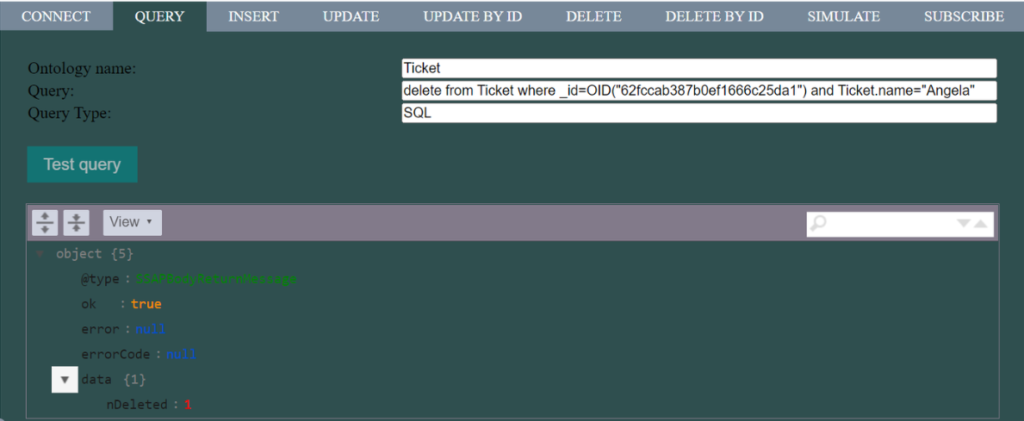
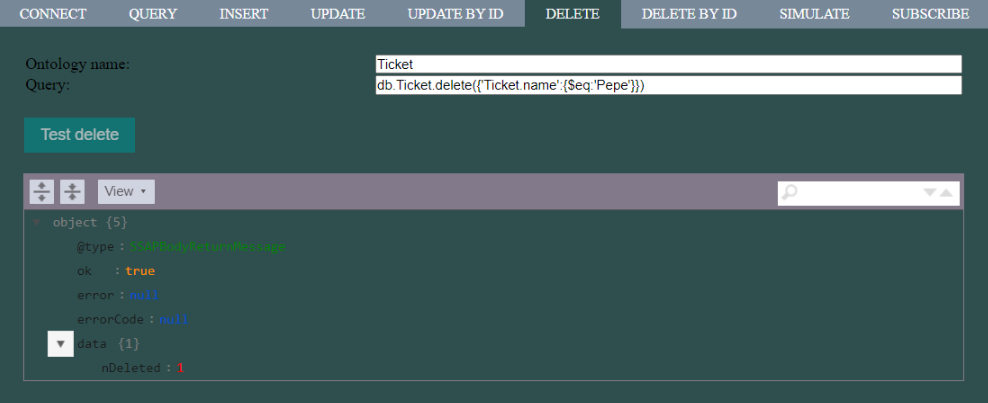
Query of the «Ticket» entity/ontology with «Delete»:
Using the query: «delete from Ticket where _id=OID(“62fccab387b0ef1666c25da1″) and Ticket.name=”Angela” »
INSERT
The «INSERT» operation allows to introduce new data in the entity/ontology. You have to ensure that the data has the structure defined in the JSON schema of the entity/ontology. Otherwise it will fail the schema validation.
To make sure the format is correct, the best option is to copy it directly from the entity/ontology schema, which returns the «ID» of the inserted instance:
this.insert = function (ontology, data, callback)

client.insert(ontology, JSON.stringify(data)).then(response => {
     writeResult('responseDivInsertResult', 'response insert ', response)
})

Inserting in the «Ticket» entity/ontology:

The instance would be:
{"Ticket": {"identification": "Nuevo Ticket","status": "true","email": "ticket@gmail.com","name": "Pepe","response_via": "","file": {"data": "","media": {"name": "","storageArea": "SERIALIZED","binaryEncoding": "Base64","mime": "application/pdf"}},"coordinates": {"coordinates": {"latitude": 12,"longitude": 45},"type": "Point"}}}As shown in the image, this operation returns the «ID» of the inserted record (or the «IDs» in case the data is a list), which you can use later to perform operations by «ID».
Bear in mind that you can perform multiple inserts by passing a list of instances (list) of entities/ontologies as input parameters to the function.
UPDATE
To update an existing instance, you can update the entire instance or update only selected fields.
For the first case, you can use «UpdateById», which works similarly to the «insert» function:
this.updateById = function (ontology, id, data, callback)

client.updateById(ontology, sofiaId, JSON.stringify(data)).then(response => {
     writeResult('responseDivUpdateByIdResult', 'test updateById ', response)
})

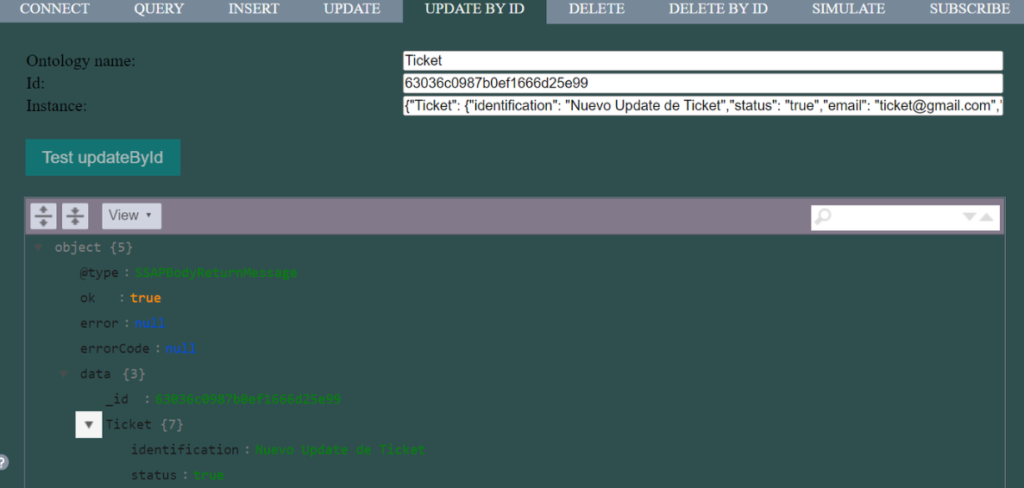
The instance in this case would be:
{"Ticket": {"identification": "Nuevo Update de Ticket","status": "true","email": "ticket@gmail.com","name": "Pepe","response_via": "","file": {"data": "","media": {"name": "","storageArea": "SERIALIZED","binaryEncoding": "Base64","mime": "application/pdf"}},"coordinates": {"coordinates": {"latitude": 12,"longitude": 45},"type": "Point"}}}As you can see in the image, in this operation the registry data with the associated «ID» will be modified – in this case, the «identification» and «status» properties.
For the second case, you can use the «Update» function, which will allow you to modify a set of selected instances through a query. Mind you, this function only accepts native queries: if you want to make updates through SQL, you must use the «Query» function (as you have seen before).
this.update = function (ontology, query, callback)

client.update(ontology, query).then(response => {
     writeResult('responseDivUpdateResult', 'response update ', response)
})

Update with the «Ticket» entity/ontology:
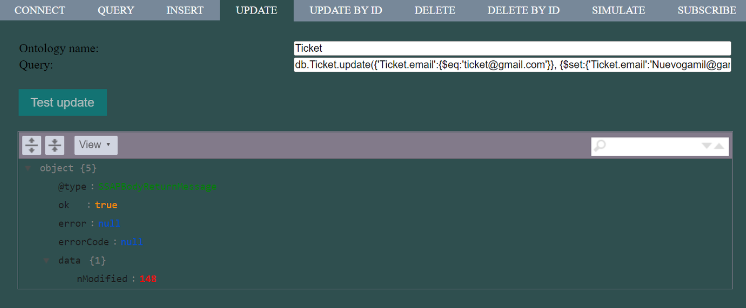
Use the query:
db.Ticket.update({'Ticket.email':{$eq:'nuevoticket@gmail.com'}}, ($set:{'Ticket.email':'Nuevogamil@gamil.com'}}))In the previous image, you can see that the number of records modified by the query is obtained as a result.
DELETE
If what you want is to delete a single instance, you can use the «DeleteById»:
this.removeById = function (ontology, id, callback)

client.removeById(ontology, sofiaId).then(response => {
     writeResult('responseDivDeleteByIdResult', 'rest remove byId ', response)
})


As a result, confirmation of the deletion of the record is obtained (this indicates that one record has been deleted).
On the other hand, if you want to remove all instances that match a particular filter, you can make use of the «Delete» function. This function, similar to the «Update» function, only accepts native queries as a parameter.
this.remove = function (ontology, query, callback)

client.remove(ontology, query).then(response => {
     writeResult('responseDivDeleteResult', 'test remove', response)
})

Deletion in the «Ticket» entity/ontology.
SIMULATE
This operation is used to introduce or insert data in your entity/ontology, indicating the time interval between insertions as a parameter. On the screen, the counters will indicate the number of records successfully inserted, and the number of errors that have occurred.
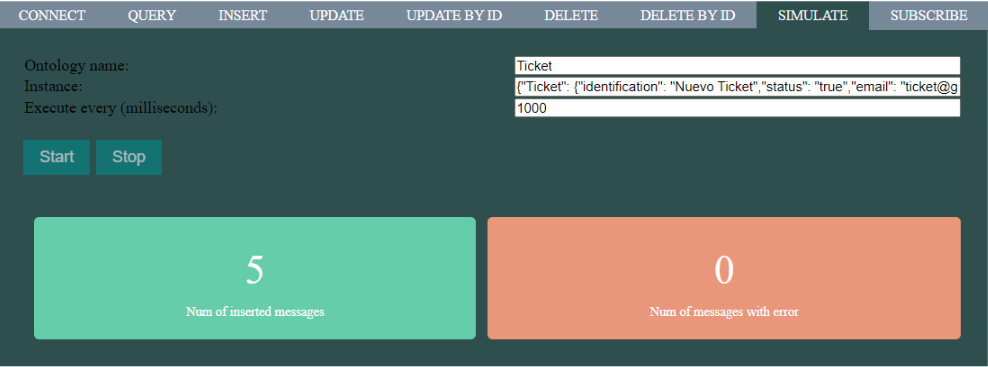
If we want to stop the simulation, pressing the «Stop» button will stop the generation of records.
SUBSCRIPTIONS
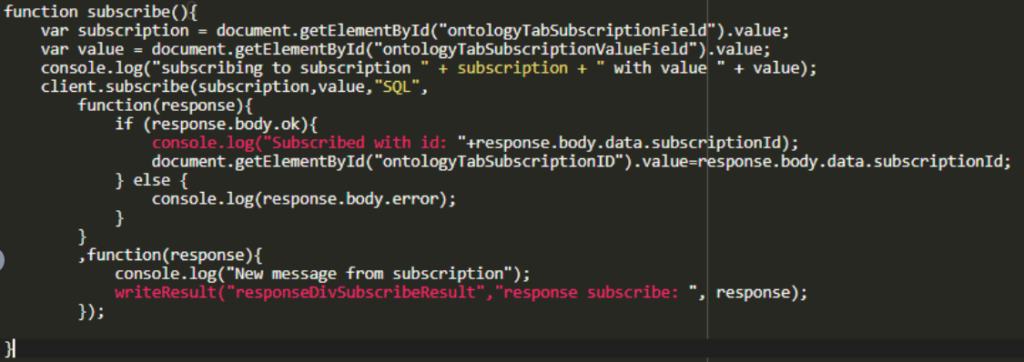
This API will allow you to subscribe to an entity/ontology. Upon subscribing, any inserts/updates made to the subscribed ontology will be notified to your client, causing an execution of the «callback» you passed when you subscribed as a parameter, to handle subscription notifications.
Upon subscription, you will receive a «callback» subscription «ID», which identifies the client’s subscription with the Platform. The subscription function looks like this:
this.suscribe = function (suscription, queryValue, queryType, callbackOpertation, callbackSubscriptionMessages)
The first «callback» function will return the message with the associated subscription «ID» as a response, while the second «callback» function will be executed every time a notification/subscription message arrives.
In the «Subscription» field, enter the identifier of the existing subscription on the Platform, and in the «Measure Value» field, enter the value that will be used to carry out the validation defined in the subscription. After clicking on the «Subscribe» button, the client will make the subscription and the identifier of said subscription will be displayed in the subscription, by «ID» field.
If insertions and/or modifications are made in the entity/ontology and those meet the condition defined in the subscription, then the client will receive a notification and the message will be displayed on the screen, including the inserted instance.
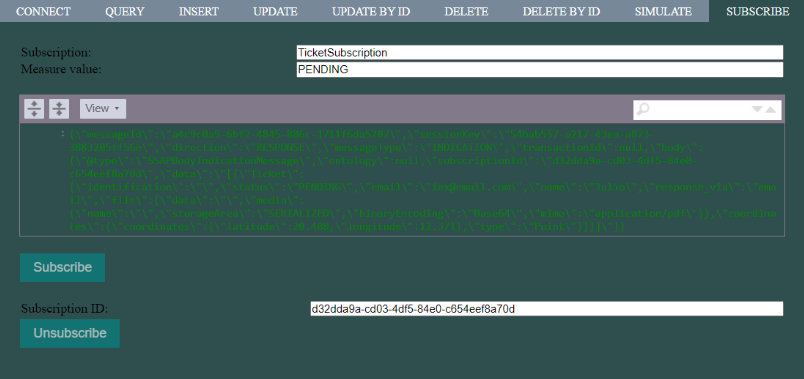
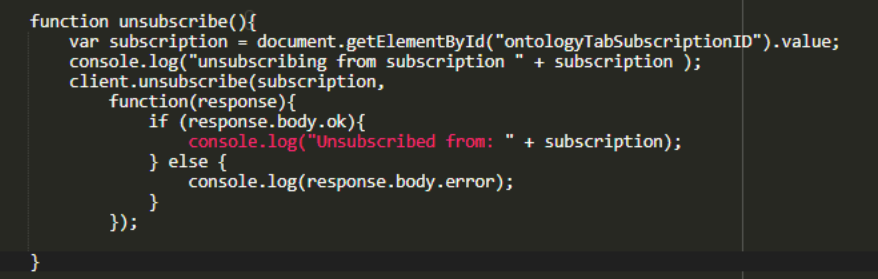
To unsubscribe from the subscription, simply click on the «Unsubscribe» button.
The function to unsubscribe is:
this.unsubscribe = function (subscription, callbackOperation)
The «callback» function will be executed when the confirmation message arrives.
As you can see, the JavaScript API is very practical and useful for interacting with our entities/ontologies, so we encourage you to try it out and make the most of its potential.
Header image: edited by Artem Sapegin at Unsplash