Creating Ontologies from Time Series
With this flashy title, today we are going to talk about a type of ontology that, we could say, was designed to manage data in time windows.
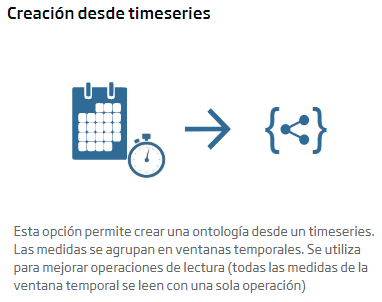
Or, in other words, the utility of these ontologies is to store in a single record of the database the values corresponding to one defined time unit.
For example, say that our ontology receives data every minute, and I want to group that per hour. Then, each record of the ontology will contain sixty sub-records, each one of these corresponding to each minute of the hour.
The advantage in this is that, if we want to retrieve the data of a given hour, we do not have to filter the whole ontology and retrieve the sixty records of the hour in question, but we only have to retrieve the record of that particular hour, and we will have all the corresponding values.
This is perfect, as we say, when we are collecting periodic data and then we want to retrieve it in groups to do something with it (like representing them, generating statistics, etc.).
A practical example would be what was previously discussed here on the blog with the IoT for around the house series (part 1, part 2 and part 3), where we used a couple of sensors to collect the temperature and humidity measurements and then sent that to the Platform every minute.
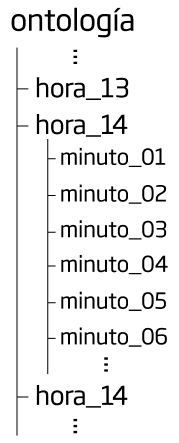
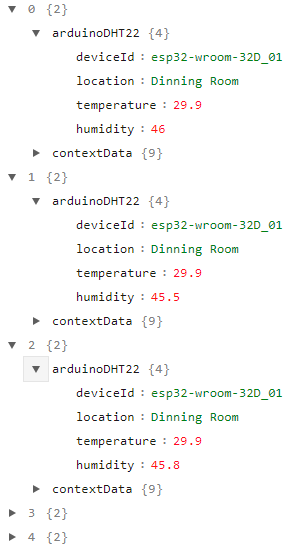
Back then, we generated a generic ontology to store that data. Its data structure is the one we see below:
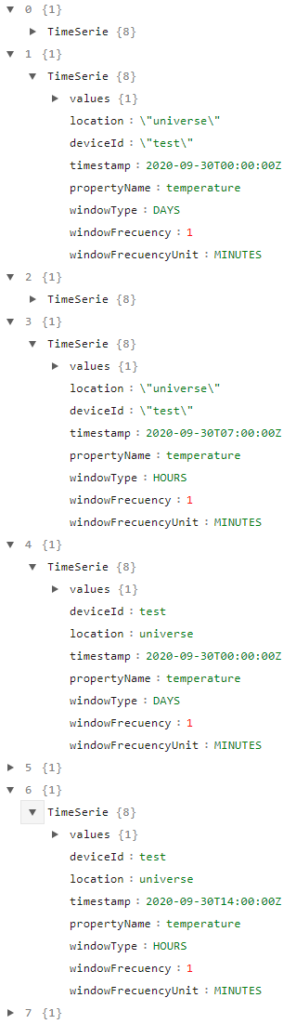
With this Time Series, however, the structure is this other one:
Do you want to know how to generate a Time Series Ontology? Then come to the CloudLab!
How to create a Time Series
To create that, we will do as we do with a normal Ontology: We will go to the menu Development > My Ontologies, and among the different options that appear, we will select the one below, that of «Time Series».
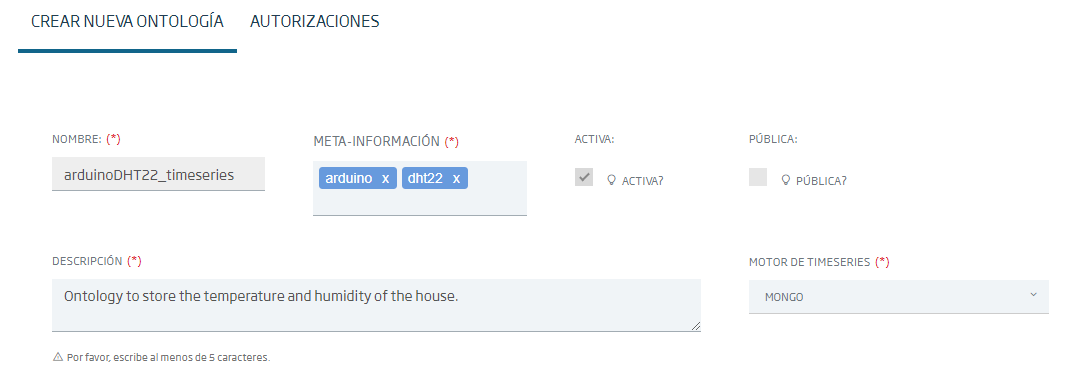
Then we will fill in the requested data:
- Name: the name the ontology will have. In my case I am using «arduinoDHT22_timeseries» because it refers to the ontologies I used in the IoT tutorial. Remember that, if you are doing the tutorial, you cannot repeat the name of the ontology, so I would recommend you to include some variation, like your name’s initials at the end.
- Meta-Information: here we will add the ontology’s descriptive labels.
- Active: this box must be ticked to indicate that the ontology in question can be used.
- Public: this option is… optional. Check it if you want anyone to be able to see your ontology.
- Description: short text explaining what the ontology is used for.
- Timeseries engine: here you can only choose, for now, MongoDB, so – deal with it.
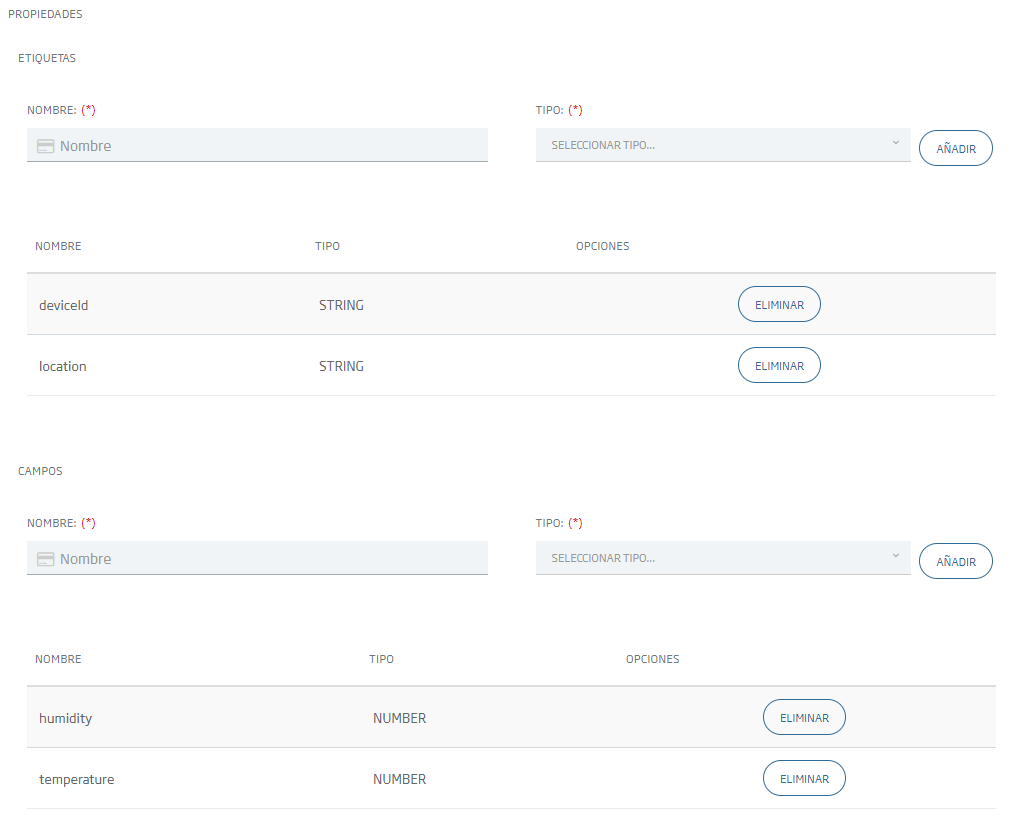
Below we have to specify two types of properties, and it’s quite important to differentiate them well:
- Tags: this refers to those properties of the ontology that will always remain constant. For example, if I have a property that identifies a device, or its location, this value will be constant; now and in two hours from now, the device is the same.
- Fields: this instead refers to those properties that vary – to the measurement values. Now the temperature is 26ºC, but in two hours it can be 28ºC (or any other value).
Therefore, depending on what we want to insert into our ontology, we will have to differentiate between labels (static values) and fields (dynamic values). In my case I have defined the following ones:
- Tags:
- deviceID: property with my sensor’s unique identifier (in the original example I used two IoT sensors, but for this example I will only use one of them).
- location: property with the location of the sensor in my house. As I am using the second sensor, it will correspond to the office.
- Fields:
- temperature: property that will store the measured temperature value.
- humidity: as above, but replace temperature with humidity.
Well, we already have inserted the information of the ontology, and we have the fields to be taken into account. Finally, we have to choose the time windows; that is to say, we have indicate how often we want to group the data.
As before, we have two important parameters to define, which are:
- Window type: here we specify the temporal grouping that interests us. You can choose between minutes, hours, days or months.
- Window frequency: here you specify how often a data will be input into the ontology. As a requirement, the time unit must always be one step below the window type; that is, if you select a window of hours, you can choose a frequency of either minutes or seconds. The options are: seconds, minutes, hours, days and months (the latter will not work because of what I have already told you).
And how did I create my ontology? Let’s recapitulate a little: I receive data every minute, so my window frequency will be every minute. As I want to the evolution of temperature and humidity in the last hour, one of my windows will be the hourly one. And, as I was already working on that, I will generate another daily window, to get information for the days of the week.
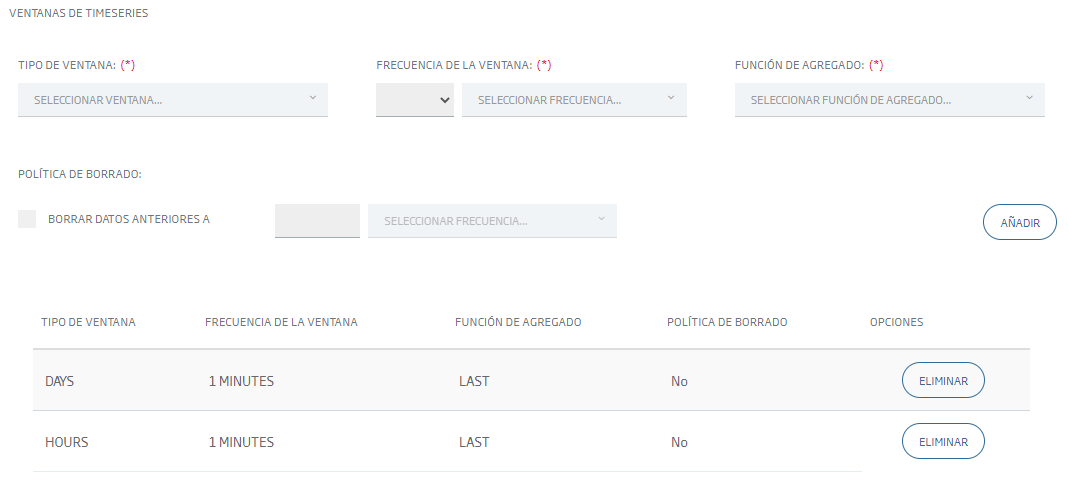
Incidentally, know that the deletion policies are not yet available, so that won’t work if you try to use it. To clean the ontology you will have to generate a Flow Engine or Data Flow that will dry-clean the ontology.
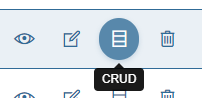
Next, we will create the ontology and that’s it, we would have it already. To understand how all this works, we can enter some invent® values using the ontology’s CRUD, to see how they are used.
To do this, we go to the list of ontologies and look for our own. Then, we click on the «CRUD» button.
If you use the same fields as I do, you will have an ontology structure like this:
{
  "TimeSerie": {
    "timestamp": {
      "$date": ""
    },
    "deviceId": "",
    "location": "",
    "temperature": 0,
    "humidity": 0
  }
}
An important issue that does not happen with the normal ontologies is that the «timestamp» field is not automatically created, but instead you need to enter it manually so that the new records can be created (in the normal ontologies this field is created automatically in the contextData property).
A couple of examples of records to be introduced in the ontology would be:
{
"TimeSerie": {
"timestamp": {
"$date": "2020-09-30T07:00:00Z"
},
"deviceId": "test",
"location": "universe",
"temperature": 23.4,
"humidity": 56.1
}
}
{
"TimeSerie": {
"timestamp": {
"$date": "2020-09-30T14:00:00Z"
},
"deviceId": "test",
"location": "universe",
"temperature": 27.3,
"humidity": 66.6
}
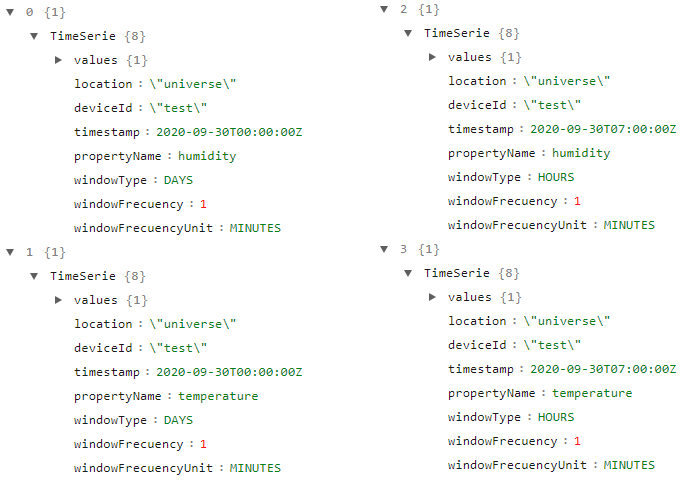
}After entering these two records, if we go to our beloved Query Tool and run a query on the Time Series ontology we have created, we should receive eight records in total.
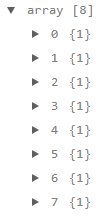
Uh? What do you mean, eight (8)? But I have only entered two records… Well, everything has its explanation.
Every record has two defined fields, one for temperature and one for humidity. This means that, for the hour window, we have two temperature records and two humidity records. That makes four. And let’s not forget the window of days… which adds up to another four. There you are, we have our eight records.
As these are a lot of data grouped in clusters, it is best if you enter CloudLab and look for the ontology «arduinoDHT22_timeseries». Take a look at it with the Query Tool and you can then browse through the records.
Okay, I have a lot of data, so how do I get it out of there and group it or whatever? Well, for this we have our friends the Datasources, working in a similar way as we would do in a common Ontology. If you are interested, in the third part of the IoT series of being around the house we focus on them, as well as in this entry of the training workshop that we published a short time ago.
What do you think? Do you think you can take advantage of this type of Ontology?