Data Governance: Data Classes
Continuing with the news of this version 4.3.0-Quest of Onesait Platform, in this entry we are going to talk about a new functionality that allows associating both Entities (at a general level) and their attributes, rules that allow checking the integrity of a data, such us how to normalize the data to the input in a simple way. We have called this functionality «Data Classes».
How to use data classes
DATACLASS centralized configuration
These rules are defined as a new type of centralized configuration within the Platform, called «DATACLASS», where you can define data validation and format rules, thus allowing pre-processing to be executed before inserting the data.
This pre-processing will allow you to define error messages that will be inserted in the user’s audit entity, thus facilitating the visualization of failed data and the display of load statistics in a dashboard.
To create these rules, you will need to follow this format when creating the configuration file:
dataclass:
    name: generalDataClass
    description: general rules
    dataclassrules:
        ruletype: property
        rulename: comunidadesEsp
        chages:
            order: 0
            name: comMadrid
            script: |
                groovy
                return value.replace("Madrid", "Comunidad de Madrid");

            order: 1
            name: Asturias
            script: |
                groovy
                return value.replace("Asturias", "Principado de Asturias");
        validations:
            name: comunidades
            script: |
                groovy
                def comunidades = ["Andalucía", "Aragón", "Canarias", "Cantabria", "Castilla y León", "Castilla-La Mancha", "Comunidad de Madrid", "Extremadura", "Galicia", "Islas Baleares", "La Rioja", "Melilla", "Navarra", "País Vasco", "Principado de Asturias", "Murcia", "Cataluña", "Ceuta"] as String[]
                return comunidades.contains(value);
            error: error
            errormsg: ${value} no es una comunidad española

        ruletype: entity
        rulename: adultAge
        changes:
            name: pediatra
            order: 0
            condition: rawdata.age > 17
            effect: rawdata.adult = 'yes'
            else: rawdata.adult = 'no'
        validations:
            name: isAdult
            error: error
            errormsg: El paciente ${rawdata.dni} es menor de 18
            script: |
                javascript
                var json = JSON.parse(rawdata);
                if (json.age > 18) {
                    return true;
                } else {
                    return false;
                }
Rule types
As you can see, there are two types of rules: «property», which will be directly related to a field/property of the entity, and «entity», which will be rules that relate different properties of an entity.
Within each rule there are two types: those of change of format (changes) and of validation (validations):
Dentro de cada regla se distinguen dos tipos; las de cambio de formato (changes) y de validación (validations):
- Changes: these rules are for changing or correcting the format, such as converting to uppercase, to lowercase, correcting a text, etc. Therefore, you will need to indicate the order of execution. The fields to be defined are:
- name: name of the format change.
- order: the order of execution.
- script: the JavaScript or Groovy code to process the change. You will need to say in the first place the language used (Groovy or JavaScript), and you must bear in mind that value will be the nomenclature for the value to change.
There is the option to not use JavaScript/Groovy code, as long as the change is a simple one, of the condition/effect type. To do this, the condition, effect and else fields must be filled in; the latter if necessary, instead of the script.
- Validations: these rules will normally return true or false, depending on whether the condition is met or not. Thus, the type of error and the error message should be indicated if the necessary condition is not met. The fields to fill in will be:
- name: nombre de la validación.
- script: código en JavaScript o Groovy a ejecutar para validar el dato. Habrá que poner en primer lugar el lenguaje utilizado, Groovy o JavaScript, y hay que tener en cuenta que rawdata será la nomenclatura para el JSON de inserción.
- error: el tipo de error. Puede ser error si se desea interrumpir la inserción de los datos, o warning si aunque falle se quiere seguir insertando el dato.
- errormsg: mensaje que queremos que aparezca cuando no se cumple la regla de validación. Se puede mostrar el valor de la propiedad a editar o a validar, poniendo «${value}» en el caso de que la regla sea de tipo property, o «${rawdata.dni}» en el caso de que la regla sea de tipo entity (DNI o la propiedad deseada del JSON de inserción).
- name: name of the validation.
- script: JavaScript or Groovy code to execute to validate the data. You need to say in the first place the language used, Groovy or JavaScript, and it must be taken into account that rawdata will be the nomenclature for the insertion JSON.
- error: the type of error. It can be error if you want to interrupt the insertion of the data, or warning if you want to continue inserting the data even if it fails.
- errormsg: message that you want to appear when the validation rule is not met. You can show the value of the property to be edited or validated, by saying “«${value}» in the case that the rule is of type property, or «${rawdata.dni}» in the case that the rule is of entity type (use dni or the desired property of the insert JSON).
How to associate a DataClass to an Entity
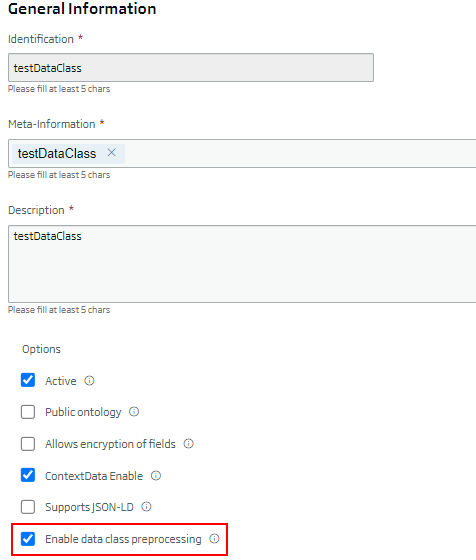
To use these rules, you have to associate them to the Entity in which you want to do this pre-processing. Therefore, when creating or editing an Entity, there will be several new options:
- A check to enable or disable rule pre-processing:
- A multiple selector where you can choose the existing rules at the Entity level:
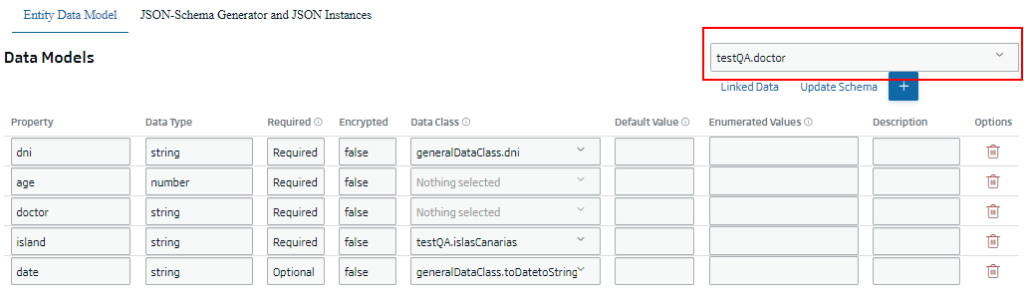
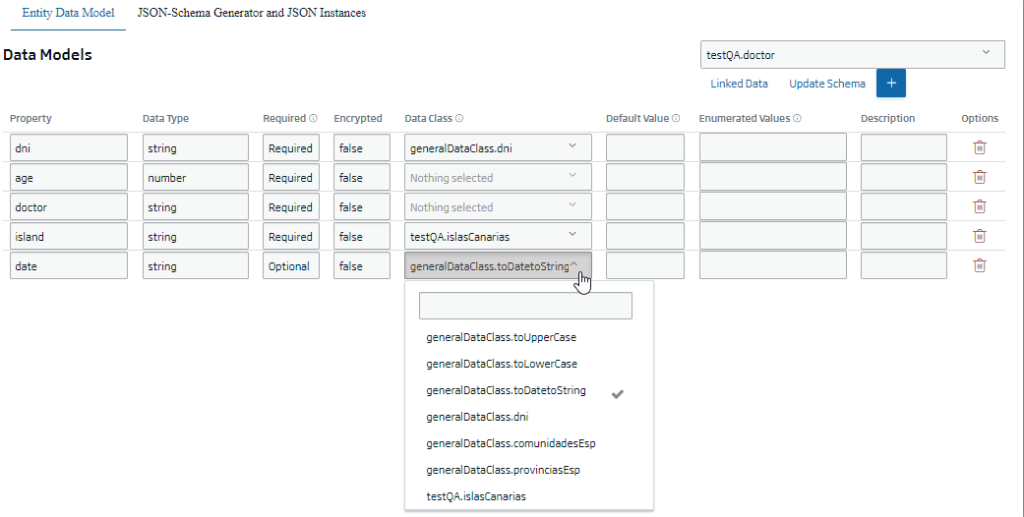
- A multiple selector for each property, where you can select the property rules that exist:
In this way, when you insert data into the Entity, the format changes will be executed and the validation rules will be checked before proceeding to the insertion.
Audit
All errors that occur when executing a validation rule, will be inserted into the audit entity of the user (Audit_UserName):
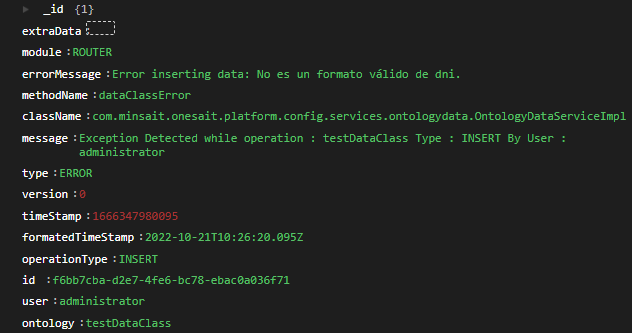
Among all the fields that exist when saving audit errors, we highlight the following:
- errorMessage: indica que el error se ha producido en la inserción, y seguidamente mostrará el mensaje que se ha introducido en el dataclass donde se define esa validación.
- methodName: siempre será «dataClassError», pudiendo así identificar todos los errores de preprocesado de datos con los dataclass.
- type: indica si es un error o un warning.
- formatedTimeStamp: indica la fecha y hora en el que se produjo el error.
- user: el usuario que ha realizado la inserción de los datos.
- ontology: la Entidad destino donde se estaba haciendo la inserción («Ontología» es el nombre con el que se conocían previamente las «Entidades»).
- errorMessage: indicates that the error has occurred in the insertion, and then it will show the message that has been entered in the dataclass where that validation is defined.
- methodName: it will always be «dataClassError», thus being able to identify all data preprocessing errors with the dataclasses.
- type: indicates whether it is an error or a warning.
- formattedTimeStamp: indicates the date and time that the error occurred.
- user: the user who has performed the insertion of the data.
- ontology: the destination Entity where the insertion was being made («Ontology» is the name by which the «Entities» were previously known).
Header image: Christina @ wocintechchat.com at Unsplash