How to use the Java API to work transparently with JPA and Entities in Onesait Platform?
Onesait Platform has a data-centric architecture, whose core is the Entities – abstractions of the database entity, no matter what it is. This is why all the modules of the Platform require these Entities in order to function correctly.
However, there may be situations in which, either due to technical requirements or other decisions in which you cannot interfere, you have to work directly with the database entities using frameworks, such as Spring Data, iBatis, etc., and you have to carry out CRUD operations from there and not from the Platform.
Of course, although you do not have the management of these Entities directly, you want to use the Platform modules, so… how can you use the Platform so that it can transparently manage the concept of entity?
The solution is the Onesait Platform itself: it has a Java client library that provides a low-level client called NotifierClient and a wrapper for Sprint Boot that will allow you to create the entities from Java classes, and inform the Platform of the CRUD operations that you carry out through the framework you are using. With this, although the Platform does not carry out these operations as such, it will always be aware of what happens with the entities. Thus, once the definition of the entity exists, all the modules can be used without problem.
Below we will see how all this works.
Entity creation
Operations provided
This client provides the following operations:
- Creation and/or update of an entity based on a Java class: From a Java class, a JSON Schema will be generated to subsequently create the entity on the Platform.
- Validation of an entity’s JSON: This operation should be executed before its insertion or update: The Platform will verify that the JSON is valid by comparing it with the JSON Schema of the referenced entity.
- Notification of CRUD operations: This operation must be executed after completing the process in your Java application, when you perform CRUD operationsyou we can use the client to notify the Platform. This operation is available in both synchronous and asynchronous formats.
Client creation
You can create the client in two ways:
- With a Platform API token: type X-OP-APIKey.
- With username and password: OAuth2 will be used for authentication.
For example:
#Configuration
public class NotifierClientConfig {

   private static final String USER = "developer";
   private static final String PASS_WORD = "UberSecret!2495!";
   private static final String SERVER = "http://localhost";
   private static final String API_KEY = "45012g6hj8k6l2k1b0n86y8uj4t823";

   @Bean("notifierClientApiKey")
   public NotifierClient notifierClientApiKey() {
      return new NotifierClient(SERVER, API_KEY, false);
   }

   @Bean("notifierClientApiKey")
   public NotifierClient notifierClientOauth() {
      return new NotifierClient(SERVER, USER, PASS_WORD, false);
   }
}
The last parameter of the constructor is used to bypass SSL validation, for the case of environments that have self-signed certificates.
Creation of the Entity from the Java class
Next let’s see an example of a JPA entity:
@Entity
@Table(name = "letter")
@Data
@AllArgsConstructor
@NoArgsConstructor
@Builder
@EqualsAndHashCode (onlyExplicitly Included = true)
@OPEntity
public class Letter {

   @Id
   @GeneratedValue
   @EqualsAndHashCode.Include
   @JsonProperty(required = true)
   private UUID id;

   @Column(name = "task_type", length = 100)
   private String taskType;

   @Column(name = "task_select_attribute", length = 50)
   private String taskSelectAttribute;

   @Column(name = "task_select_value", length = 100)
   private String taskSelectValue;

   @Column(name = "report_id", length = 50)
   private String reportId;

   @OneToMany (mappedBy = "letter", cascade = CascadeType.ALL, orphanRemoval = true, fetch FetchType.EAGER)
   @JsonManagedReference
   private final Set<LetterAttributes> letterAttributes = new HashSet<>();
}
@Entity
@Table(name = "letter_attributes")
@Data
@AllArgsConstructor
@NoArgsConstructor
@Builder
@EqualsAndHashCode (onlyExplicitly Included = true)
@OPEntity
public class LetterAttributes {
@Id
@GeneratedValue
@EqualsAndHashCode.Include
@JsonProperty (required = true)
private UUID id;
@Column(name = "task_attribute", length = 50)
private String taskAttribute;
@ManyToOne(fetch FetchType.EAGER)
@OnDelete(action OnDeleteAction.CASCADE)
@JoinColumn(name = "letter", nullable = false, foreignKey = @ForeignKey(name = "fk_letter_attributes_letter")
@JsonIgnore
@JsonManagedReference
private Letter letter;
}For the generation and/or update of the Entity on the Platform, you will use all the annotations of the Jackson Fasterxml library. This will give you a number of advantages, such as:
- @JsonProperty(required = true): for required properties.
- @JsonIgnore y @JsonManagedReference: to avoid infinite serialization loops.
A good time to create the Entity in the Platform of your JPA entity can be at the beginning of the application. In this way, you will always ensure that your Entity exists and is updated to its latest version of the JSON Schema.
@PostConstruct
void createOrUpdateEntity() {
notifierClientApiKey().createOrUpdateOntology(Message.class);
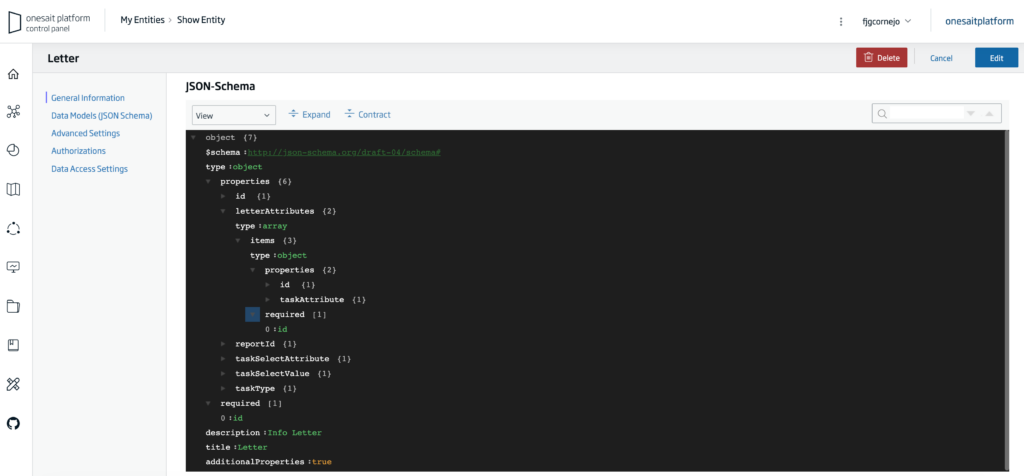
}As you will see, this will create the Entity in the Platform with the following JSON Schema:
JSON Schema Validation
When you want to save data or update them, you can use this method to check that the JSON instance is correct. You must pass either the name of the Entity and the JSON in String format, or the object that will be serialized to JSON internally:
notifierClient.validateSchema(message);
notifierClient.validateSchema("Message", json);
If the validation fails, an exception of type NotifierException would be thrown with the validation errors. An example would be:
ERROR com.minsait.onesait.platform.client.NotifierClient - Validation failed with following errors Error processing data:{"message":"hello"}by:{"level":"error","schema":{"loadingURI":"#","pointer":""},"instance":{"pointer":""},"domain":"validation","keyword":"required","message":"object has missing required properties ([\"idMessage\",\"toMessage\"])","required":["idMessage","toMessage"],"missing":["idMessage","toMessage"]}Otherwise, the code will continue its flow normally.
Notification to Onesait Platform
Depending on your needs, you can use the synchronous or asynchronous version. You must pass it a Notification object, in which you must indicate:
- QueryType: sólo si es operación QUERY. Enum {SQL, NATIVE}
- Query: sólo si es operación QUERY (la consulta en sí, vamos).
- Payload: para INSERT/UPDATE, que contendrá la instancia de la Entidad serializada; el equivalente a un toString()
- Operation: Enum {INSERT,UPDATE,DELETE,QUERY}
- Id: identificador de la instancia, para casos como el DELETE/UPDATE por ID.
- QueryType: only if it is a QUERY operation. Enum {SQL, NATIVE}
- Query: only if it is a QUERY operation (the query itself, I mean).
- Payload: for INSERT/UPDATE, which will contain the serialized Entity instance; the equivalent of a toString()
- Operation: Enum {INSERT,UPDATE,DELETE,QUERY}
- Id: instance identifier, for cases such as DELETE/UPDATE by ID.
Let’s see an example:
// Sync
notifierClient.notify(Notification.builder().ontology("Message").id(message.getIdMessage()).operation(Operation.INSERT).payload(json).build());

// Async
notifierClient.notifyAsync(Notification.builder().ontology("Message").id(message.getIdMessage()).operation(Operation.INSERT).payload(json).build());
Use example
You can make use of these operations described in your business logic; for example, when a new message is created in the database, you can previously validate its content, and subsequently notify it to the Platform:¡
@Overrider
public void createMessage(Message message) {
if (!Message.MessageStatus.PENDING.equals(message.getStatusMessage())) {
message.setStatusMessage(MessageStatus.PENDING);
}
if (message.getIdMessage() == null) {
message.setIdMessage(UUID.randomUUID().toString());
}
// Validate Schema
notifierClient.validateSchema(message);
messageRepository.save(message);
// Notify Onesait Platform
String json = null;
try {
json = mapper.writeValueAsString(message);
} catch (final JsonProcessingException e) {
log.error("Invalid Json");
throw new RuntimeException();
}
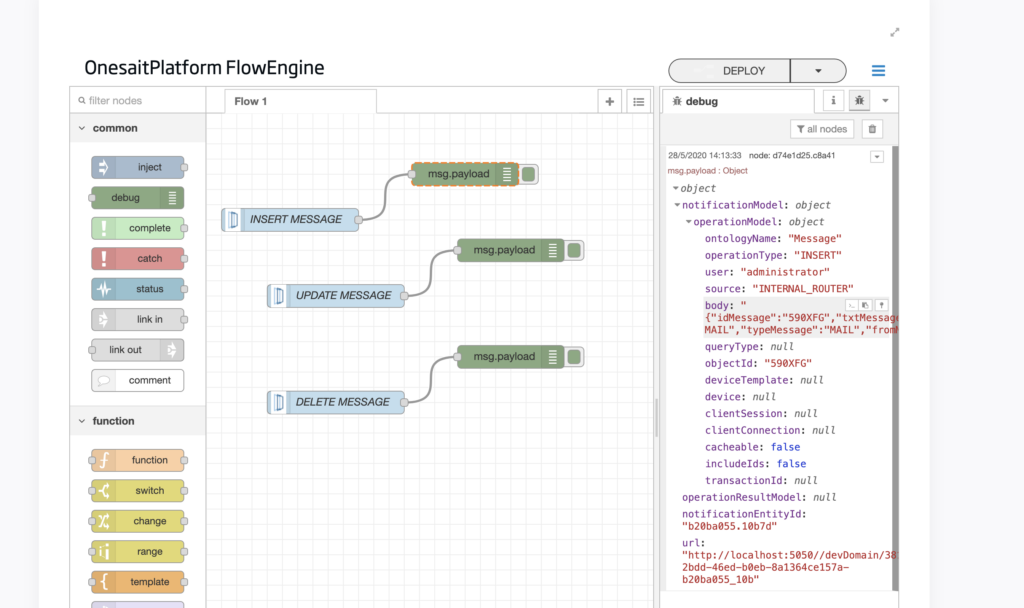
notifierClient.notifyAsync(Notification.builder().ontology("Message").id(message.getIdMessage()).operation(Operation.INSERT).payload(json)build());In this way, for example, if you have a flow created in the FlowEngine that works with the Message entity, you will receive the notifications as if it the Platform was doing the operations:
In our GitHub repository, we have an example of use of this library with some tests mounted:
For it to work in the application.yml, you will have to change the credentials associated with the client and the user (the API Key):
onesaitplatform:
   iotclient:
    token: 3b8a25fe233b4a45a19d1308bbb9073a
    deviceTemplate: client
    device: client
    urlRestIoTBroker: https://development.onesaitplatform.com
   notifierclient:
    enabled: true
    server: https://development.onesaitplatform.com
    username: <username>
    password: <password>
    apikey: QdYmw02uPRdL4Slof1dqktSGG41mssCVB20yGAM
Wrapper for Spring Boot
For the development of applications with Spring Boot, a wrapper is provided with the aim of facilitating the use of this library.
Properties
First of all, you will have to inject the corresponding dependency:
<dependency>
	<groupId>com.minsait.onesait.platform</groupId>
	<artifactId>onesaitplatform-iotclient4springboot</artifactId>
	<version>2.1.0-RELEASE</version>
	<!-- For Spring Boot 3.X+ <version>10.0.0</version>  -->
</dependency>
You must also specify the following properties:
onesaitplatform:
   notifierclient:
    enabled: true
    server: https://development.onesaitplatform.com
    username: <username>
    password: <password>
    #apikey: alternative to username + password
The good thing about all this is that you will be able to configure the client to use either user credentials and password, or an API Key from the Platform.
@OPEntity annotation
This annotation will be used in the model classes of your application. For example, if you use Spring Data:
@Document(collection = "Message")
@OPEntity
public class Message {
   public enum MessageType {
      MAIL, SMS
   }

   @Id
   @JsonProperty(required = true)
   private String idMessage;

   private String txtMessage;

   private MessageType typeMessage;

   private String fromMessage;
}
Using this annotation will cause the creation and/or update of an Entity from the Java class itself at application startup.
In order for the attributes to remain as required in the JSON Schema created from the class, you must use the JSON annotation:
@JsonProperty(required = true)@OPValidateSchema annotation
This annotation will launch a validation against the Entity schema synchronously, meaning that, if it fails, an exception will be thrown and disrupt the flow of the code. It is used at the attribute/argument level.
@Override
Message save(@OPValidateSchema Message entity);
@OPNotifierOperation annotation
This annotation allows you to notify the Platform of the operations that happen in your application, both synchronously and asynchronously. It is used at the method level, and has the following arguments:
- async: boolean default false. Indicates whether the notification is sent synchronously or asynchronously.
- ontology: name of the Platform Entity. For example: Message.
- operationType: QUERY, INSERT, UPDATE, DELETE. Type of operation performed.
- queryType: SQL, NATIVE, default NATIVE. As in most cases, the Spring Data / JPA interfaces will be used, this field will not be used.
- id: SpEL expression indicating which method argument/value will be used as the id for the notification. This id is the unique identifier of the instance being operated on. For example: “#p0”.
- payload: SpEL expression that indicates which argument/value of the method will be used as the body of the notification. For example: “#p1”.
Use examples
INSERT
@OPNotifierOperation(ontology = "Message", operationType = OperationType.INSERT, async = true)
public void createMessage(@OPValidateSchema Message message) {
  ....
}
QUERY
@OPNotifierOperation(ontology = "Message", async = true)
List<Message> findByToMessage(String toMessage);

@OPNotifierOperation(ontology = "Message", async = false)
Message findByIdMessage(String idMessage);
UPDATE
@Override
@OPNotifierOperation(ontology = "Message", id = "#p0.idMessage", payload = "#p0", operationType = OperationType.UPDATE, async = true)
public void updateMessage(@OPValidateSchema Message message) {
	messageRepository.save(message);
}
DELETE
@OPNotifierOperation(async = false, ontology = "Message", operationType = OperationType.DELETE, id = "#p0")
public void deleteMessage(String idMessage) {
	messageRepository.deleteById(idMessage);

}GitHub: Onesait Platform.