Simulating data in Onesait Platform (part I)
Frequently, when you start with a project, you have a data model but not the data itself, either because it still has to be loaded into the databases or because the access API is not available.
To get by until the data is available and you are able to develop the front, commonly we use mock data, whether it is created by the back team itself, a sample of the real data that will arrive, or even data generated by the front itself to do tests.
Having a JSON (usually) for these affairs is fine, but it is far from the actual operation that the reception of this data will have, especially when you are dealing with asynchronous topics in which the data will not be there, but will have to arrive with a delay (hello, Async/Await).
To try to solve this problem and make life easier for our developers, Onesait Platform has the possibility of simulating the generation of data and making said data available as if using an API, which will allow receiving the data as if were the real data.
Depending on our needs and license, this data simulation can be executed in two different ways:
- Through the data simulator incorporated in the Platform.
- Making use of KPI-type entities.
In this first post, we are going to learn how to use the simulator; and in a later post, we will see how to use KPI type entities.
As a workspace, in both cases we are going to use CloudLab, our free testing environment with open access to everyone.
Data simulators
Creating an entity
When working with data simulators, you first need an entity in which to store the data that is generated.
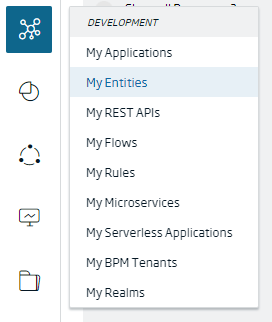
To create it, navigate to the Development > My Entities side menu.
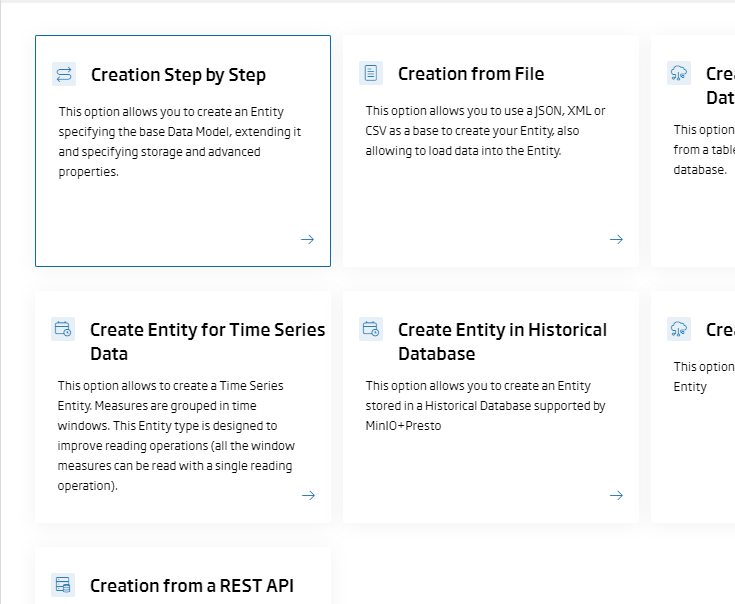
Once in the list of entities, create a new entity by clicking on the «+» button located in the upper right part of the screen. Several options will appear, so you will have to select the first of them: «Creation Step by Step».
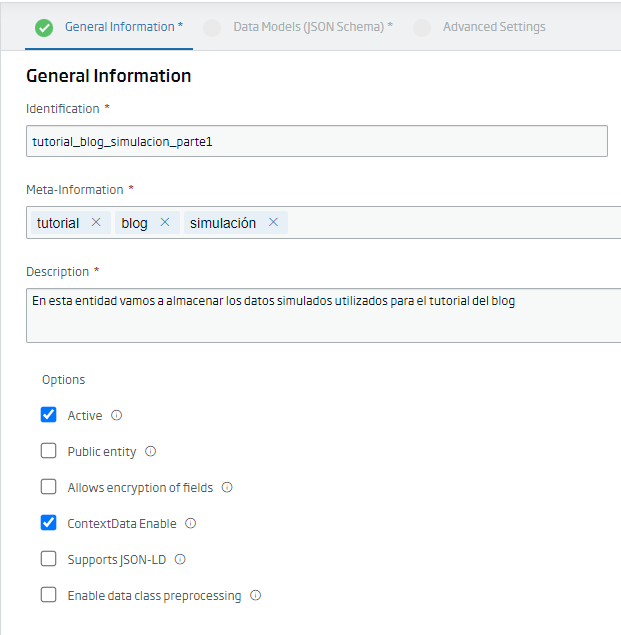
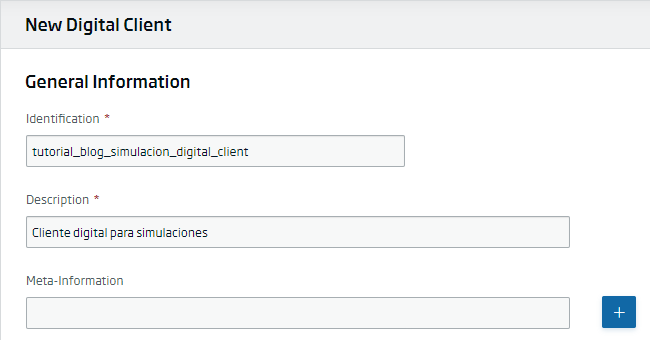
First of all, you will have to indicate the generic information of the entity: identification, description and metadata that the entity will have, as well as what options you will want it to have: it will be active, it will be public and everyone can access it, etc. You don’t have make it too complicated here so, after adding an identifier, a description and some metadata, you can leave the rest as is.
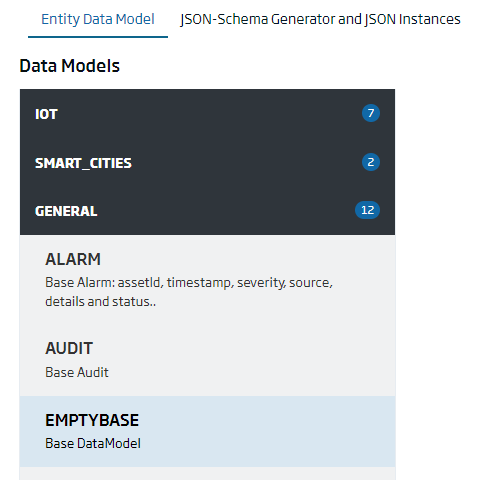
Once this information is filled in, click on the «Continue» button and you will next define the data structure that the entity will have. From the different options that will appear, choose «General», and from the interior drop-down menu, select «Empty Base»:
Here, you need to have a clear idea about what data structure you want to generate, so you should ask yourself: What data do I want to simulate? Depending on the fields you are going to use, you will have to define them here.
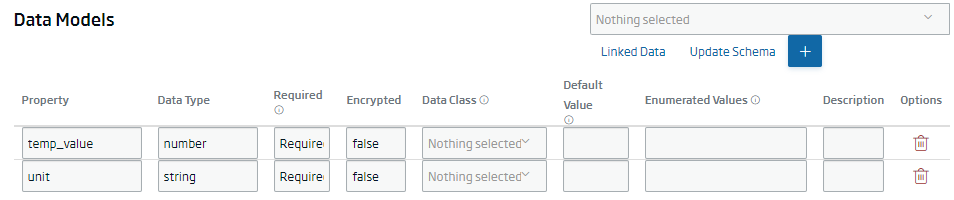
Let’s imagine that you are going to simulate a temperature reader, so you will be recording the temperature value on the one hand, and the unit of measurement on the other. This means that you are going to create two fields in the data model:
- Numeric field named «temp_value»: in which the measurement value will be stored.
- Text field with the name «unit»: where the type of measurement unit will be entered. This field would not be really necessary, but is included to show options in the simulation later.
On the right side of the screen, a row of headers will then appear next to a «+» button, which you will press to add properties to the entity.

It should look similar to this:
Next, click on the «Update Schema» button, located next to the «+» button to update the entity’s data schema.
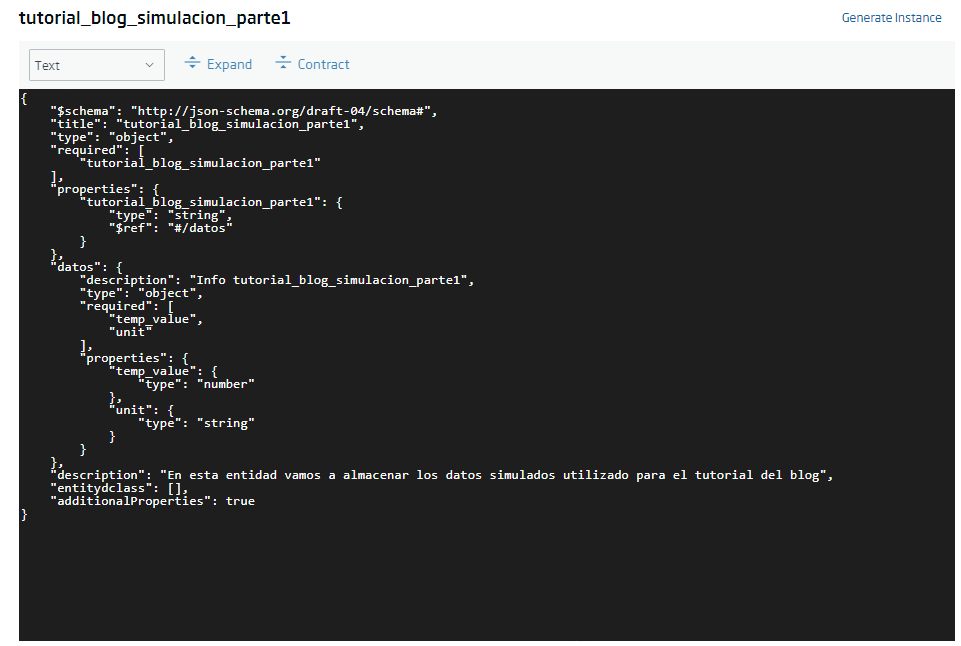
A code viewer will appear, where you can see the JSON structure of the entity. At the top right, click on the «Generate Instance» button to generate an example of data.

Something similar to this will appear at the bottom of the code window:

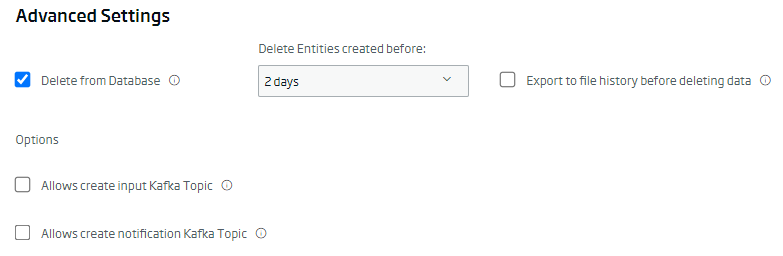
Once this is done, click again on the «Continue» button at the top to access the advanced configuration of the entity. Here, among the different options that will appear, check the «Delete from Database» option, to enable the deletion of data after a time, and in the «Delete Entities created before» drop-down menu, choose a short period of time (to avoid generating a very large entity).
Once all this is configured, click on the «Create» button to finish creating your entity. If everything has gone correctly, your newly created entity will appear in the list of entities somewhere among the pages:

Creating a digital client
Now that you have the entity ready, the next step will be to create the digital client that will produce the logic and operation of the simulator.
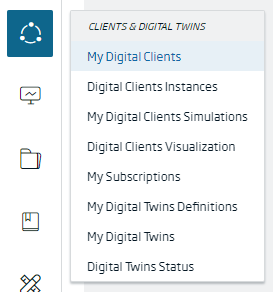
To do this, navigate to the Clients & Digital Twins > My Digital Clients menu.
You will see the list with the digital clients you have created (if you have any, of course). To generate a new one, click on the «+» button located on the top right of the screen.
This will launch the new digital client creation wizard, where you will have to enter certain generic information, such as its identifier or description.
Next you will have to specify which entity you want to add to the digital client. In this case, select from the drop-down list the entity that you have previously created, which will be the one used to store the simulated information.
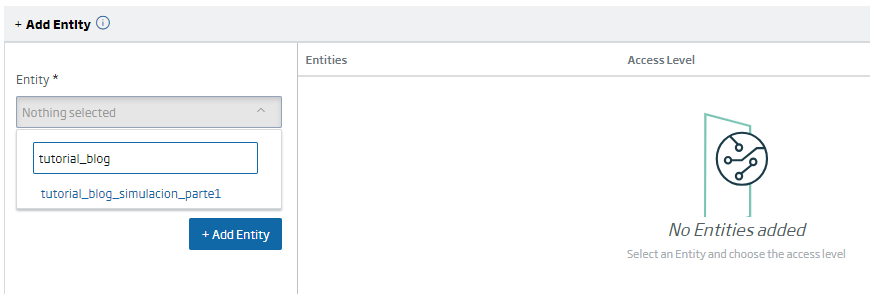
Once found and selected, make sure that the access permissions are all.
Next, click on the «+ Add Entity» button to add it to the list.

So, with this, everything that had to be done, has been done. Click on the «Create» button to finish creating your digital client. As in previous cases, if everything has gone well, your new client will appear in the list of clients you have available.

Creating a simulator
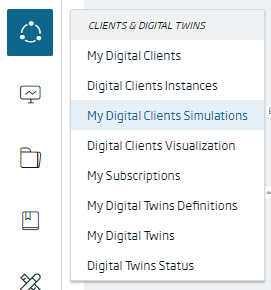
Now you have all the necessary pieces to start creating your simulator. You will do this from the Clients & Digital Twins > My Digital Clients Simulations menu.
Access the list of available simulators, and click, as in previous cases, the «+» button to create a new simulator. This will launch the simulation creation wizard, where you will have to fill out some information.
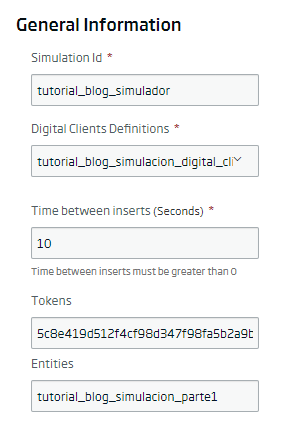
On the one hand, you have to indicate the simulator identifier, as well as the definition of the digital client, which you will select from the drop-down menu. Once this is done, more configuration options will be enabled. Specify an insertion time (How often do you want a value to be simulated). The token and registration entity will be added by default and you don’t have to touch anything.
The next step will be to configure the simulator options, properties that are found on the right side of the screen and that you will initially see like this:
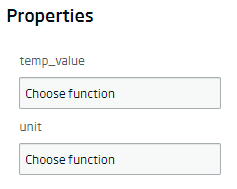
In the case of the «temp_value» field: This is where you want random temperature values to be added. Thus, click on the «Choose function» drop-down menu and select the «RANDOM_NUMBER» option.
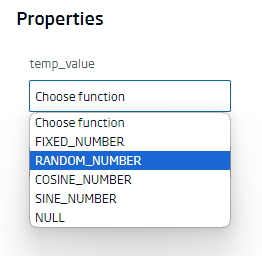
This will enable new options on the right side of the selector: «Begin value» refers to the value from which the random number will begin to be calculated, while «End value» refers to the value up to which it will be considered. The «Decimal precision» option refers to the number of decimal places that the calculated value will have.
For this example, let’s assume that you are simulating the temperature variation inside a room, so you will enter a range of values from 22.0 to 24.0 degrees Celsius. It will therefore remain as:

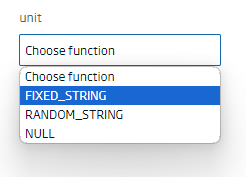
Now, as said, you are simulating temperature values in degrees Celsius, and you must add this other information, the unit, to the «unit» field that you have also created. To do this, open the options dropdown and choose «FIXED_STRING»:
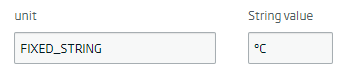
A new option will appear on the right, where you will enter «ºC» to indicate that the measurement is in degrees Celsius.
With this you will have everything configured, so click on the «Create» button to create and start running the simulator. Return to the screen with the list of simulators, and if everything has gone well, the simulator will appear with the «Active» option in green.

Checking the simulation
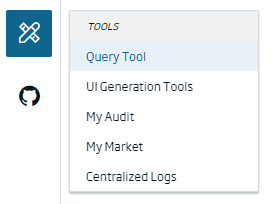
The simulator is already working but: How can you know for sure that it is working? Well, with the entity query tool, which you will find in the Tools > Query Tool menu.
Once the tool is launched, select the name of the entity you are using to ingest the simulated data. The type and format, you can leave these with the default values.

Next, you can make an SQL query to count how many records the entity has. Since you are simulating data every ten seconds (for this tutorial), you should already have quite a few.
SELECT COUNT(*) FROM tutorial_blog_simulacion_parte1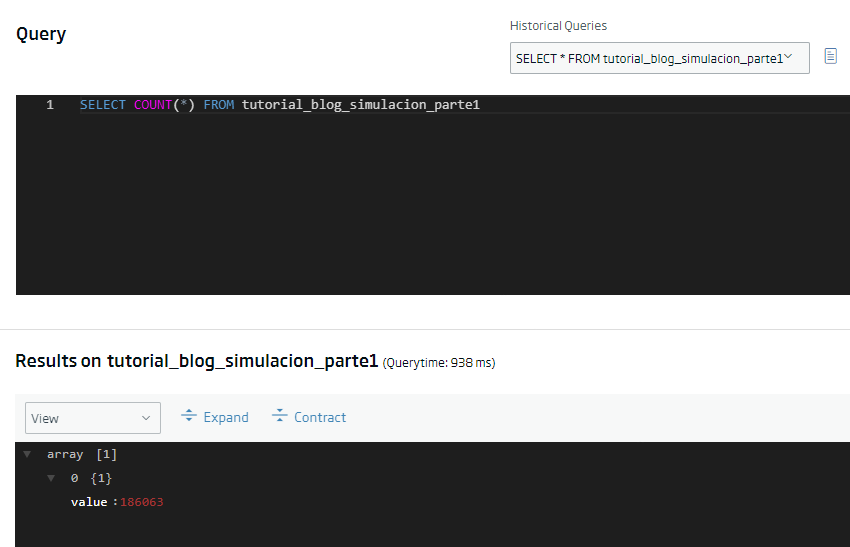
To see some example logs, you can run another query and see what data comes out:
SELECT * FROM tutorial_blog_simulacion_parte1 LIMIT 10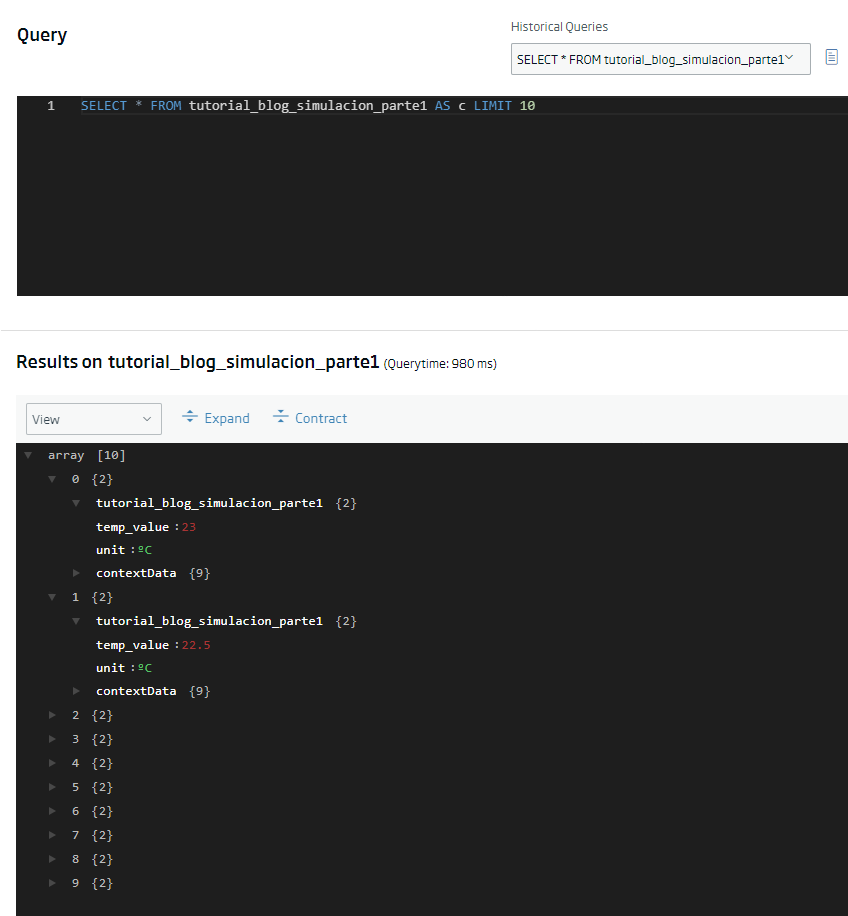
As you can see, the data is being simulated just as you wanted: with random values for the «temp_value» field, and with a fixed text for the «unit» field.
As we have seen, simulating data is something simple and fast, which can get us out of trouble when working without final data or when the back-end connections are not ready yet.
Although this is the most correct way to simulate data, there are a number of restrictions, such as the fact that we cannot insert a logic for the evolution of the simulated data. For example, if we set a value between 20 and 40, we will not obtain an evolution of the value from the minimum to the maximum, but rather it will be something random.
In future posts, we will see how to use previously-prepared data to simulate it, and thus achieve a more realistic result through the use of KPI entities.
Header image: Joanna Kosinska at Unsplash.