Spring Security Use Guide
Spring Security is a framework that provides authentication, authorization and protection for Java applications (mainly those based on Spring). It is highly customizable both in its authentication part and in its access control for users, since it can be easily extended to meet the desired requirements. Within the applications based on Spring, Spring Security is the main standard for all the implementation of their security.
OAuth2
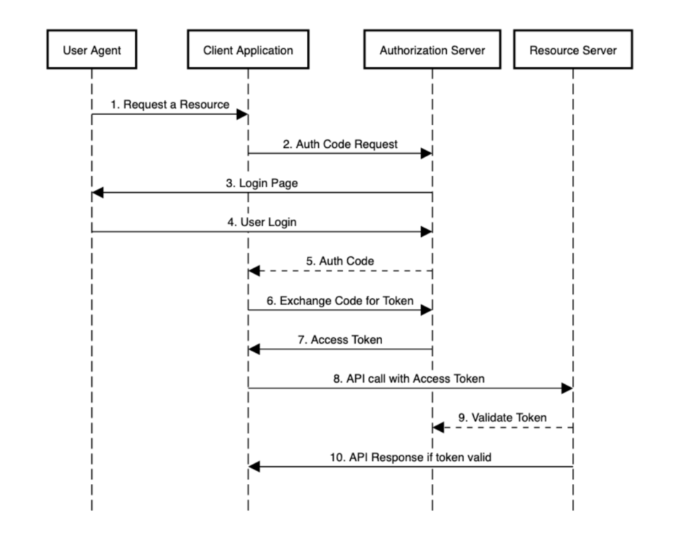
OAuth2 is a standard that allows you to create authorization flows for your applications. It is focused on simplicity when granting specific authorizations, allowing secure authentication of APIs.
The example below shows the flow that OAuth2 follows when a user who is not authenticated requests an application resource:
Spring Security offers you support to implement your security using OAuth 2.0 flows. Its implementation is as simple as adding the following dependency to the «pom.xml» file:
pom.xml

<dependency>
    <groupId>org.springframework.boot</groupId>
    <artifactId>spring-boot-starter-oauth2-client</artifactId>
</dependency>
We will also have to define the following variables within your «yml» configuration file:
application.yml

spring:
        security:
                oauth2:
                        client:
                                registration:
                                       custom-client:
                                             client-id: //OAuth2 server id (mandatory)
            			client-secret: //OAuth2 server secret (mandatory)
            			client-name: //OAuth2 server name
           				scope: //Access roles
           			 	provider: //Provider name (line 16 of file 'custom-provider')
            			redirect-uri: //Url to user redirected user to after successful authentication and authorization
          			  	client-authentication-method: //Specifies the type of server authentication (basic, post, none)
        			   	authorization-grant-type: //Method by which the application obtains an access token (authorization_code, refresh_token...)
provider:
          		custom-provider:
            		token-uri: //URL to obtain the token
            		authorization-uri: //Application authorization URL
            		user-info-uri: //URL for obtaining user information
            		user-name-attribute: //Name of the field with the username
Next, add the following configuration in the «SecurityConfig.java» file of your project to create the login:
Seguidamente, añadiremos la siguiente configuración en el archivo de nuestro proyecto para crear el login:
@Configuration
public class SecurityConfig extends WebSecurityConfigurerAdapter {

    @Override
    protected void configure(HttpSecurity http) throws Exception {
        http.authorizeRequests()
         .anyRequest().authenticated()
         .and()
         .oauth2Login();
    }
}
Security filters
Spring Security has a number of default security filters to which you can add your own custom filters, at any point in the filter chain.
To do this, create a class for your filter in «CustomFilter.java»:
public class CustomFilter extends GenericFilterBean {

    @Override
    public void doFilter(

      ServletRequest request,
      ServletResponse response,

      FilterChain chain) throws IOException, ServletException {
        chain.doFilter(request, response);
    }
}
And later, add your filter, in the position you want, to a configuration class «CustomWebSecurityConfigurerAdapter.java»:
@Configuration

public class CustomWebSecurityConfigurerAdapter extends WebSecurityConfigurerAdapter {

    @Override
    protected void configure(HttpSecurity http) throws Exception {

        http.addFilterAfter(
          new CustomFilter(), BasicAuthenticationFilter.class);
    }
}
Apart from the «addFilterBefore» method, there are also the following ones:
- addFilterAfter(filter, class): adds the filter after the specified filter.
- addFilterAt(filter, class): adds the filter in the position of the specified filter.
- addFilter(filter): adds a filter that must be an instance or extend one of the filters already provided by Spring Security.
URL protection
Within the configuration class, you can define rules in which you indicate which URLs of your application you want to be protected, and which can be accessed without authorization.
To do this, you can define something like the example below in «CustomWebSecurityConfigurerAdapter.java»:
 @Override
 protected void configure(final HttpSecurity http) throws Exception {

        http.authorizeRequests().antMatchers("/admin**").hasRole("ADMIN")
        //We specify that the URLs belonging to /admin can only be accessed if you have the administrator role
        .antMatchers("/home").permitAll()
        //We specify that the start URL can be accessed by everyone
        .anyRequest().authenticated()
        //We specify that for the rest of the URLs not indicated above, you must be authenticated
Pre-Authorize
In addition to being able to add security filters for incoming HTTP requests to your application, you can add these checks at the method level, so that they are executed when that method is called (mainly those methods of the controllers). It is necessary for the application to have some type of authentication, or to administer a token to the methods that you want to add this security layer to.
These two features are not mutually exclusive, so the security filters that you have defined would be applied and, after having passed them, the Pre-Authorize checks would be executed.
To make use of Pre-Authorize, you must first add the following annotations to the configuration class «CustomWebSecurityConfigurerAdapter.java»:
@EnableGlobalMethodSecurity(prePostEnabled = true)
@EnableWebSecurity
To specify which methods are going to use this security layer, simply mark them with the following annotation in «RestController.java»:
@PreAuthorize("hasRole('ADMIN')") This example indicates that the user who has made this request, must have the administrator role to be able to access that resource. The following conditions can also be defined:
- hasAnyRole(‘Rol1’, ‘Rol2’,…) : specifies the list of roles that can access the resource in question.
- hasAuthority(‘Authority1’) : the user must have the corresponding authorization for that method.
- hasAnyAuthority(‘Authority1′, Authority2’, etc.) : specifies a list of the authorizations allowed for that method.
PostAuthorize
In addition to Pre-Authorize, there is Post-Authorize, which fulfills the same function but adds a security layer to the return of the method marked by said annotation.
CSRF
CSRF attacks are often used for Internet scams. Attackers take over a session authorized by the user to perform their scams using HTTP requests.
Through Spring Security, you can define security to prevent CSRF-type attacks. By default, protection against these attacks is enabled by default; even so it can be configured in «Configuration.java»:
@Override
protected void configure(HttpSecurity http) throws Exception {
    http
      .csrf().disable();

}
CORS
Cross-Origin Resource Sharing (CORS) is a mechanism for HTTP requests in which, through headers, a user is allowed to obtain permission to access resources from an origin other than the one to which the server belongs.
In order to allow these requests within your microservices, in your configuration class, you can extend the default Spring Security CORS filter in «Configuration.java»:
@Bean
public FilterRegistrationBean<CorsFilter> corsFilterOauth() {

        final UrlBasedCorsConfigurationSource source = new UrlBasedCorsConfigurationSource();
        final CorsConfiguration config = new CorsConfiguration();

        config.setAllowCredentials(true);
        config.addAllowedOrigin("*");
        config.addAllowedHeader("*");
        config.addAllowedMethod("*");

        source.registerCorsConfiguration("/**", config);
        final FilterRegistrationBean<CorsFilter> bean = new FilterRegistrationBean<>(new CorsFilter(source));
        bean.setOrder(Ordered.HIGHEST_PRECEDENCE);

        return bean;
    }
As you can see, configuring Spring Security is quite easy and offers several very interesting options for your projects.
If you have any questions, please leave us a comment and you will respond swiftly.
Header image: Matthew Waring at Unsplash.