
Kafka Connect
Kafka Connect is an open source Apache Kafka component that serves as a centralized data center for simple data integration between databases, key-value storage, search indexes, and file systems.
So far, it offers the following advantages:
- Data-centric pipelines: it uses comprehensive and useful data abstractions to consume or create data in Kafka.
- Flexibility and scalability: it runs with streaming- and batch-oriented systems on a single node (standalone) or scaled to an organization-wide service (distributed).
- Reuse and extensibility: it leverages existing connectors or extends them to fit the needs and to provide faster time to production.
Kafka Connect focuses on the transmission of data to and from Kafka, which makes it simpler to write high-quality, reliable, and high-performance connector plug-ins. Kafka Connect also allows the framework to offer guarantees that are difficult to achieve using other frameworks.
How does it work?
Kafka Connect can be deployed as a standalone process running on a single machine (for example, collecting records from a table), or as a scalable, fault-tolerant distributed service supporting an entire organization. In addition, it also offers a low barrier to entry and a low operational overhead. You can start with a standalone environment for development and testing, and then scale to a full production environment to support a large organization’s data pipeline.
It includes two types of connectors:
- Source connector: it ingests entire databases and transmit table updates to Kafka topics. Usually this process is done through the CDC (Change Data Capture) mechanism of the databases. They can also collect metrics from all its application servers and store the data in Kafka topics, making the data available for processing streams with low latency.
- Sink connector: it sends Kafka topic data to other data management systems, such as Elasticsearch, or to batch systems, such as Hadoop, for offline analysis.
Kafka Connect is usually integrated into a Kafka installation with the bare minimum necessary to start it. You only have to execute the initialization script of this system to be able to use it, as long as Kafka is working correctly. Once this is done, the normal thing would be to configure the connectors appropriately according to your needs, in either a standalone or a distributed way, and installing the necessary plug-ins to work with the different systems that are required.
How is it used?
This section could go much deeper, but we will just stay with the basic concepts you need to understand how to make Kafka Connect work. For more extensive detail, we recommend making use of its extensive documentation.
Standalone vs Distributed Modes
Connectors are logical units of work that run as a process. The process is called a worker in Kafka Connect, and there are two ways to run it:
- Standalone: it is useful for developing and testing on a local machine or on a development environment.
- Distributed: it runs the workers on multiple machines (nodes), which form a cluster. Kafka Connect distributes the running connectors across the cluster. You can easily add or remove nodes through an API as your needs evolve.
This mode is also more fault tolerant. For example, if a node unexpectedly leaves the cluster, Kafka Connect distributes the work of that node to other nodes in the cluster. Besides, as Kafka Connect stores configurations for connectors, status, and compensation information within the Kafka cluster, where it is replicated securely, the loss of the node where a worker is running does not result in any data loss.
Plug-in installation
A Kafka Connect plug-in is a set of JAR files that contain the implementation of one or more connectors, transformers, or converters. Kafka Connect takes care of isolating each plug-in from the others so that the libraries of one plug-in are not affected by the libraries of other plug-ins. This is very important when mixing and matching connectors from multiple vendors.
They can be arranged in the following ways:
- Directory: which contains all the necessary JAR files and third-party dependencies to run the plug-in. This form is the most common, and preferable.
- Single JAR file: which contains everything needed to run the plug-in.
The way to find the location of these plug-ins is through the configuration of the workers themselves, through the plugin.path variable. For example, in a Bitnami installation, these could be in the following location:
plugin.path=/opt/bitnami/kafka/pluginsThere are different alternatives for connectors, among which we can highlight the following ones:
- Debezium: open source platform where you can find connectors for relational and non-relational database management systems. It includes extensive and detailed documentation on each of the connectors, and on how to make them work.
- MongoDB Kafka Connector: open source connector for MongoDB, verified by Confluent.
- Confluent Hub: for when you are using Confluent as a platform.
Worker startup
We have previously explained that there are two ways to launch Kafka Connect: standalone and distributed. The difference between running one type of mode or another is generally launching a different script within the Kafka installation, that indicates which mode you want to run Connect in. This script must be launched with a specific configuration, because depending on what has been chosen, there are more variables that must be included within the configurable properties.
The difference is that, in standalone mode, you need to indicate a properties file to be loaded for each connector, while in distributed mode, it simply starts and later, through a centralized API on a specific port, the connectors and their settings can be managed.
Assuming that we have chosen a Bitnami distribution, these would be valid examples for each type:
Standalone Mode
/opt/bitnami/kafka/bin/connect-standalone.sh worker.properties connector1.properties [connector2.properties connector3.properties...]Where worker.properties would contain the configuration of the worker in standalone mode, and the following file/s would be the specific configurations of each connector.
Distributed Mode
/opt/bitnami/kafka/bin/connect-distributed.sh worker.propertiesIn this case, you would only need to include the configuration of the worker in distributed mode. It includes more necessary options such as definition of groups, port and path where the API will be located, etc.
Example with MongoDB
Considering all of the above, let’s nowsee a practical example with MongoDB using its official connector. The first thing you will therefore need, is to have a MongoDB instance, and in replica mode since it is a necessary requirement for connectors of this type of database.
Worker configuration
First of all, you have to create a simple configuration to be able to start the worker. You can do it in a simple way with the standalone mode.
standalone-worker.properties
########################
# GLOBALES
########################

bootstrap.servers=<URL_DEL_BROKER_DE_KAFKA>:<PUERTO_DEL_BROKER_DE_KAFKA>
plugin.path=/opt/bitnami/kafka/plugins

########################
# SEGURIDAD
########################

# Sin seguridad óptima, para realizar pruebas en un entorno local
# Se recomienda configurar apropiadamente estas variables de seguridad para un entorno de desarrollo y productivo
sasl.mechanism=PLAIN
security.protocol=PLAINTEXT
consumer.sasl.mechanism=PLAIN
consumer.security.protocol=PLAINTEXT

########################
# CONVERSIONES
########################

# A nivel centralizado podemos definir como resolver las claves y los valores,
# pero también se puede indicar a nivel de conector
# key.converter=org.apache.kafka.connect.json.JsonConverter
# value.converter=org.apache.kafka.connect.json.JsonConverter
# key.converter.schemas.enable=true
# value.converter.schemas.enable=true

########################
# OFFSET SETUP
########################

offset.storage.file.filename=/tmp/connect.offsets
offset.flush.interval.ms=10000
Connector Configuration
Let’s add a simple configuration that listens to a specific collection within MongoDB and logs its changes.
mongodb-connector.properties
name=<NOMBRE_IDENTIFICATIVO_CONECTOR>
connection.uri=mongodb://<IP_MONGODB>:<PUERTO_MONGODB>/<COLECCION_MONGODB>
connector.class=com.mongodb.kafka.connect.MongoSourceConnector
database=<BASE_DE_DATOS_A_ESCUCHAR>
collection=<COLECCION_DE_LA_BASE_DE_DATOS_A_ESCUCHAR>
tasks.max=2
key.converter=org.apache.kafka.connect.storage.StringConverter
value.converter=org.apache.kafka.connect.storage.StringConverter
key.converter.schemas.enable=false
value.converter.schemas.enable=false
publish.full.document.only=false
pipeline=[{"$match":{"$or":[{"operationType":"insert"},{"operationType":"update"},{"operationType":"delete"}]}}]- Conversion values have been defined as
StringConverterbecause they are easier to process by Spring Boot thanJSONConverter. There are different types of conversion classes, and they can be used to the user’s requirements. - We have indicated that we want not only to be shown the document that has changed. In this way, we can control the types of operations that are done on the MongoDB documents; while, in the other way, we would only see the result of the change.
- We have added a pipeline where we basically say that we only want to listen for insert, update, and delete operations. Many types of operations can be defined within the pipeline, as long as MongoDB allows it.
Launching the worker
Once we have the configurations and the database correctly configured, it is time to launch Connect. To do this, use the following command:
/opt/bitnami/kafka/bin/connect-standalone.sh $RUTA_FICHEROS_CONFIGURACION/standalone-worker.properties $RUTA_FICHEROS_CONFIGURACION/mongodb-connector.propertiesThis will start the connector that will continuously listen to the specified MongoDB collection in this case. Once the changes are processed, it will register them in a topic. What is the name of this topic? Default is <DATABASE_NAME>.<COLLECTION_NAME>.
Testing the connector
Now you only have to launch a request to MongoDB and consume the topic, for example from a console consumer with the following command:
/opt/bitnami/kafka/bin/kafka-console-consumer.sh --bootstrap-server <IP_BROKER_KAFKA>:<PUERTO> --topic <NOMBRE_BD>.<NOMBRE_COLECCION>Then launch a request, for example from an IDE like MongoDB Compass:
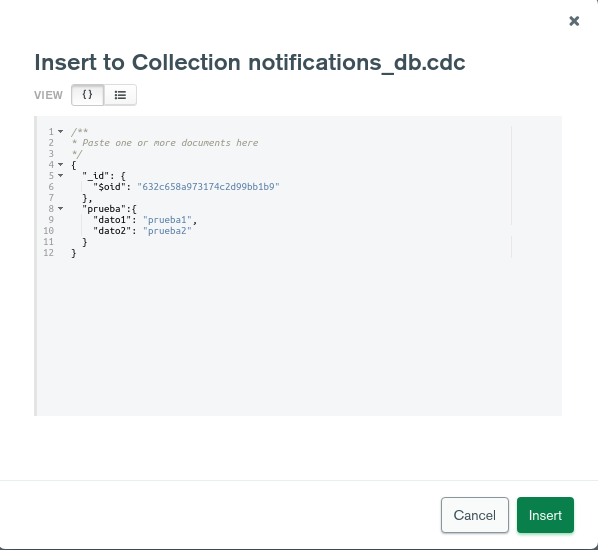
And finally see how the connector indeed registers that insertion event in the topic:
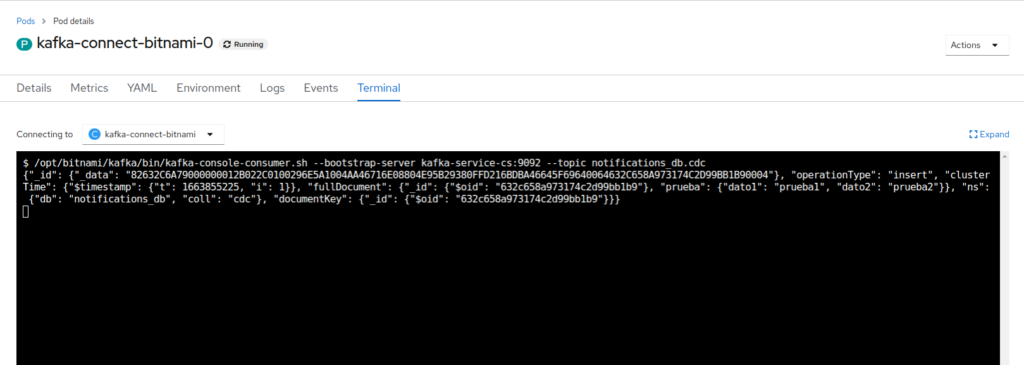
As we can see, and as we said under configuration, this shows detailed information about the operation that has been carried out, along with the document generated. This schema changes according to the type of operation, so you have to be aware of the events that are generated in Kafka through the connector.
Conclusions
Kafka Connect is a flexible, scalable, reusable, extensible solution that helps you monitor changes to your data and generate events with them, and then process them as needed. We found a number of useful scenarios where this solution is quite suitable, such as:
- Saga Pattern: to generate the events that allow maintaining consistency between different entities in an optimal way.
- Migration process: useful for when you have a complex migration process and data consistency between the different entities must be maintained while the migration itself is being completed.
- Replication of a persistence system for unattended historical data.
- Sending notifications when an event that needs to be monitored in your database occurs, such as the removal of a user.
References
Header image: openlogic.com


Pingback: Release 4.3.0-Quest for Onesait Platform – Onesait Platform Community