Spring Cloud Streams Guide for EDA
Spring Cloud Streams is a project built on top of Spring Boot and Spring Integration that will help us build applications using event-driven patterns. As it is developed on these projects, its use is very simple for developers, since it requires minimal configuration and the use of Spring annotations.
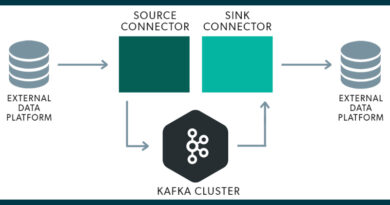
As an event manager, it allows us to make use of most of currently existing message managers, such as: Apache Kafka, RabitMQ and Amazon Kinesis, among others.
For more information, visit the official documentation.
How to use it
To use the library, the first thing we must do is import the maven dependency in the pom of our project.
spring-cloud-streams dependency
<dependency>
    <groupId>org.springframework.cloud</groupId>
    <artifactId>spring-cloud-stream-binder-kafka</artifactId>
</dependency>
This library must be imported in both the sending and receiving projects.
In the case of the sender, we must configure the bindings (or event channels) in which we will send the generated events. We can do this by modifying the application.yml file of our project.
YAML Publisher Configuration
spring:
  cloud:
    stream:
      bindings:
        users: # Binding name
          destination: users_event # Output channel
          binder: local_kafka # Desired broker binder
      kafka: # Broker connection data
        binder:
          brokers:
          - localhost:19092 # kafka brokers
      binders: # List of available brokers
        local_kafka: # Broker name
          type: kafka # Broker type
To send events, we must create an interface in charge of linking this YAML configuration data. To do this, we will create the following interface.
Binding Publisher Interface
public interface UsersChannel {

    @Output("users") // Binding name
    MessageChannel output();

}
Once the interface is created, we can create a service that sends the events.
publisher class
@Slf4j
@Component
@EnableBinding(UsersChannel.class) // Tab to be able to select the binding to use
@RequiredArgsConstructor(onConstructor = @__(@Autowired))
public class UsersPublisher {

     private final UsersChannel source;

    public void newUser(UserKafka user) {

        log.info("Sending newUser: {}", user);
        source.output().send(MessageBuilder.withPayload(user).setHeader("operation", "new").build());
        log.info("Message sent successfully");
    }

    public void deleteUser(UserKafka user) {
        log.info("Sending deleteUser: {}", user);
        source.output().send(MessageBuilder.withPayload(user).setHeader("operation", "delete").build());
        log.info("Message sent successfully");
    }
}
We can add headers that will be automatically added to the event in Kafka so that we can then filter on the subscriber as we will see below.
With these simple steps, we have already created the issuing micro-service. In order to create the subscriber, we must follow some similar steps. Firstly, we need to modify the YAML.
YAML Subscriber Configuration
spring:
  cloud:
    stream:
      bindings:
        users: # Binding name
          destination: users_event # Input channel
          group: homeQueue_users # Kafka GroupID
          binder: local_kafka # Desired broker binder
      binders: # List of available brokers
        local_kafka: # Broker name
          type: kafka # Broker type
      kafka:
        binder:
          brokers:
          - localhost:19092 # Kafka brokers
Next, just like in the publisher, we’ need to create an interface to bind the YAML data.
Binding Subscriber Interface
interface InputBinding {

    @Input(value = "users")
    SubscribableChannel channel();

}
Finally, we will need to create a class that listens to all the events generated by the publisher. Since we have two events to create and delete, and we have added the headers, we can create two methods that listen and filter the events.
Subscriber class
@Slf4j
@EnableBinding(InputBinding.class)
public class UsersSubscriber {

    @Autowired
    private UsersRepository repository;

    @StreamListener(target = "users", condition = "headers['operation']=='new'")
    public void processUser(UserKafka user) {
        log.info("User NEW recived: {}", user);
        Optional<UserDocument> optUser = repository.findByUserId(user.getId());
        if (!optUser.isPresent()) {
            UserDocument doc = new UserDocument(user.getId());
            repository.insert(doc);
        }
    }

    @StreamListener(target = "users", condition = "headers['operation']=='delete'")
    public void processDeleteUser(UserKafka data) {
        log.info("User DELETE recived: {}", data);
        Optional<UserDocument> optUser = repository.findByUserId(data.getId());
        if (optUser.isPresent()) {
            repository.delete(optUser.get());
        }
    }
}
This way, in the first method we will read the events that have the header «operations = new», and in the second method, only those that have the header «operations = delete» will arrive.
Example
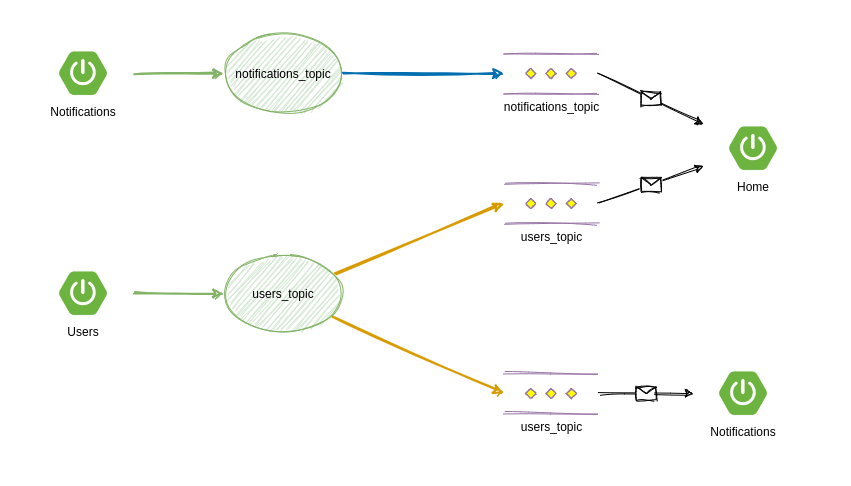
We are going to analyze an example applying the EDA pattern for three micro-services, which will obtain different events in their respective channels.
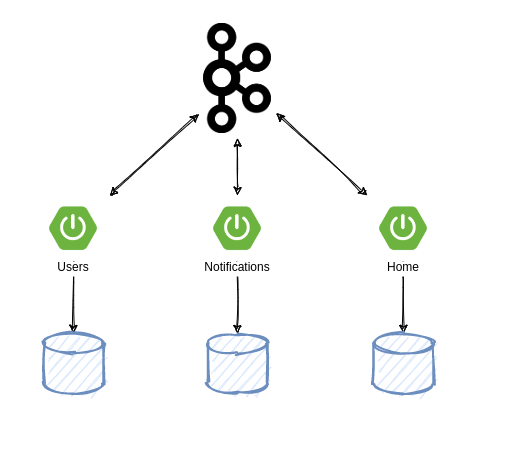
As we can see, each of the micro-services will have a different database and will share data through a messaging broker, in this case, Kafka.
When the Users micro-service receives a request from the user to create a new one or delete it, events will be sent to two other micro-services, Notifications and Home, so that, when they receive these events, each one will create or delete from their database the user who registers. For that reason, there will be a communication channel in which we will send all user events.
On the other hand, the Notifications micro-service will have an Endpoint in which, when a user creates a new notification, an event will be automatically sent through another channel, which in this case will only be received by the Home micro-service, which will be used to list all the created notifications.
Instructions
1. Clone the GitLab project.
git clone https://gitlab.devops.onesait.com/onesait/onesait-architecture/examples/eda/spring-cloud-streams 2. Access the project’s «sources» folder and build the necessary Docker containers. To do this, a Docker Compose is available:
cd spring-cloud-streams/sources
docker-compose up -d
With this, we will build three Docker containers: on the one hand, we have MongoDB, that will use the services as a database; and on the other hand, we have Kafka and Zookeper, which will be used as event managers. It is important not to modify ports or credentials of these containers. If you do, you will have to enter the application.yml and modify the settings.
3. Start each of the services: «home», «notifications» and «user». This can be done from sts or from the console:
cd home
mvn spring-boot:run

cd user
mvn spring-boot:run

cd notifications
mvn spring-boot:run
With this we have had started all we need.
4. Access the swagger service user: http://localhost:8090/users/swagger-ui.html and create a user; the user id will be returned.
5. Access the swagger notification service: http://localhost:8092/notifications/swagger-ui.html and create a notification with the obtained user id.
6. Access the home service swagger: http://localhost:8091/home/swagger-ui.html , where we can list both the users and the notifications that have been created in the «home» database, and that have come through Kafka events.
Header image: photo by Liana Mikah in Unsplash