
Multi-language module
Today I want to tell you about our multi-language module, a functional accelerator designed by the Minsait Architecture group with the possibility of being integrated into any project. Next, I will detail its functionality.
What is it for?
The need to prepare our digital businesses, and therefore our products, for the different languages that our customers can speak, entails the design of our solutions considering their multi-language, and in most cases with coverage or experience aimed at non-technical users, meaning that product languages can be changed or added without the help for a technical user and without the need for software changes or redeployments.
The multi-language module aims to prepare our digital businesses -and therefore our Products- for the different languages that our customers may speak. This will allow us to include, from the design of our solutions, the management of their languages from a web module with UI that is intended for non-technical users, thus enabling the channel to change or add Product languages without the need for changes or redeployments of the software.
This is why we have this module available, it being focused on the bulk of the multi-language needs of a web product, which are the UI labels of our product.
Features
This module has the following features:
- It does not require technical knowledge: because the text strings for each required language can be configured from a console.
- Integration through API REST: for direct consumption.
- Instant and dynamic changes: all the changes made in the language strings will be immediately reflected in the Front-End part.
How does it work?
Once the user has signed up and registered in the application, there is a menu on the left side, with several options:
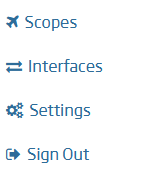
We will now see what each option means.
Scopes
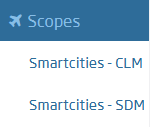
Within the «Scopes», we will find all the products or modules available in the database. To access only one of them, we have to click on its name, and this way we will access its different modules.
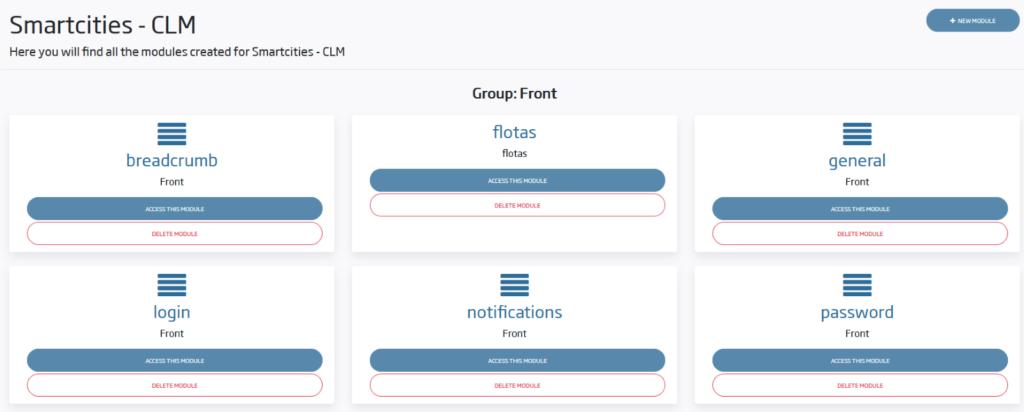
Once we have clicked on the product/modules, we will access the different modules that have been created for it. For example, in the case of Smartcities – CLM, we will see the following:
Module creation
To create a new module, we must click on the «New module» button on the top right, then fill in the fields specified in the image:
- Id: identifier of the vertical. Must be unique.
- Name: name associated with the vertical.
- Description: a description of the vertical.
- Group: group within the product where the vertical will be inserted. If we choose one that does not exist, then a new group will be created.
- Icon: icon associated with the vertical.
Once all the fields have been completed, we must press the «Save changes» button to save the changes.

Module removal
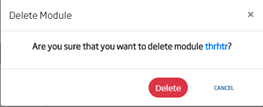
To delete a module, we will click on the «Delete Module» button. We will get a confirmation modal message, so as to be sure that we want to delete the module.
Translation Management
Once we have created the module, we can access it by clicking on the «Access this module» button. Within it, we click on the «New Area» button and select the following option:
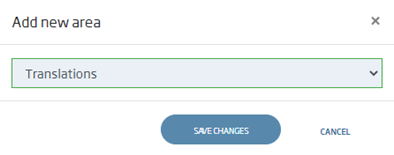
We create the translations area. By clicking on the «Translations» button that will have been generated when saving the changes, we can create the different key-value pairs for the different utilities that we want to give it.
Create translations
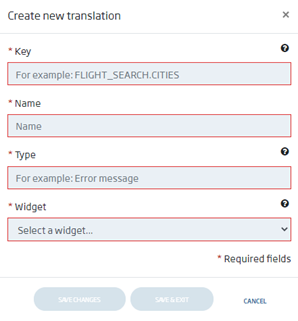
By clicking on the «New translations» button, we can create a new key-value pair, filling in the form as follows:
- Key: key associated with a translation. Must be unique.
- Name: common name that we want to give to the translation
- Type: specification of the type of translation.
- Widget: there are three options to choose from:
- Textbox: used to specify translations of a word.
- Textarea: used to associate compound translations such as sentences.
- Textunit: used to specify both the singular and the plural forms of a word.
Once we have completed the fields we will have two possible options:
- Press the «Save changes» button, which will allow us to continue creating keys for the different translations.
- Press the «Save & Exit» button, which will allow us to exit the window once the change has been saved.
Once we have performed all the previous steps, the created element will appear in the lower table:
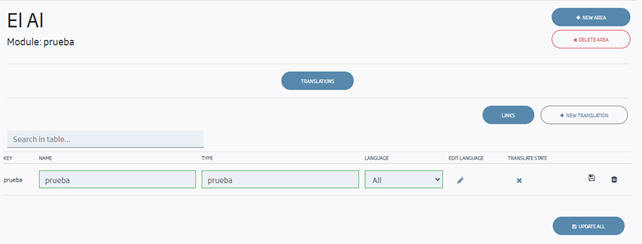
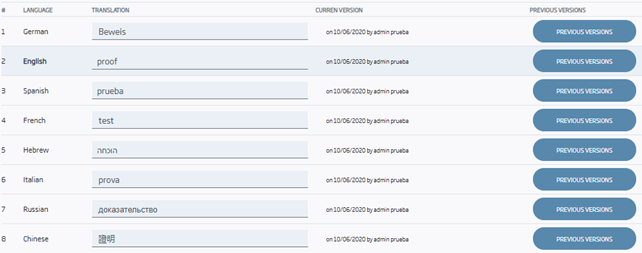
To edit the values associated with that key, we must click on the pencil icon located at the bottom of «Edit Language», thus appearing the table that we must fill in with the different values:
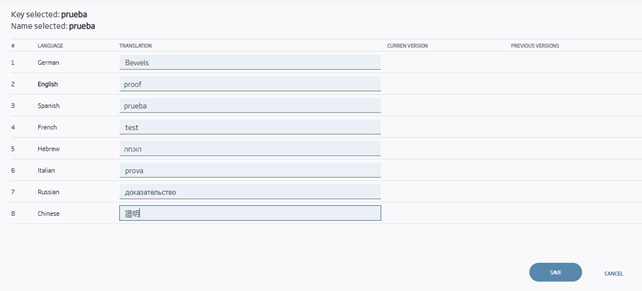
Once we have filled them in, we press the «Save» button to save the changes.
By clicking on the button, we can find the way to obtain the translations associated with a given module. For this specific case, if we want to return all existing key-value pairs for a specific language in JSON format, we must call the following URL:
// Para el idioma, utilizaremos su código ISO 639‑1 (es, en, pt, etc.)
[HOSTPORT] + /ibe/rest/scopes/elal/modules/prueba5/translations/[language]
This will return the translation object in the selected language:

Delete translations
To delete a key and its associated translations, we simply have to click on the button with the trash can icon, that we will find to the rightmost of the row of the key that we want to delete, then confirm it by clicking on the «Delete» button.
Modify translations and version management
To edit the values associated with a key, we will have to press the button with the pencil icon, change the value or values that we want, then press the «Save» button.
If, for some reason, we want to return to any of the previous versions in any value that we have changed, we must click on the button with the pencil icon, and then the button «Previous versions» that we will find next to each value, then select the version we want to return to, by pressing the «Rollback» button and confirm it by pressing the «Rollback» button.
Settings
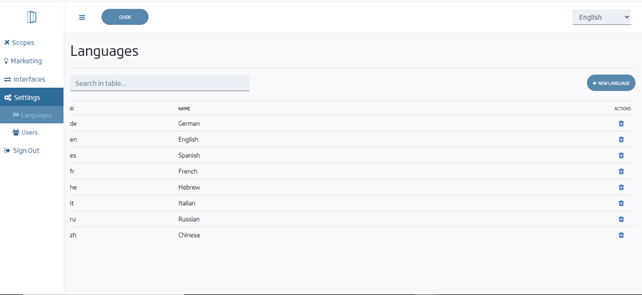
To add or delete the languages that we will see in the translations, we must click on «Settings > Languages», as we can see below:
Add new language
To add a new language, we must click on the «New language» button, in the upper right part of the window. Then, the following window will appear:
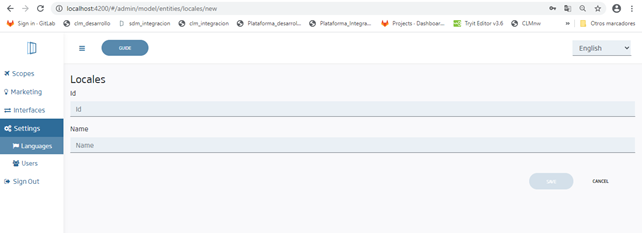
In this window, we must fill in the id, which must be unique for each language, and the name that we want to add to it. Once we have filled in the fields, we press the «Save» button and we confirm the operation.
Delete a language
To delete a language we must go to the «Languages» tab, and then we must click on the trash can to the right of the language that we want to delete.
As we have seen, managing the languages of a project is something simple and quick to prepare, so that we can easily add new languages as well as new terms. Besides, this LowCode-type tool allows non-tech-savvy people to easily prepare multilanguage characterization.
Header image: Jeremy Bezanger at Unsplash