Deploying the Onesait Platform Community Edition with Docker and Docker Compose
Taking advantage of the recent release of our Platform’s Community Edition version 2.0.0, we would like to explain you how to deploy it using containers in Docker and with Docker Compose.
First of all, we have to meet certain prerequisites to be able to do this.
Prerequisites
To build the Community Edition (from now on, CE) in an environment, we must consider the following prerequisites:
Have Docker installed
It may sound obvious enugh, but we must have a Docker installed on the machine where we want to run the Onesait Platform CE version.
To install the Docker, simply download it from its official website and follow the installation steps indicated.
Having the Docker Compose installed
Yes, it is also necessary to have it previously installed in the machine where the installation will be carried out.
As in the previous case, you can download it from the Docker page.
There’s something important here you must know: Once we have installed the Docker, both in Windows and MacOS environments, you will need to increase the memory assigned to the Docker service. We recommend that you increase the memory to at least 8GB, and specify at least 2GB of swap.


Windows environment: have the right docker shared file system configuration
In the case of Docker for Windows, it uses a shared file system configuration, for which we need to establish the user credentials (permissions on the file system). These settings can be changed in Settings > Reset Credentials.

So, once we meet these requirements, now we can start the Platform’s deployment.
Deployment
Let’s roll up our sleeves. The deployment will be carried out by following these steps:
1.- Download the Docker Compose files to set up the Platform’s services
These files, in yml format, are in the Platform’s repository in our GitHub.

To obtain them, we need to locally clone the repository and position ourselves in the «master» branch. We will do this using the following command lines:
git clone https://github.com/onesaitplatform/onesait-cloud-platform-community-deploy.git
cd onesait-cloud-platform-community-deploy
git fetch origin master
git checkout master
2.- Launching the persistence services
We will have to place ourselves in the directory where the docker-compose.yml file is located. This file is in charge of setting up the database services. This is done with this command line:
cd onesait-cloud-platform-community-deploy/op_dataOnce in that directory, we should be able to see the following files:

By analysing the «.env» environment file, we will ensure that the keys have the following values:
| key | value |
| MODULE_TAG | 2.0.0-ce |
| MONGO_TAG | latest-noauth |
| PERSISTENCE_TAG | mariadb |
| QUASAR_TAG | 14 |
| REPOSITORY | registry.hub.docker.com |
About the «docker-compose.yml» file, if we want to launch the databases without persistence, we will execute from a terminal the following command, in the same directory where the file is located:
docker-compose up -dBe very careful with this last option, since in the case of lifting the databases in ephemeral mode, when stopping the services with docker-compose down, we will lose all the data.
If we want to persist with the databases, go the «.env» file and specify there the directories in your machine where you want to store the data – because these have no default value assigned. As an example, we could say:
| key | value |
| CONFIGDB_VOLUME | /Users/devopsuser/configdbdata |
| REALTIME_VOLUME | /Users/devopsuser/realtimedbdata |
Next we launch the «docker-compose.persistent.yml»using the following command in the console:
docker-compose -f docker-compose.persistent.yml up -dOnce the databases are up, we can see what state they are in by using the following command:
docker psWe should then be able to see an output like the one below, in which we check that «configdb», «realtimedb» and «quasar» have been launched.

Lastly, if we want to see the records of a database container, we will only have to execute one of the following commands:
docker logs <container_name>

docker logs -f <container_name> (-f equivale a un tail)
3.- Populate the databases
In the same directory where we are, «onesait-cloud-platform-community-deploy/op_data», there is another docker-compose file in charge of setting up the initial data loading service.
If we are configuring the Platform through the machine’s hostname, we must replace «localhost» in the «SERVER_NAME» variable of the docker-compose.yml file with the machine’s hostname.
Next, as previously done, the following command will be executed:
docker-compose -f docker-compose.initdb.yml upOnce this is done, the Platform’s ConfigInit must be executed.

In this case, the -d flag (detached mode) has not been included because the service itself is stopped once its task has been completed.
When it finishes, we should launch it a second time to populate the realtimedb, now changing the variable «LOADMONGODB» in the «docker-compose.initdb.yml» file to value «true».
docker-compose -f docker-compose.initdb.yml up4.- Launching the Platform’s modules
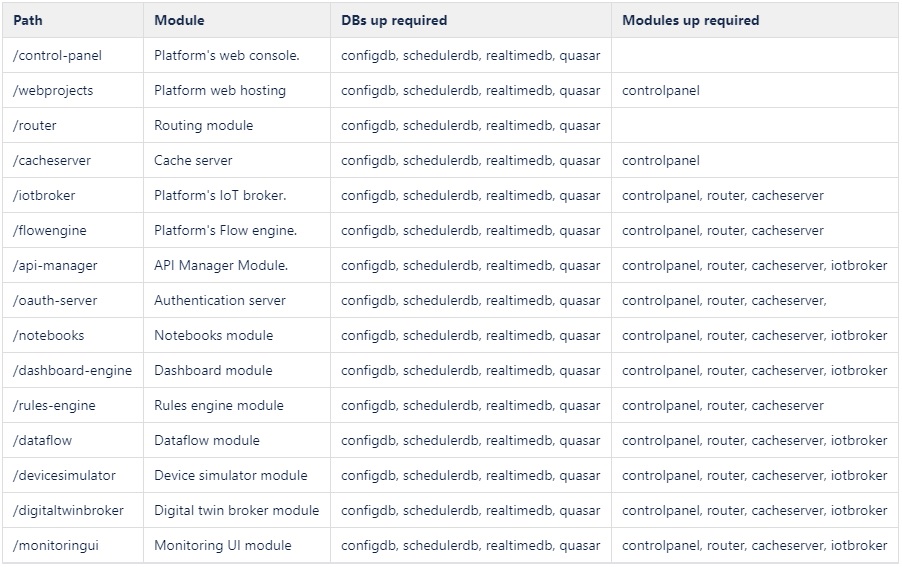
Same as we did with the persistence services, we are going to launch the Platform’s different modules with the docker-compose, in the order of start-up, and in the directory «onesait-cloud-platform-community-deploy/op-modules».
The modules in question are these:
Each of the directories contains two files; the “.env” «.env» and the «docker-compose.yml».
For the first file, the «.env», we have to check that it has the following values defined:
| key | value | description |
| REPOSITORY | registry.hub.docker.com | registration with service image |
| SERVERNAME | localhost | hostname de la máquina anfitriona |
| MODULE_TAG | 2.0.0-ce | etiqueta de la imagen del servicio |
About the second one, the «docker-compose.yml» contains the description of the service, volume mapping, ports, subnets, etc.
As we said before, if we configuring the Platform through the machine’s hostname, «localhost» must be replaced in the docker-compose.yml‘s «SERVER_NAME» variable (or «SERVERNAME» in the case of the “flowengine”) with the machine’s hostname.
To launch each of these modules, we need to position ourselves in the module directory from the command line, then execute the following command:
docker-compose up -d5.- Launch the reverse proxy service (NGINX)
To do this, we go to the «onesait-cloud-platform-community-deploy/op-modules/nginx-proxy» folder, where the NGINX service is located. This container should have a volume mapped to it with the configuration file needed to redirect the requests that come to the ControlPanel.
There you will find several files. One of them is nginx.conf, where all the modules are indicated, and one for each module (controlpanel.conf, dashboardengine.conf, etc).
We must only edit the nginx.conf file and replace the string «${SERVER_NAME}» with the Docker host machine’s hostname (you can get it from the command line by running the «hostname» command).
So, before indicating the name of the server, this should be the output:
server {
    listen 443 ssl;
    # Replace ${SERVER_NAME} with name obtained from console command output: "hostname"
    server_name ${SERVER_NAME};
After setting a name – say «user-pc», this will be the output:
server {
        listen 443 ssl;
        # Replace ${SERVER_NAME} with name obtained from console command output: "hostname"
        server_name user-pc;
By default, inside nginx.conf, only the controlpanel line is uncommented, so we need to uncomment the «include» lines that are necessary for the modules we are launching.

I’d like to remind you here that you should never uncomment those «include» of modules that are not working, because the nginx will constantly restart when it can’t find them.
After finishing with nginx.conf, we must now generate the certificates with the «generate-certificates.sh» script that is included. We will do this with the following command:
sh generate-certificates.shWe must also modify the following variables in the script:
# Set IP and COMMONNAME
export IP="172.22.11.203"
export COMMONNAME="localhost"
# Comment SO not used
SEP="//" # WINDOWS
#SEP="" # OTHERS
When we run it, a «tls» directory will be generated and mapped to the container.
Once the script is edited, we will launch the service as we have done before, from the «nginx-proxy» directory, and then we will run the following command:
docker-compose up -dOnce this has been done, we can access the ControlPanel by entering the following URL in the browser: «https://<hostname>/controlpanel»

And how can I access it? By using one of the following credentials:
- administrator/Community2019!
- developer/Community2019!
- analytics/Community2019!
That wasn’t so painful, was it? We hope you found it interesting. If you have any questions, please do not hesitate to leave us a comment.
Lastly, remember that you can access all our deployment and installation guides in our Development Portal.