Workshop on the Platform. Part II: Data Entry
In the first part of this workshop, we talked about the components that were going to be used and we registered two ontologies. In this second part, we will focus on data input from an Open Data portal using Flow Engine.
We will create two information flows, one for each service, which will consult the information, transform it to the semantic format of the defined ontology, and store it in the corresponding ontology.
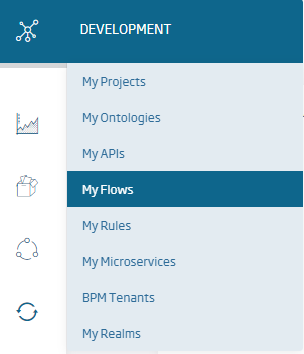
To create the flows, access the Platform’s Flow Engine from the menu Development > My Flows
If you have not previously created a domain name, an empty list will appear.
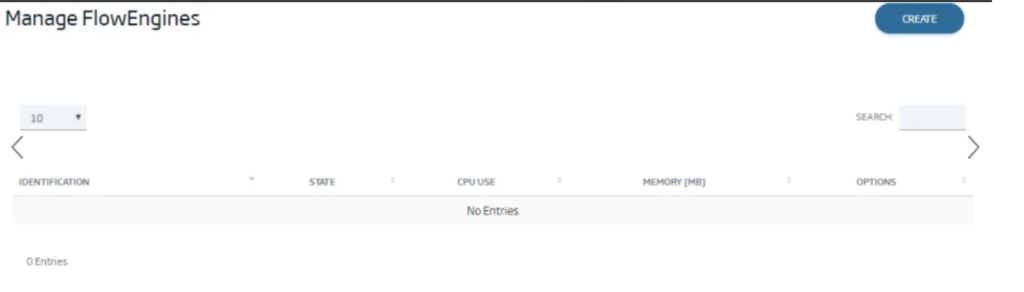
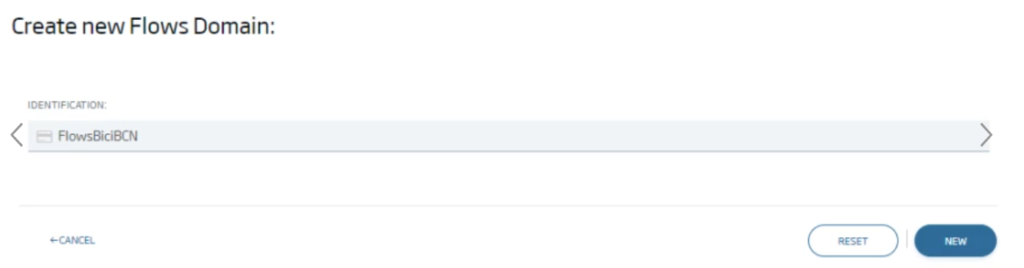
In this case, you will have to create an instance of the flow engine by pressing the «Create». button. A screen will open from where you can give an identification to our instance and create it by clicking on «New».
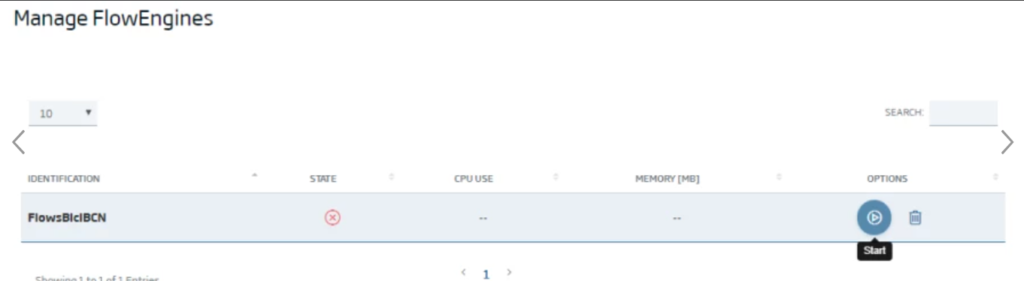
This will instatiate your flow engine, which you can start by clicking on «Start»:
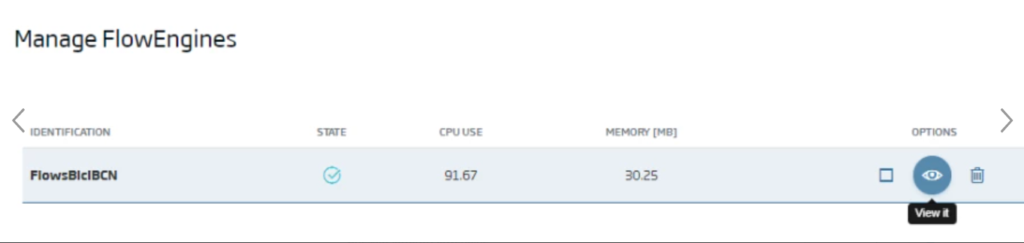
Once started, access the flow editor by clicking on «View it»:
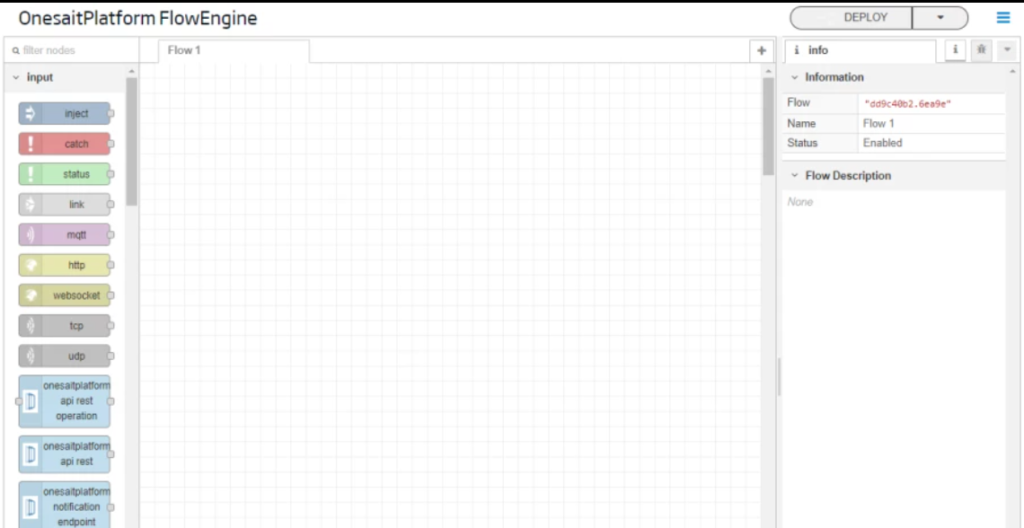
Another screen will open with the flow editor mode:
Station Inventory Ingest Flow
Now, you will program a flow that will daily connect to the Open Data service, query the inventoried stations, convert this information to the semantic model of the Platform (BicingBCN_Inventory ontology) and store it in the ontology.
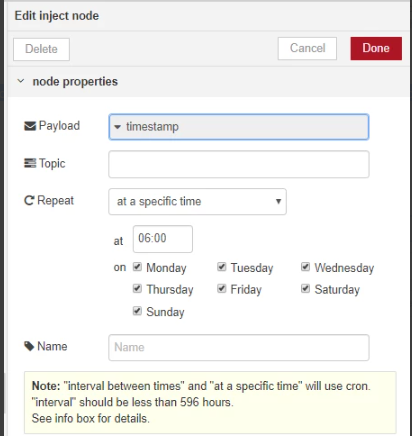
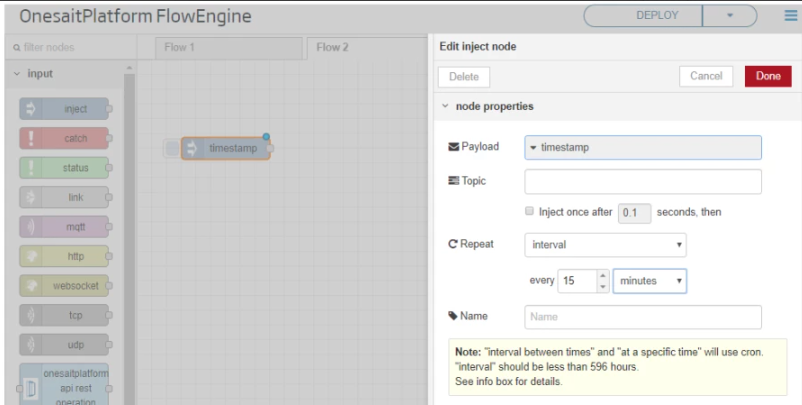
To do this periodic flow launch, program the periodic execution of the flow using an inject type node. To implement it, find the node in the palette and drag it to the grid.
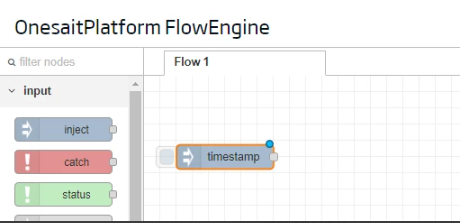
Next, double-click on the node to access its configuration, and configure it to run every day at 06:00. After that, click on «Done».
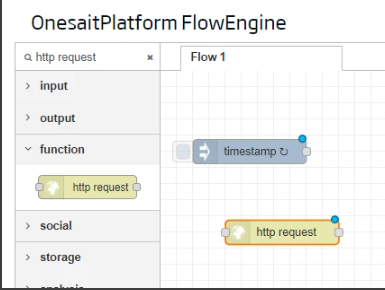
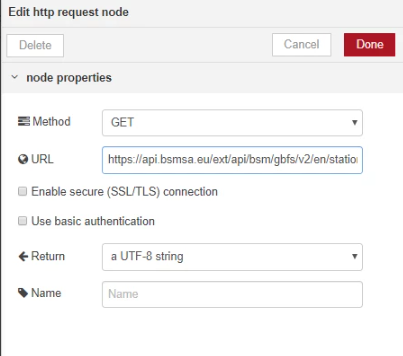
To carry out the Open Data service invocation, the next step in the flow is to retrieve the information of the stations from the Open Data service. To do this, use a HTTP Request type node, which you must find also in the node palette and drag to the grid.
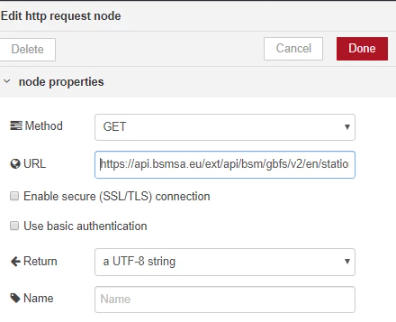
Then, double-click on it to establish its configuration, indicating the URL it must invoke, and click on «Done».
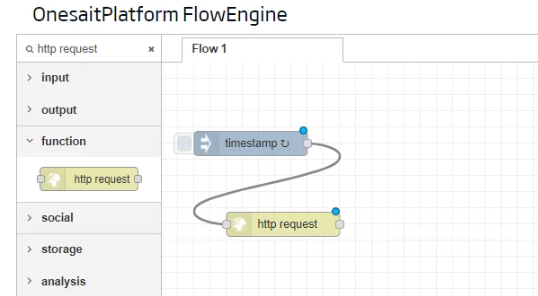
Finally, establish the connection with the previous node to connect it to the flow.
Once connected, you can test the flow to verify that the output of the HTTP request node is the response of the Open Data service. To do this, connect it to a debug type node. This node shows, in the tool’s debug console, the output message of the node that is connected to it.
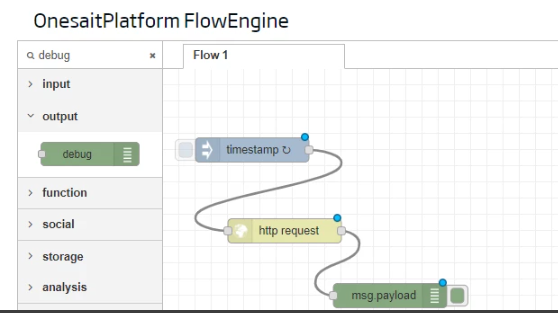
Then, deploy the flow by pressing Deploy and you can test it by enabling the debug tab ![]() and pressing the inject node button.
and pressing the inject node button.

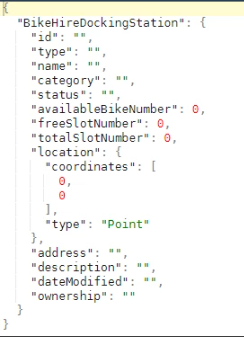
Once this is done, the next step will be the conversion of the information to the ontology semantic model. The information retrieved from the Open Data service is a list of stations with the following format for each one:
{
   "station_id": 1,
   "name": "GRAN VIA CORTS CATALANES, 760",
   "physical_configuration": "ELECTRICBIKESTATION",
   "lat": 41.3979779,
   "lon": 2.1801069,
   "altitude": 16.0,
   "address": "GRAN VIA CORTS CATALANES, 760",
   "post_code": "08013",
   "capacity": 46,
   "nearby_distance": 1000.0
}
And to store them in the platform it must be converted it to the model defined in the BicingBCN_Inventory ontology, where the instances must have the following structure:
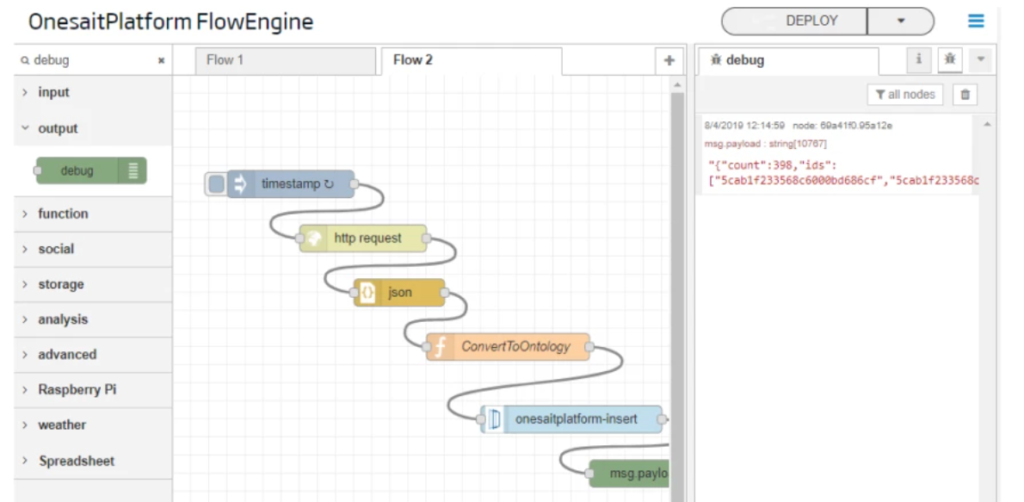
To do this, in the flow, convert the response of the Open Data service, which is a string with the JSON of the response, to a pure JSON object model. To do this, connect a JSON type node, which does exactly that, it converts the service response into an array of JSON objects.
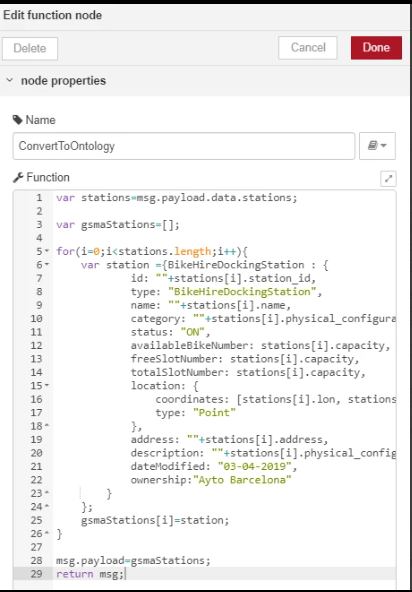
After that, process the array of stations with the Open Data service format, converting it into an array of stations with the BicingBCN_Inventory ontology format. To do this, use a Function type node, which allows you to program logic in JavaScript language. Double-click on the recently-added Function type node to configure it, including the following code, which performs the transformation process indicated above, then press «Done»:
var stations=msg.payload.data.stations;var gsmaStations=[];for(i=0;i<stations.length;i++){var station ={BikeHireDockingStation : {id: ""+stations[i].station_id,type: "BikeHireDockingStation",name: ""+stations[i].name,category: ""+stations[i].physical_configuration,status: "ON",availableBikeNumber: stations[i].capacity,freeSlotNumber: stations[i].capacity,totalSlotNumber: stations[i].capacity,location: {coordinates: [stations[i].lon, stations[i].lat],type: "Point"},address: ""+stations[i].address,description: ""+stations[i].physical_configuration,dateModified: "03-04-2019",ownership:"Ayto Barcelona"}};gsmaStations[i]=station;}msg.payload=gsmaStations;returnmsg;
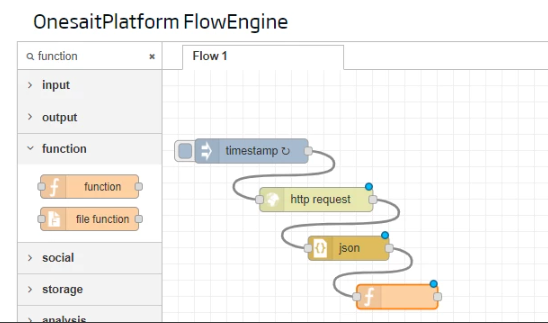
Your final flow should look like this:
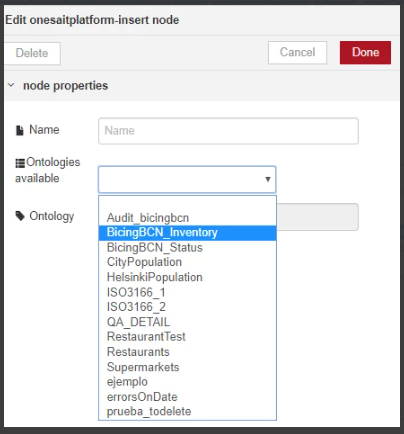
The next step will be to insert in the Platform. Therefore, once the information has been converted to the ontology format, it can be stored in the Platform. Include in the flow a node of onesaitplatform-insert type, double-click on the node, configure the BicingBCN_Inventory ontology as destination of the information and click «Done».
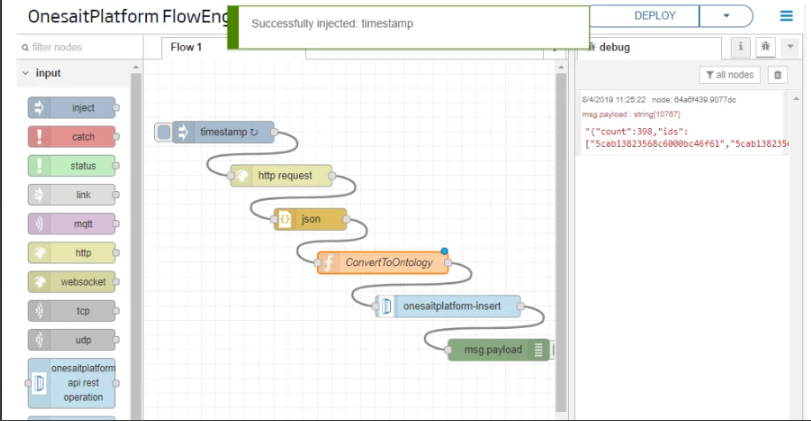
Add a debug type node to visualize the result of the insertion in the debug tab, which, as it is an insert, will be the number of elements inserted in the Platform. After deploying and testing what is obtained, you can see your finished flow:
Next, you will proceed to delete previous records; as you saw when you started the flow, this is a flow that will be executed periodically, every day, so, in each execution, the inventory should be updated. The easiest way to to so is to previously delete the stations of the last execution of the flow, then reload those of the current execution. To do this, add another node to the flow for the deletion of stations just before the flow is launched.
To do this, add a node of onesaitplatform-query-static type and connect it to the initial node (you must also add a debug type node to display the result).
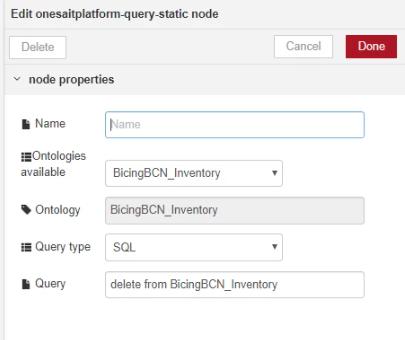
Double click on the onesaitplatform-query-static node and configure the ontology you want to delete: BicingBCN_Inventory and the SQL statement: delete from BicingBCN_Inventory. Now click «Done».
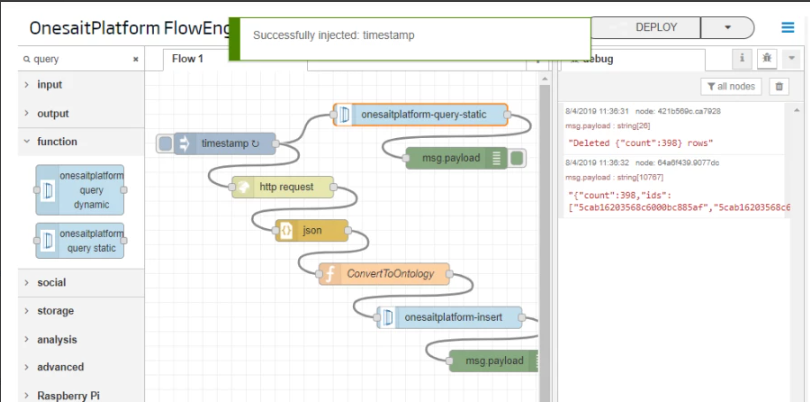
Deploy again and check, in the debug tab, that first the previous information is deleted and then the new one is stored.
Station status ingest flow
The station status ingest flow is very similar to the previous one. It requires the same nodes, only changing the data source service and the BicingBCN_Status destination ontology, so we will not go into so much detail.
Start by creating a new flow. To do this, click the ![]() button to add a new tab with a new blank grid to define another flow.
button to add a new tab with a new blank grid to define another flow.

Again, schedule a periodic release of the flow. To do this, prepare the flow’s periodic launch using an inject type node. As this is the state of the stations, configure the node to be executed every 15 minutes.
The next step in the flow is to invoke the Open Data service to retrieve the status information of the stations from the Open Data service.
Then, you will carry out the conversion of the information to the semantic model of the ontology. The information retrieved from the Open Data service is the list of stations with their status, meaning that, to store them in the platform, you must convert that to the model defined in the BicingBCN_Status ontology.
To do this, use again the JSON node to convert the string into a pure JSON and add a Function type node with the following code:
var stations=msg.payload.data.stations;
var ontologyStations=[];
for(i=0;i<stations.length;i++){
var station= {BicingBCN_Status: {
station_id:""+stations[i].station_id,
numBikesAvailable:stations[i].num_bikes_available,
numBikesMechanical:stations[i].num_bikes_available_types.mechanical,
numBikesElectric:stations[i].num_bikes_available_types.ebike,
status:stations[i].status
}
};
ontologyStations[i]=station;
}

msg.payload=ontologyStations;
return msg;
Now, you will carry out the insertion in the Platform. Include in the flow a node of onesaitplatform-insert type and configure it to store the information into the BicingBCN_Status ontology.
Add a debug type node to visualize the result of the insertion in the debug tab, which, being an insertion, is the number of elements inserted in the platform. After deploying and testing, you can see:
A continuación, llevaremos a cabo la inserción en la Plataforma. Incluimos en el flujo un nodo de tipo onesaitplatform-insert y lo configuramos para que almacene la información en la ontologia BicingBCN_Status.
Añadimos un nodo tipo debug para visualizar el resultado de la inserción en la pestaña de debug, que al tratarse de una inserción, es el número de elementos insertados en plataforma. Tras desplegar y testar podemos ver:
Deletion of previous records: Same as in the previous flow, you must delete the information previously inserted in each execution of the flow, thus, configure the deletion of the BicingBCN_Status ontology with an onesaitplatform-query-static node.
Deploy and check the response in the debug tab.

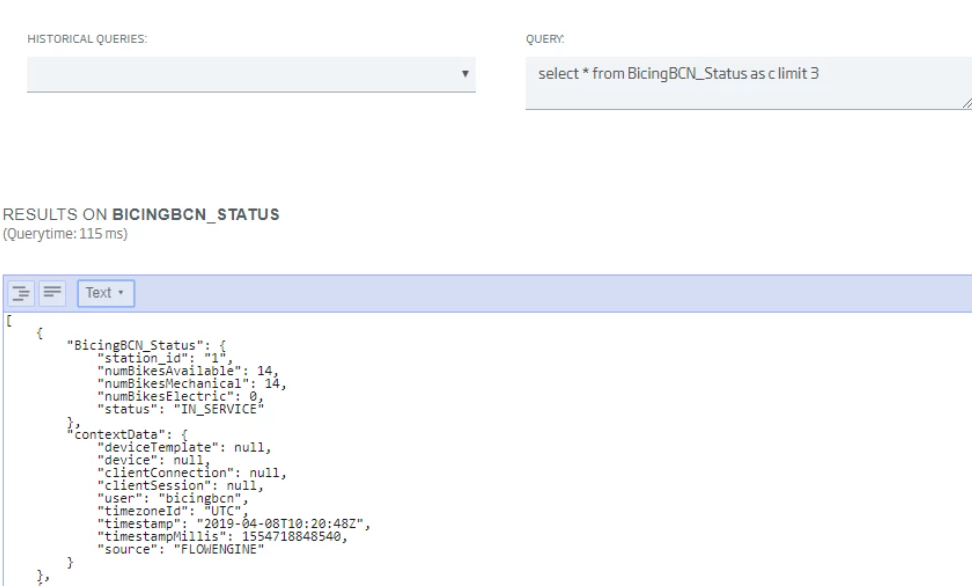
Finally, perform an insertion check, checking in the Platform that the information has been correctly inserted in the ontology. To do this, access Tools > Query tool and launch a query sentence about the BicingBCN_Status ontology:
This is the end of the second part of the workshop. We will soon continue with the next part: the GIS Viewer.
We hope you found it interesting and do not hesitate to leave us a comment with your comments or doubts.