Reactive Programming: Spring WebFlux
Reactive programming is a programming paradigm focused on working asynchronously with finite or infinite data. The systems that are developed under this type of programming meet a series of requirements, meaning that they must be:
- Responsive: they must ensure the quality of the service by complying with established response times.
- Resilient: they must remain responsive even in case of error.
- Elastic: They must remain responsive even in case of increased workload.
- Message-oriented: they must minimize the coupling between components for asynchronous interactions.
Advantages
The use of this type of programming provides us with the following advantages in our developments:
- Scalability: the use of reactive programming allows us to keep implementations loosely coupled to each other, thus improving the fault isolation. This allows us to easily add or remove new modules thanks to the generated decoupling.
- Savings: reactive programming is developed in such a way that a better use of available resources is made, since they are released more quickly for later use in new incoming requests.
How to implement it in our projects?
In order to make use of the functionalities of reactive programming within our Spring projects, we can make use of the Spring Webflux framework, with the functionalities for the development of applications based on this type of programming.
Spring WebFlux
Spring WebFlux is a reactive web-based framework developed by Spring for the creation of applications, based on the reactive programming paradigm. It coexists with Spring MVC since each module is optional, so applications can use each framework separately or together, since one can use features of the other.
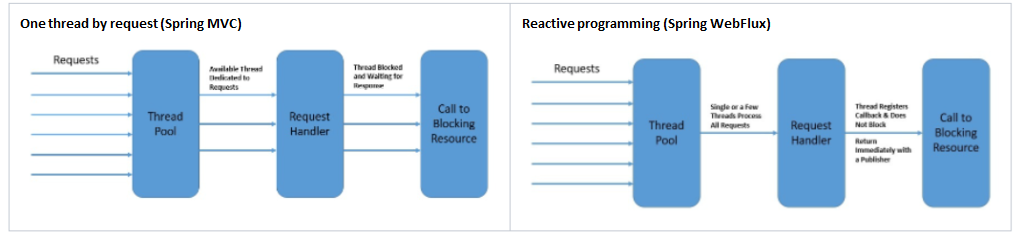
This framework changes the way of working with threads so that, while Spring MVC makes use of blocking threads (a request occupies a thread and blocks it until it finishes its execution and releases it), in Spring WebFlux a thread stores and can execute one or several requests at a time, returning a publisher which will return the data when this occurs, instead of keeping the thread blocked waiting for the response.
To include Spring Webflux within our projects, simply add the following dependencies in the pom.xml:
<!-- In case our project is a library -->
<dependency>
    <groupId>org.springframework</groupId>
    <artifactId>spring-webflux</artifactId>
</dependency>

<!-- In case our project is a module-->
<dependency>
    <groupId>org.springframework.boot</groupId>
    <artifactId>spring-boot-starter-webflux</artifactId>
</dependency>
Spring WebFlux vs Spring MVC
As previously stated, Spring WebFlux has been developed to coexist with Spring MVC. The functionalities that both present are designed to be able to work complementarily, taking advantage of the benefits and functionalities that either can offer us.
In the following diagram, we can see what both models have in common and what makes them different from each other:
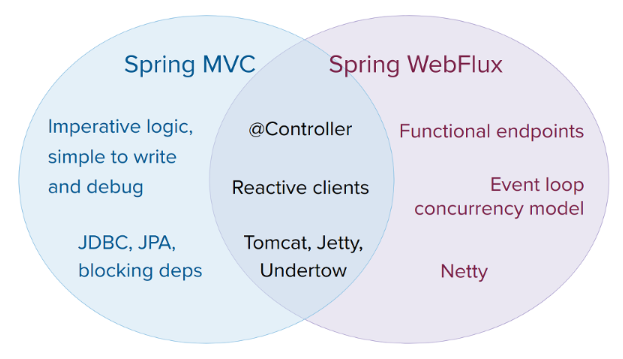
The two main differences between the two are:
- The way of programming: beacuse in Spring MVC the logic is imperative and easier to develop, while Spring WebFlux takes advantage of Java 8’s (or Kotlin’s) lambdas to use a more functional language.
- The way of working: as mentioned in the introduction, one of the novelties included in Spring WebFlux is the way of working with the program’s threads, since while in Spring MVC a thread was used for each request and this was blocked waiting for that request to finish, in Spring WebFlux this is changed so that it works more dynamically with non-blocking threads.
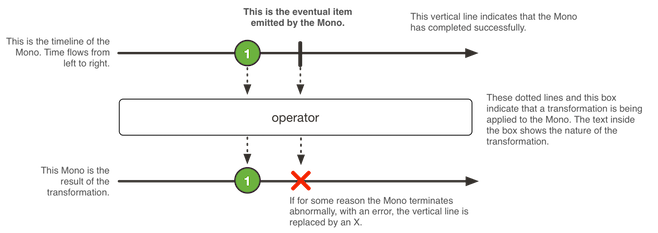
Flux and Mono
Spring WebFlux introduces two new Publisher implementations: «Mono» and «Flux». These two classes are the ones that will be used to work with the elements of our applications, making calls between them to obtain the necessary information.
- Flux: generate series from 0 to N elements.
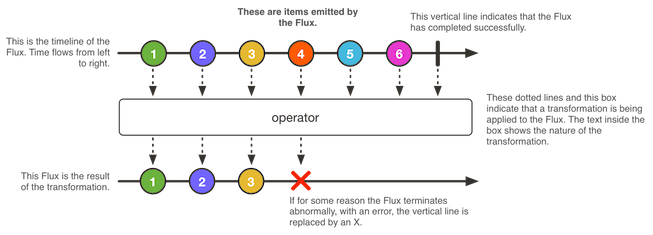
- Mono: generate series from 0 to 1 elements.
Building a Reactive Rest API
Let’s say we want to develop an API which makes requests to a destination address from which it obtains the necessary information to return through the endpoints of its own API. To develop this application, we must follow these steps:
Import dependency
First of all, we will need to add the corresponding dependency to our project.
Create the service
Within the service of our application, we must create the methods with which the calls will be made to obtain the data from our DB, external API, etc.
To do this we will have to make use of the «Mono» and «Flux» classes explained above, and the «WebClient» class that will be in charge of making the calls, as can be seen in the following example:
Service.java

@Override
    public Flux<User> getAllUsers(String token) {

    	WebClient client = WebClient.create("http://localhost:8081/webfluxexample-server");
    	Flux<User> userFlux = client.get()
    			  .uri("/")
    			  .header("Authorization", token) //Optional: It is added to show how headers could be added to the requests that we launch with the WebClient
    			  .retrieve()
    			  .bodyToFlux(User.class);
    	userFlux.subscribe(System.out::println); //Optional: Shows the changes received from the WebClient on the console
    	return userFlux;
    }

    @Override
    public Mono<User> getUserById(String token, String id) {

    	WebClient client = WebClient.create("http://localhost:8081/webfluxexample-server");
    	Mono<User> userMono = client.get()
    			  .uri("/{id}", id)
    			  .header("Authorization", token) //Optional: It is added to show how headers could be added to the requests that we launch with the WebClient
    			  .retrieve()
    			  .onStatus(HttpStatus::isError, response -> { //Optional: If the specified user is not found, the flow to follow when receiving the error status of the invoked API can be indicated

    				  if(response.statusCode() == HttpStatus.NOT_FOUND) {
   					  throw new UserNotFoundException("User not found with that id");
    				  }
    				  throw new RuntimeException();
    			  })
   			  .bodyToMono(User.class);
    	userMono.subscribe(System.out::println); //Optional: Shows the changes received from the WebClient on the console

    	return userMono;

    }
With this example, the API of another microservice is being called. This new API has two endpoints, one to return all users, and another one to return one user, filtering by the user’s ID.
As you can see, the main difference between one method and another is the use of the «Flux» and «Mono» classes. In the case of «getAllUsers», we need to use Flux, since the result that we are going to obtain is a list of Users which may contain between 0 and N elements. However, in the case of «getUserByID» we use “Mono” since it will only return one User (which we have filtered by its ID).
This last case can return an error response with the 404 code if the user we are looking for does not exist, so, when making the request, we must add the method «.onStatus()» in which we specify, in the example shown, that should it receive a 404, it must throw an exception in the response.
Exception message
It may be the case that, when receiving the response of a request that has given an exception, it does not include the message that has been specified in the code. To do this, it is necessary to add the following line in the application.yml file of the application that has generated the exception:
server.error.include-message: ALWAYS