Software Repositories – Getting Started with Git
When starting the development of a software product, the first step that is recommended is to request a software repository. A software repository is a storage location from which software packages can be retrieved and installed on a computer.
There are several options, so it can be difficult to choose the right repository. Two of the most common options are Git and SVN, both being version control systems, but fundamentally different.
Differences between Git and SVN
Git is a version control software designed by Linus Torvalds (yes, the guy from Linux), thinking about the efficiency, reliability and compatibility of application version maintenance when the versions have a large number of source code files.
On the other hand, SVN uses a centralized system in which all files, as well as their history, are stored on a central server. SVN was originally designed as a command line interface – that is to say, to work with it, you must open a terminal and enter the commands.
To work with SVN, you need to have the server and a local copy of the files, while Git uses multiple repositories: a central repository and a number of local repositories. Local repositories are an exact copy of the entire repository, including change history.
The way of working in Git is quite similar to SVN, with the difference that it contains an extra step: to create a new feature, you must create a copy of the repository on your local machine.
Being a distributed system means that multiple redundant repositories and branches are first class concepts of the tool. In a distributed system like Git, each user has a complete saved copy of the project, making access to each other’s history extremely fast. Something very important is that, due to this, it allows us to use it with little or no Internet connection.
In SVN on the other hand, only the central repository contains the full history. Therefore, users must communicate through the network to the central repository to obtain the history of the files. Being a distributed system, you don’t have to grant access to other people to use the version control features. Instead, it is the repository owner who decides which changes to merge and from whom.
In Git, users can have version control of their own project, while the main project is controlled by the owner of the repository. Regarding branch management, in Git using branches is very common and easy, while in SVN it is a bit more cumbersome and not so common.
On the other hand, in terms of performance, since Git works with a local repository, there is no latency in most operations, except for push and fetch, in which you will need to connect to the central repository.
History in Subversion is permanent, while in Git the history of a file or directory may be lost. Git doesn’t care about keeping track of every file in the repositories. Since SVN only allows you to have one repository, you don’t have to worry about where something is stored.
Since Git works with distributed repositories, it can be more difficult to know what things are located where. Since Subversion has a central repository, it is possible to specify read and write control there. It will be enforced throughout the project.
Version control systems have the idea that most files to be versioned are mergeable. That is to say, it should be possible to merge two simultaneous changes made to a file. This model is called Copy-Modify-Merge and both Git and SVN use it.
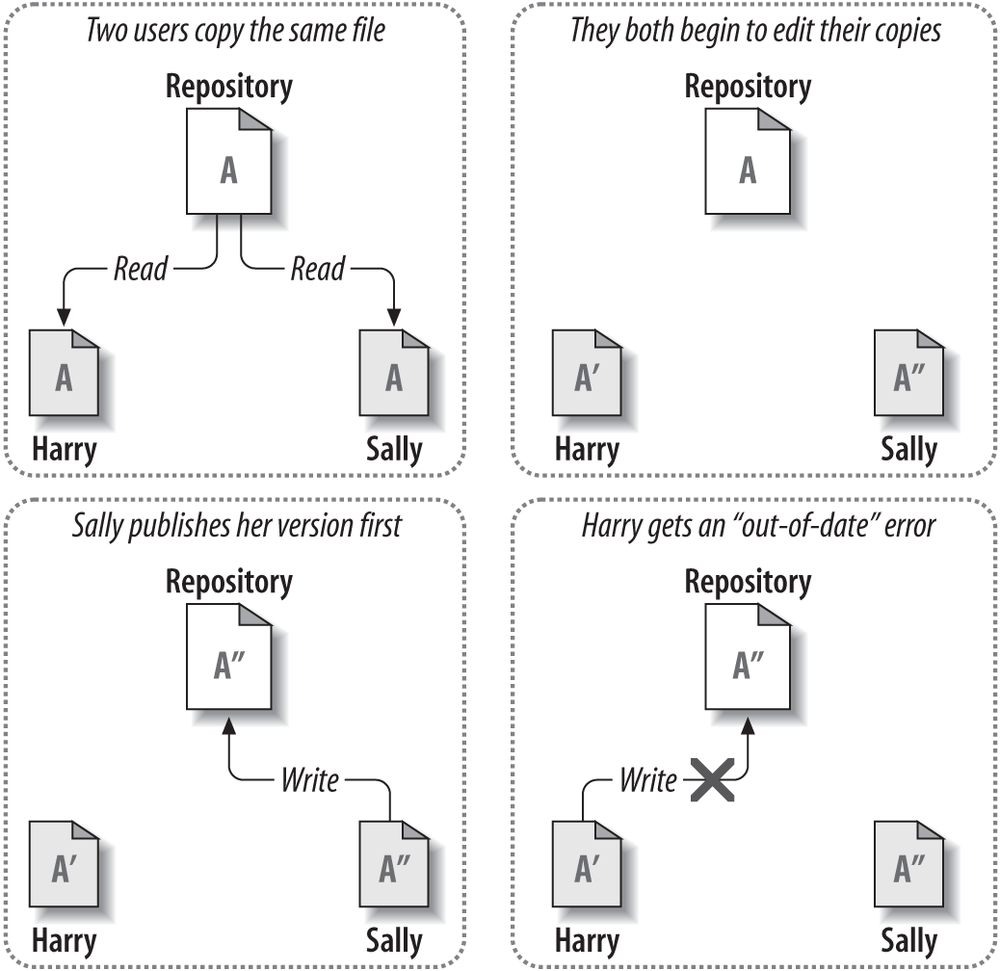
The only problem is that this generally does not apply to binary files – which is why Subversion provides support for the Lock-Modify-Unlock model for these cases.
On the other hand, Git does not support exclusive file locking, which makes it more difficult for companies with projects where there are many non-mergeable binaries. In case we want to use Git with binary files, we will have to specify which of them are.
First steps with Git
Now that we have Git in mind, let’s see how we can start working with it. Of course, in order to work with Git, we need to have it installed on our machine, so first things first.
Please bear in mind that Git is an Open Source version control system, flexible and easy to use for all kinds of teams no matter how big or small these are. To start using it in daily development, a model called Gitflow has been introduced to help simplify the management of development and shipping.
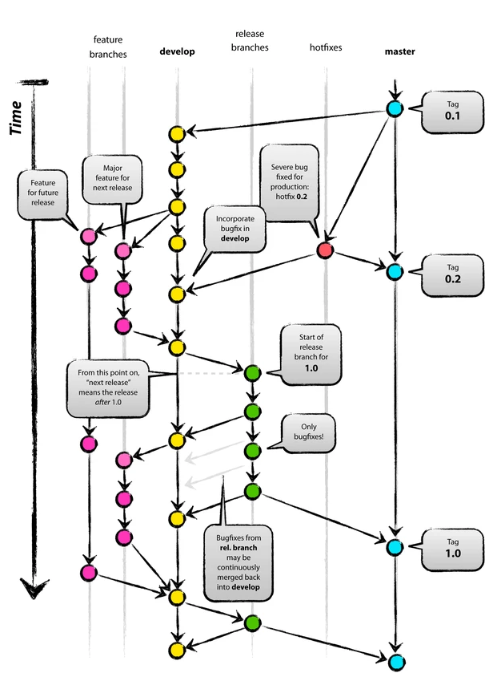
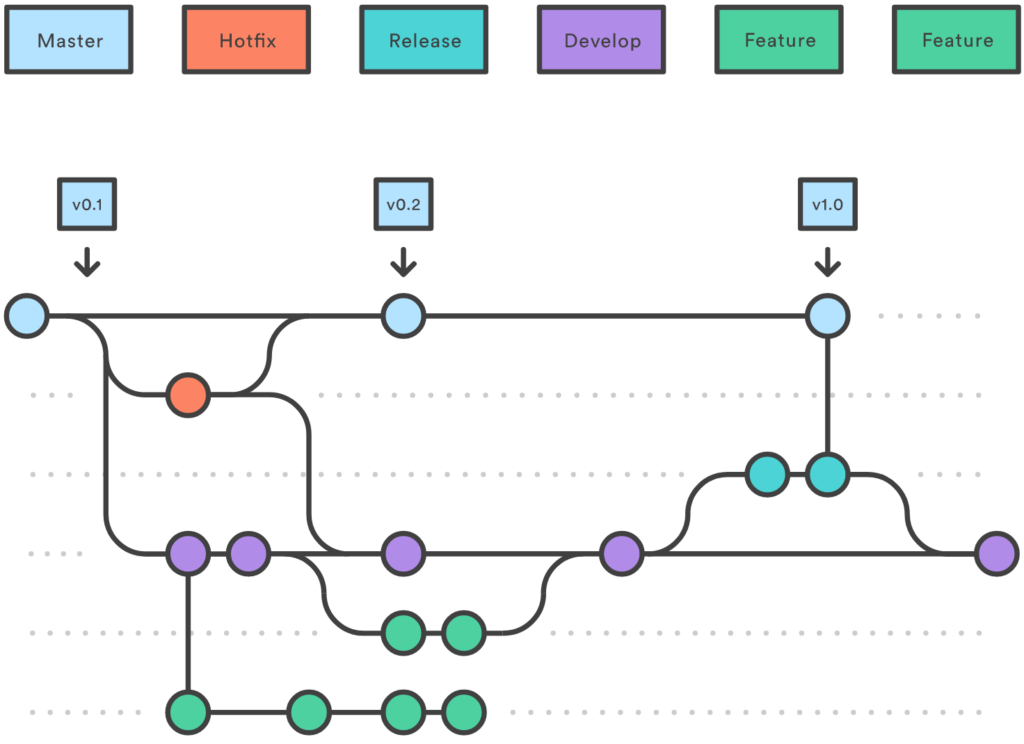
Gitflow is an alternative Git branching model that uses function branches and multiple parent branches. In this model, a repository has two main branches:
- Master: It is the most stable and always ready for production branch, which contains the latest version of the source code in production.
- Develop: derives from the master branch, and serves as a branch to integrate different features planned for the next release. This branch may or may not be stable like the master branch. It is where the developers work and collaborate, merging their branches with the new features developed.
The two branches above are the starting points of any project. They are very important and should be protected from accidental deletion until the project is better defined. Only authorized members should have the responsibility to merge changes from other branches.
Aside from those two primary branches, there are other branches in the workflow:
- Feature: this branch derives from the develop branch and is used to develop new features.
- Release: also derives from the develop branch, but it is used during releases.
- Hotfix: this branch derives from the master branch, and is used to fix bugs detected after a release in the production branch.
Git commands
Next we are going to see what commands must be executed to carry out certain basic actions in any project.
How to start repositories with Gitflow?
Firstly you need to know the URL of the repo (site) in which you are going to work (the code store, come on). To make things easier, let’s to assume that there is one (the name is now the least important), and that there is also a develop branch within that repo.
The first thing you have to do is clone the repo in your local. You can do this using the «git clone» command, followed by the repo URL:
git clone https://gitlab.com/folderName/gitflow-example.gitThis will download a copy of the repository to the folder where you are currently. The next thing you will do is access the repository by accessing the local folder. The name of this folder is the name of the .git file that you have cloned (in this case, «gitflow-example»).
cd gitflow-exampleOK, once inside the repository folder, the next step will be to browse to the develop branch, since by default you will be in the master branch, and we don’t want to break anything in the important branch, right? To change branches, use the «git checkout» command and the name of the branch.
git checkout developHaving done that, you will only have to start the Gitflow with the «git flow» command:
git flow initCreate a new repository
In the case of not having a repository, we always have the option of creating one from scratch. To do this, first start the Git environment using the «git init» command (it will start in the folder you are in currently).
git initNext, indicate the URL where the repository that you are going to create will be stored (this will surely require some type of identification, be it user/pass or SSH):
git remote add origin https://gitlab.com/folderName/gitflow-example.gitThe last step will be to create your develop branch. Creating branches is similar to switching to another branch, but with a flag that forces the creation of the branch. This is achieved with the «git checkout -b» command and the name of the branch:
git checkout -b develop How to add a branch for features?
Here you have two options. One is using Gitflow, using the «git flow feature start» command with the name that the branch will have. For example, «feature1».
git flow feature start feature1This creates the new branch. However, this branch only exists in the local repository of your machine, not in the remote repository (on the Internet, I mean). We will next see how to synchronize it with the cloud.
The other option is to use generic Git, doing the same thing you did when creating the develop branch, this time using «git checkout -b» and the branch name:
git checkout -b feature/feature1Here, as you can see, you manually specify that feature1 corresponds to a feature.
Well, once the branch is created, you can work with it and create some great code that will impress everyone once it goes into production. And how can you upload your changes? To do this, you are going to update the branch in the repository with our changes.
Upload the changes to the repository
The first thing you need to do is take a look at the synchronization between your local branch and the branch in the repository. In general, if you are the only one modifying the branch, there should be no problem – but if there are several people at it, most likely your branch is not up to date with the remote one. You can carry out this verification through the «git status» command.
git statusThe result will tell if you are up to date, or what are the differences between the local and remote branches, etc.
Next, bundle all our changes using the «git add .» command:
git add .Now it’s time for the famous commit, which allows you to add a note with the changes that you have introduced in the code. You can make several commits before uploading anything to the remote repo, and you can revert them later if you realize that you have blundered. Execute the following code:
git commit -m "Description Test"If you get a warning saying that the commit cannot be done because there are no changes… that’s probably because you have missed doing the «git add .» (As I say, this happens more than I’d like).
Do you remember the «git status» you just did? If your branch is not up to date, you will proceed to download the contents of the remote branch using the «git pull» command (it is necessary to have previously made the commit, that is why you have not done it for starters):
git pullIf the remote branch differs a lot from yours, it is likely that there will be problems and you will have to adjust the code that you have created with the one that has been downloaded – but come on, this will only happen if there are more people modifying the branch. If it’s just you, there shouldn’t have to be much of a problem.
So, you already have everything packed, noted down and up to date. It’s time to upload it to the remote repository. To do this, use the «git flow publish» command for the Gitflow case:
git flow publish feature1Or using the «git push» command in case of generic Git:
git push origin feature/feature1If you go to the remote repository, you will see that a branch with the name «feature/feature1» has been created.
Add your branch to the develop branch
Well, now your branch with the brand new features is uploaded to the repository. What do you have to do to add these improvements to the development branch? That’s as simple as making a request known as «Merge Request».
Once approved, your changes will join the development branch, and all your work will be integrated with the rest of the developers.
We still have something to do, and that is to clean up. Once the «Merge Request» has been accepted, your working branch is no longer needed (now, reusing the branch is not recommended, but…), so it should be deleted to keep the repository clean. You can do this using the «git branch -D» command, plus the name of the branch to delete.
git branch - D feature/feature1How can we add a new release branch?
In the following example, I will explain how the release branch can be created and published using the Gitflow extension for the command console.
Let’s start by browsing to the develop branch:
git checkout developNext, make sure that you are up to date with a «git pull»:
git pullHaving done this, start a release branch using Gitflow:
git flow release start release1In this branch, touch whatever necessary, commit the new changes or additions, and push to the remote repository (as you have done before, that’s easy):
git add .

git commit -m "Your message"

git flow publish release1

git push
If you are just using Git:
git push origin realese/realese1 Once uploaded to the remote repo, merge the changes to the develop branch (that is, you will merge both branches, including your new changes in the develop branch).
git checkout develop

git merge release/release1
After updating the develop branch, do the same with the master branch. Here you can do this in two different ways:
git checkout release/release1

git pull

git flow release finish release1
git flow release finish -m "Your message" "release1"
git checkout master
git push --all originHow can you add a hotfix type branch?
The workflow will be similar to what we have seen before. Start by browsing to the develop branch, start a hotfix type branch, make your changes, commit, and push to the remote repo:
git checkout develop

git flow hotfix start hotfix1

git status git add .

git commit -am "Your message"

git flow publish hotfix1
Once uploaded, again you have two options to merge it with the master branch:
git flow hotfix finish -m "Your message" "hotfix1"

git status git checkout master

git push --all origin

// You can also replace the last two commands with:
//git push origin hotfix/hotfix1
git flow hotfix finish hotfix1 With this, you would already have unified your correction branch with the master branch.
I hope that you have found this little introduction to Git interesting. If you are interested in reading a little more about it, I recommend these articles: