Working with Spring Cloud Config
In this post, we are going to see how to keep external the configurations of our different microservices, using the Spring Cloud Config tool. Let’s see what it can offer us, both for server-side and client-side support, for external configuration in a distributed system.
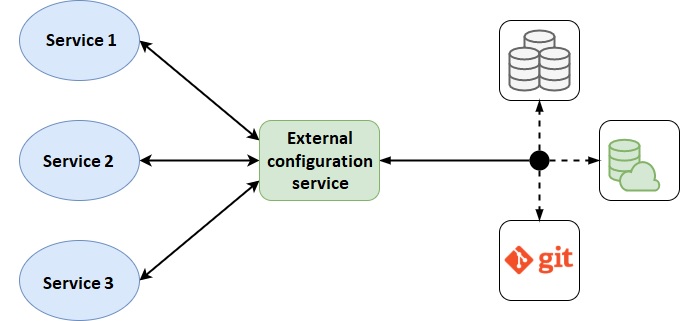
Spring Cloud Config is based on two parts: on the one hand, we have the server, which is in charge of querying the configurations in different repositories, such as Git files, SQL database, etc.; and on the other hand, we have the client, which will go to each of the applications and is in charge of querying the necessary configurations to the server and adding them to our service.
In the following image, we can see the scheme of how it would look:

Spring Cloud Config Server
As we have mentioned, one of the necessary parts to have the external configuration is the server, in this case Spring Cloud Config. Thanks to this technology, we will be able to create the server quickly and with almost no configuration, as we will see next.
The first thing we must do is add the corresponding dependency to the «pom.xml» file:
<dependency>
        <groupId>org.springframework.cloud</groupId>
        <artifactId>spring-cloud-config-server</artifactId>
        <version>${spring-cloud-config.version}</version>
</dependency>
We must specify the version to add; at the time of writing this post the latest version available is «2.2.4.RELEASE».
It is also recommended that security be added to our application for security reasons, so we can add the following dependency, again in the «pom.xml» file:
<dependency>
        <groupId>org.springframework.boot</groupId>
        <artifactId>spring-boot-starter-security</artifactId>
</dependency>
To include a basic security configuration, such as the use of a username and password, we will include in the «application.yml» file:
spring:
  security:
    user.name: username
    user.password: password
Next, we will see how to configure different configuration sources, which our server will query.
From a Git repository
The first option that Spring Cloud Config offers us, is to obtain the configurations from a Git repository, for which we must add the following configuration in the «application.yml» file:
spring:
  profiles.active: git
  cloud:
    config.server:
      git:
        uri: <URL_REPOSTORIO>
        clone-on-start: true
        username: <GIT_USER>
        password: <GIT_PASSWORD/TOKEN>
In the code above, we need to update the following variables:
- <URL_REPOSTORIO>: URL of our Git repository where we have the configurations.
- <GIT_USER>: Git user who has access to the repository.
- <GIT_PASSWORD/TOKEN>: password or access token of the Git repository user.
Repository structure
Within our Git repository, we must place the different configuration files of all the applications, following this structure:
«{application_name}-{profile}.properties/yml».
In these files, we add all the configurations, just as it would be done with our application.yml inside the service. We can also add labels, which will be configured in the client to ask a specific one. In Git, we will define these through branches, that is to say, if our application asks for the «latest» label, the server will look for the configuration in a branch called latest. If the client provides no tag, ti will search in the master branch.
From a database
Another data source that we can configure is a database, using JDBC. For this, the first we must do, is to add the Spring JDBC dependencies and, in our case, the PostgreSQL driver, to the «pom.xml» file:
<dependency>
        <groupId>org.springframework.boot</groupId>
        <artifactId>spring-boot-starter-jdbc</artifactId>
</dependency>

<dependency>
        <groupId>org.postgresql</groupId>
        <artifactId>postgresql</artifactId>
        <scope>runtime</scope>
</dependency>
We will also have to add the Spring JDBC configuration to the «application.yml» file, so that we can connect to the database:
spring:
  profiles.active: git
  datasource:
      url: jdbc:<DB_URL>
      username: <DB_USER>
      password: <DB_PASS>
      driver-class-name: org.postgresql.Driver
As in another previous case, we will have to update the content of this script with the following variables:
- <DB_URL>: database connection url, indicating the type and database (for example: jdbc:postgresql://localhost:5434/cloud-config).
- <DB_USER>: user with access to the database.
- <DB_PASS>: database user’s password.
Finally, we will have to add the spring cloud server configuration to the «application.yml» file:
spring:
  profiles.active: jdbc
  cloud:
    config.server:
      jdbc:
        sql: SELECT PROP_KEY, VALUE from PROPERTIES where APPLICATION=? and PROFILE=? and LABEL=?
        order: 1
We see how we only have to add the query we want to make to the DB. Next, we will see a possible structure of this.
Database structure
The database must have a table with the following columns:
- id
- created_on (not required, but recommended)
- application
- profile
- label
- prop_key
- value
Both «prop_key» and «value» should contain the key of our configuration and its value. Here is a possible example of this database:

Encryption of sensitive data
There are times where, within the configuration of our projects, sensitive data is included. To do this, Spring Cloud Config provides mechanisms to be able to encrypt and decrypt this type of data.
To do this, the first thing we need to do is define a secure encryption key in a «bootstrap.yml» file on our Spring Cloud Config server. An example could be:
encrypt.key: Bz43j5qrwBJ6MlfXjumV3tdKt0eaKZzN Having defined this key, our server will use it for the encryption and decryption of our data. Spring Cloud Config servers have two support endpoints «/encrypt» and «/decrypt», with which we can encrypt the sensitive data that will go in our data source (Git, DB’s, etc.). In order to indicate that this data is encrypted data, we need to add «{cipher}» to the configuration files, just before the encrypted string. Depending on whether the file is a yml or a propertie filess, it will be indicated differently:
For the «yml» file:
example:

text: '{cipher}FKSAJDFGYOS8F7GLHAKERGFHLSAJ'
For the «application.properties» file:
example.text: {cipher}FKSAJDFGYOS8F7GLHAKERGFHLSAJ Client
For a service to make use of the server configuration, we must first add the Spring Cloud Config client dependency to the «pom.xml» file:
<dependency>
        <groupId>org.springframework.cloud</groupId>
    	<artifactId>spring-cloud-starter-config</artifactId>
    	<version>${spring-cloud-config.version}</version>
</dependency>
As in the previous case, we must specify the version to add («2.2.4.RELEASE» at the moment).
Next, in the «bootstrap.properties» file, we will include the necessary configuration for the connection to the server:
spring.application.name=<APPLICATION_NAME>
spring.profiles.active=development
spring.cloud.config.uri=<CLOUD_CONFIG_URL>
spring.cloud.config.username=<CLOUD_CONFIG_USER>
spring.cloud.config.password=<CLOUD_CONFIG_PASS>
spring.cloud.config.label=<CLOUD_CONFIG_LABEL>
In the code above, we will update the following variables:
- <APPLICATION_NAME>: name of the application, must match what is specified in the server.
- <CLOUD_CONFIG_URL>: URL where our server is deployed.
- <CLOUD_CONFIG_USER>: username, in case we have added security.
- <CLOUD_CONFIG_PASS>: user password.
- <CLOUD_CONFIG_LABEL>: label by which the server will search.
With this, our service would already look for the configurations in our Spring Cloud Config server. An example would be the following:
Controller.java
@Value("${example.profile}")
    private String profile;
In this case, the value indicated by the server would be added to the «profile» String, which would query Git or PostgreSQL (or any configured one).
Header image: adapted from Anthony Tori at Unsplash


