
Inserting data using REST into a Kafka topic via DataFlow
Today we want to show you how to allow the insertion of data in a Kafka topic using our DataFlow tool. To do this, we are going to define in the DataFlow a flow that has a REST node as its source and a Kafka producer as its destination.
Therefore, in this entry, we will address the following objectives:
- Validating the data received using the schema of an ontology defined in the Onesait Platform.
- Using the authentication and authorisation framework of the Onesait Platform when exposing the REST endpoint.
Dataflow for the example
Firstly, let’s look at the dataflow we will use in the example:

This flow defines a REST endpoint that can be invoked with a POST method. It then validates that the data received in the body of that POST is a well-formed JSON. If this is so, it will check the schema using a Groovy script and, finally, it will insert it in Kafka.
Data validation
Onesait Platform validates all inserted data using the «json-schema» defined in the ontologies. This is a process that is automatically performed for each data insertion. But, could we use this same schema to validate data that is not going to be inserted in an ontology? We will now look at the Groovy script code of the data flow above, to see how this can be done in a simple way.
Let’s start with the initialisation script. It will be run once when the dataflow is started:
import com.fasterxml.jackson.databind.JsonNode;
import com.fasterxml.jackson.databind.ObjectMapper;
import com.github.fge.jsonschema.main.JsonSchema;
import com.github.fge.jsonschema.main.JsonSchemaFactory;
import groovy.json.JsonSlurper;
import groovyx.net.http.RESTClient;

def token = ${token}

RESTClient client = new RESTClient('http://controlpanelservice:18000')
def path = "/controlpanel/api/ontologies/apiTest"
def headers = ["X-OP-APIKey": token]
def response = client.get(path: path, headers: headers)

ObjectMapper mapper = new ObjectMapper()
JsonSchemaFactory factory = JsonSchemaFactory.byDefault()
JsonNode jsonSchemaNode = mapper.readTree(response.getData().jsonSchema)

state['jsonSchema'] = factory.getJsonSchema(jsonSchemaNode)
state['mapper'] = mapper
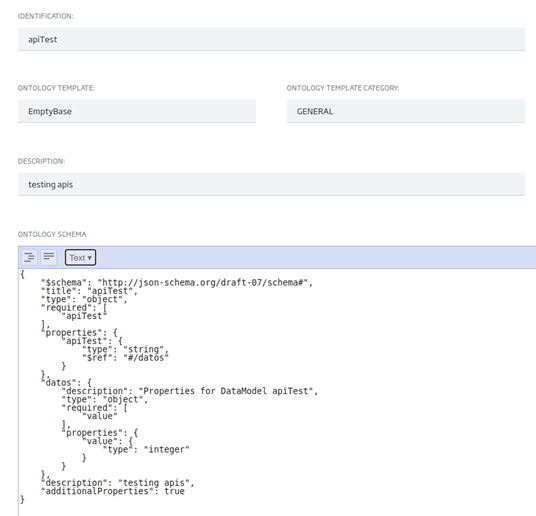
This initialisation process connects to the Platform using the Control Panel management APIs to download the ontology information we want to use. In this example, it is «apiTest».
Once we have obtained the ontology data, we use the «json-schema-validator» library to validate the JSON data, generating the object with the schema and leaving it ready to be used in the execution of each request. For this, we will use the «state» map, which can be used during the processing of each batch of the data stream to obtain these objects.
Once initialised, the script to be executed in each batch is the following one:
import com.github.fge.jsonschema.core.report.ProcessingReport;
import com.github.fge.jsonschema.core.report.LogLevel;
import com.github.fge.jsonschema.core.report.ProcessingMessage;

for (record in records) {
    try {
      def body = state.mapper.readTree(record.value.jsonBody)
        ProcessingReport report = state.jsonSchema.validate(body)
        if (report != null && !report.isSuccess()) {
          def errors = state.mapper.createArrayNode();
          Iterator<ProcessingMessage> it = report.iterator();
          while (it.hasNext()) {
            ProcessingMessage msg = it.next();
            if (msg.getLogLevel().equals(LogLevel.ERROR)) {
              errors.add(msg.asJson());
            }
          }
          throw new Exception("Invalid JSON format: " + state.mapper.writeValueAsString(errors));
        }
        output.write(record)
    } catch (e) {
        // Write a record to the error pipeline
        log.info(e.toString(), e)
        error.write(record, e.toString())
    }
}
Broadly, this obtains the «body» of the request, which in this case comes in the «jsonBody» field of each of the records, and then checks it with the validator that we have initialised in the initialisation script. This validation is done in this line:
ProcessingReport report = state.jsonSchema.validate(body)The rest of the code is used to get the validation errors, if any, and is based on the documentation of the library itself.
Finally, error handling within the DataFlow will depend on how it is being done in the project. In the example we are seeing, we have included a line to the DataFlow record at the «Info» level, and generated an error record that we will send to the error flow. As we can see, the data can be validated without any problem and with very little effort.
Now, let’s test the next pipeline, and for this we will see the configuration of the REST connector we have created:
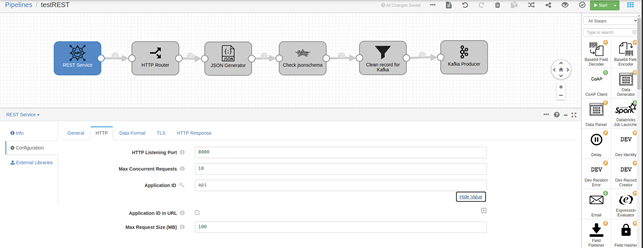
We also have to consider the data schema we are using, which is in this case very simple:
For this example, we are going to use Postman to invoke the POST method. Bear in mind that, to invoke the endpoint, we have to include a specific DataFlow header:

Its value will be the one configured in the REST component, specifically in the «Applicaton ID» field. This field is a so-called «secret» that must be kept confidential. And of course, for something other than a simple test like this, we must use a pseudo-random, sufficiently long value. When we send a correct value, the result will be a 200:

If we send an incorrect data, the result will be an error with code 400 (Bad Request), and will include the error’s description:

Adding authentication and authorisation
We have already seen how we can make a REST method available to insert into Kafka using the DataFlow and that, by default, a «secret» is available to authorise this method. In most scenarios, this will not be enough. To use the Platform’s standard authentication and authorisation mechanisms, we only need to integrate this REST method in the Control Panel API Manager.
To integrate APIs in the API manager, we make use of the Open API standard, so it is enough to describe our API with this standard. The following example is a valid example for our API:
openapi: "3.0.0"

info:
  title: "Platform  API Manager"
  description: "Platform - testAPI - v1"
  contact:
    name: "Platform Team"
    url: "https://dev.onesaitplatform.com"
    email: "support@onesaitplatform.com"
  license:
    name: "1.0.0"
    url: "http://www.apache.org/licenses/LICENSE-2.0.html"
  version: "Apache 2.0 License"

servers:
  - url: http://streamsets:8000
    description: "Rest to Kafka"

paths:
  /:
    post:
      summary: Insert new data
      description: Insert new data into kafka. The data format will be validated with the apiTest ontology
      operationId: postApiTest
      parameters:
        - name: X-SDC-APPLICATION-ID
          in: header
          description: Streamsets X-SDC-APPLICATION-ID header
          required: true
          schema:
            type: string
      requestBody:
        content:
          application/json:
            schema:
              type: object
        required: true
      responses:
        200:
          description: New data inserted
        400:
          description: Bad request
        403:
          description: Not authorized
        500:
          description: Error processing request
Next we can see the rest of the API fields, once configured:
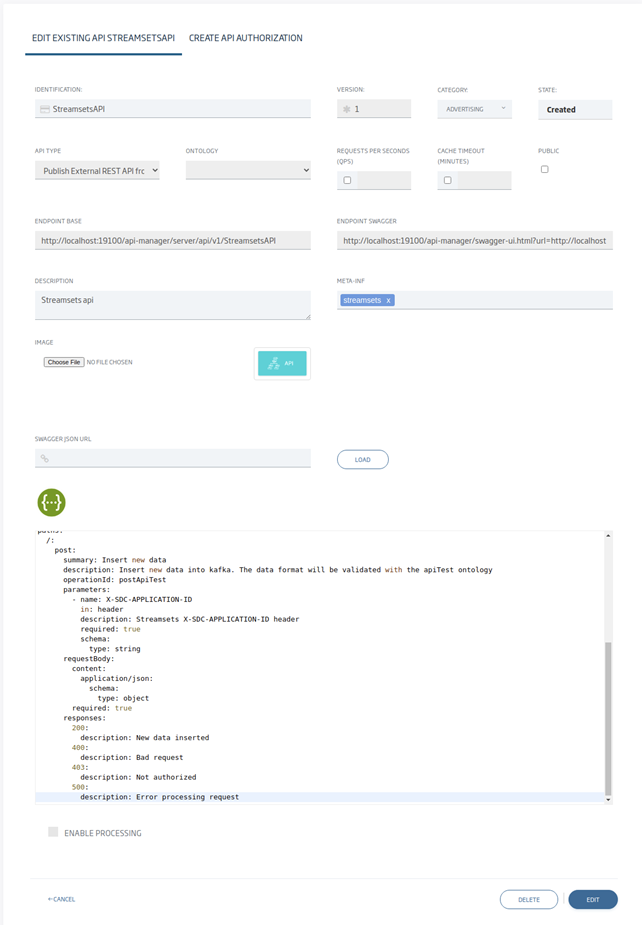
Once created, this is ready to be used from any site with access to the API Manager. In most installations, the API Manager is configured with external access via HTTPS, so the API can be used from other systems in a secure way. In this example, everything is being done locally and without HTTPS.
Let’s see how to use the API from the Swagger of the API Manager itself, to confirm that it has been correctly integrated:
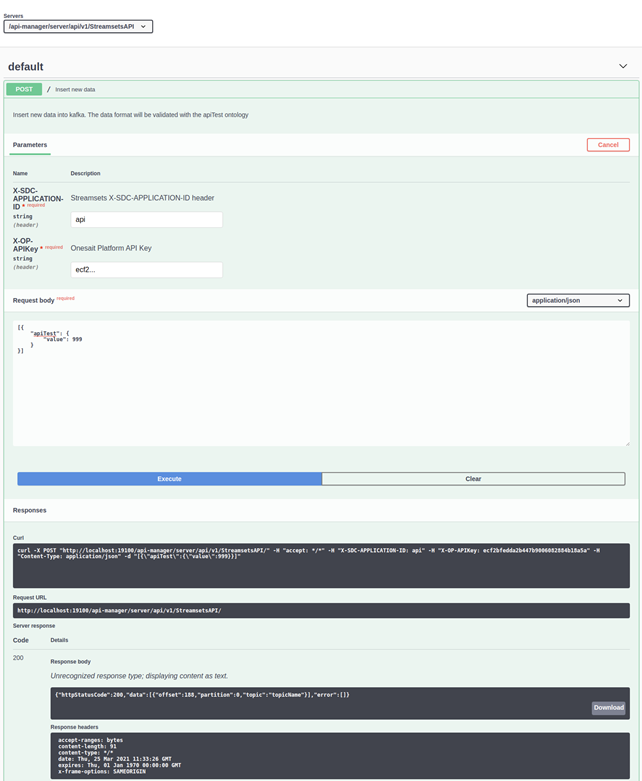
As we can see, to use this method we now need to use the X-OP-APIKey user token or, if preferred, an Oauth 2.0 token as with any other API in the Platform.
Conclusions
As we have seen, in a very simple way we have exposed a REST method to insert data in a Kafka topic validating the data before inserting it, but it can be done similarly on any other destination.
To validate the data, we have used the schema of an ontology defined in the Onesait Platform. For the example with Kafka, an Avro schema defined for Kafka can also be used, but if another target is used, that is not possible. To securely expose the API, we have used the Onesait Platform API Manager. Likewise, any other API that is created within the Platform, or a Microservice deployed together with the Onesait Platform, can be exposed in a similar way.

